SubjectGuides – set up and maintenance
The SubjectGuides functionality allows you to present information in web pages – the information might be hints for your client base about where to find information in their areas of interest, or it might just be internal documentation for staff. Its uses are as broad as your imagination. It can be presented under the “Subject Guides” heading in the RefTracker client interface, or, the SubjectGuides pages can be linked into your web pages by their individual fixed URL or at the SubjectGuides home page (<YourRefTrackerDomain>/refs000.aspx).
Each SubjectGuide can have two levels of table of content with unlimited topics at each of those levels. And you can have more than one SubjectGuide – allowing you to use this concept for a number of different information dissemination or documentation needs.
Click here for information about how to use SubjectGuides to make information available to your staff and/or clients.
This section is about implementing or modifying your SubjectGuides (free for full RefTracker customers and available at a small additional price for Express customers).
An editor (the HTML editor) that is as simple to use as a word processor, allows you to design the content of your pages in flexible layouts with all the tools you would expect such as hyperlinks, images, tables, dot point lists, and more.
File names and directories control the subject areas automatically included in the Table of contents, and the Search index of your SubjectGuide content is automatically maintained.
Each SubjectGuides page provides a Search function that is automatically inserted in each page by the system. Using this Search function will return SubjectGuide ages that contain the text being searched for.
Each Subject Guides page also includes a two level Table of contents showing the names of all pages in your SubjectGuide. Click the Subject of interest to see the contents of that page, or to expand that Subject to show its Sub-topics.
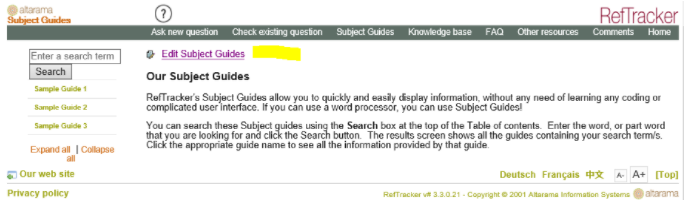
Here is an example Subject Guides page:

SubjectGuides will be useful to those organisations that do not yet have access to any corporate Content Management System. The pages generated by SubjectGuides are HTML pages and so can be easily moved to a corporate Content Management System, should one become available at a later time.
RefTracker SubjectGuides has been specifically designed to be exceptionally easy to use. Should you find the SubjectGuides features are limiting, and still do not have access to a Corporate Content Management System, for a small fee Altarama can host a full Content Management System for you, that will provide you with greater flexibility.
Making SubjectGuides available in your system
If you want to start using SubjectGuides you need to set Parameters 6.15 and 6.16 in unison.
Parameter 6.15 determines whether or not the “Subject Guide” link displays in the header bar of your RefTracker client interface. Set it to Yes if you want your SubjectGuides to be easily acccessible by cients through the RefTracker client interface.
Note that even with this parameter set to No, you can still make the SubjectGuides that you maintain in RefTracker, available to your client base. Just insert the individual SubjectGuides page URL’s, or insert http://<YouRefTrackerDomain>/refs000.aspx to make the full set of RefTracker maintained SubjectGuides available anywhere in your web pages.
Parameter 6.16 determines the URL that the “Subject Guides” client interface header bar link will go to.
The default entry is http://<YouRefTrackerDomain>/refs000.aspx, and this link points to the SubjectGuides pages that you can maintain within RefTracker.
However, if you maintain SubjectGuides elsewhere, and you want to link them into the “Subject Guides” link in the RefTracker client interface, enter the URL of your already existing SubjectGuides into parameter 6.16.
Creating your own Subject guide pages
A helpful set of example SubjectGuide pages is distributed with your system. Set Parameter 6.15 to Yes to view them through the client interface. These pages are just examples. Use them to familiarise yourself with the system.
You will need to edit or replace them with the content that you want to make available.
In our example set of pages, you’ll see the “subjects” we’ve created (Table of contents entries) on the left, and, to the right some content (this is where the information you want to present goes). Above our “subjects” table of contents is a Search box, capable of retrieving any string used in any of your Subject guide content. You can click on any subject listed in the Table of contents (where the examples read: Sample Guide 1, Sample Guide 2…..), and if there are individualized subjects within them, you’ll see a drop-down menu. If only one page is in any given subject, you’ll only see that page – there won’t be a drop down.
Editing these pages, or creating new ones is simple – all the tools that you need are provided within RefTracker. Maintaining the Table of contents is as simple as naming files, and providing content for your pages is as simple as using a word processor like editor. The search index is automatically maintained.
Any staff member with access granted in their signon, to the “Web page editor” function in RefTracker, can edit your SubjectGuides pages.
Editing your SubjectGuides
Go directly to System>Utilities>Administration utilities>Web page editor, or, if a staff member has both the RefTracker staff and client interface running in the same browser, they will see an “Edit Subject Guides” link at the top of the Subject Guides pages that will take them directly to the Web page editor.
System>Utilities>Administration utilities>Web page editor allows you to edit existing SubjectGuides, as well as create any new ones you might need. Let’s further investigate how we go about doing this, and the structure for setting up these SubjectGuides, in general. Click here for even more information about how to use the Web page editor.
Here’s an overview of how to use the Web page editor specifically in relation to creating and maintaining SubjectGuides.
You are initially presented with a screen that looks like this:
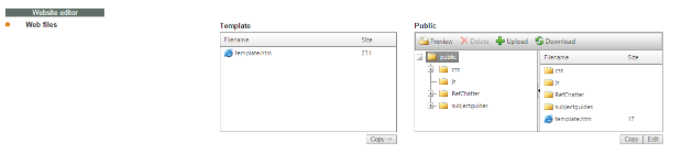
You can right click on any directory name at any time to change its name (use Rename), which will change how it appears in the menu (on the client side), and on any file name (with the extension .htm).
The page that the user first lands on is “home.htm” – let’s highlight that file name, and click the “Edit” button. This will open up the editor for you to be able to use and edit this file. Use the features of the HTML editor to create and amend the content that you need. The SubjectGuides pages are HTML pages so there is no reason whey you can’t swap to HTML mode and enter HTML code in the editor, should you want to do that.
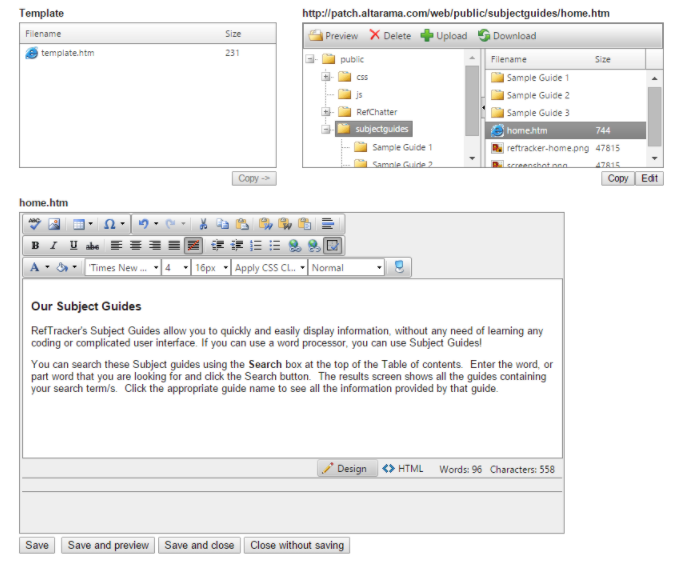
In the window where our example reads: “Our Subject Guides”, feel free to highlight all text within that box, and hit the “delete” key – this will allow you to begin with a fresh start. Then, simply type in the text you’d like to display as your Subject guide introductory page. The buttons in the toolbars immediately above will allow you to format your text, as you see fit. For more details about using this HTML editor and its buttons, click here.
Adding more subjects to the table of contents
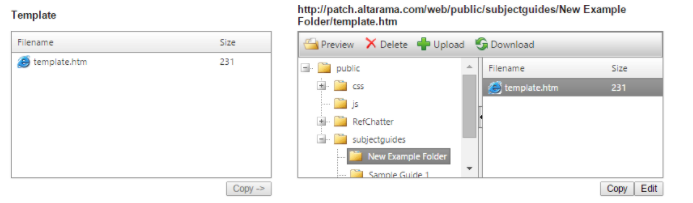
You can have as many “Subjects” as necessary. Simply right-click where it says “subjectguides”, and choose the “New Folder” option. You can use any alphanumeric character in the folder name but be aware that the name of this folder will be the first level Table of contents entry (topic). The names of the files in that directory will provide the second level table of content entries (sub-topics). In other words your folder and file structure will be reflected as the Table of contents.
Once you’ve created a folder, it’s necessary that you also copy over the template for use as your stating point for each sub-topic in that folder. Ensure that the right hand panel is positioned at the directory that you want to copy the template into, then, from the box on the left-hand side, select the “template.htm” file, and hit the “Copy” button underneath it, to move it to your desired location. You may rename the copied template file to anything you’d like – as long as you keep the .htm extension at the end of the file name. Again, only alphanumeric characters are allowed and the file name will be used as its sub-topic name in the Table of contents.
You can now edit that file to provide content to your liking.
Note that copying the template.htm file as your starting point for each new file in this directory, is a mandatory first step. If you do not start with the template.htm file, you will receive an error when attempting to access that SubjectGuide page.
When you click on a file, its URL displays above the right hand panel, providing the information that you need to be able to insert that particular page directly into your web pages.
Creating additional Subject guides
The file structure under “subjectguides” in the right hand panel is the default place for creation of the SubjectGuide linked to the RefTracker client interface. However you can create more than one SubjectGuide should that be desirable – e.g. one for guides for public consumption, and another for internal correspondence only.
To create another Subject Guide, right click the “Public” folder and create a new directory at the same level as ‘Subjectguides”, with a different name. Copy template.htm from the “subjectguides” folder into your new folder, and then go about creating subfolders and files to match your table of contents as per the instructions above.