Reporting – Data extract
The purpose of the Data extract report (found under Reporting in the main header bar, and at Reporting>Data extract>New data extract, if this user has created any saved extracts) is to allow you to see, export, and save the data generated by your work in RefTracker. It provides one line of data for every request/DeskStat that matches your selection criteria. The data is presented in columns with labels as defined for that data element in the Data Dictionary.
You might use a Data extract report to:
- download the data and save it for historical comparison.
- download the data for use in another application or Request Management system.
- download the data to Excel or a .csv compliant reporting system for more sophisticated analysis than can be done with the standard RefTracker Statistics reports.
- Make the RefTracker body of information available to other applications, such as search tools and Business Intelligence reporting tools.
Importantly this output can include columns for total “Time used” and “Cost incurred“, and it also includes a calculated value for the “Minutes to close” (the time in minutes from the date and time the question was received, or reopened, until the date and time that the question was answered).
It can also include helpful “Resource list” and “Category list” fields that provide a single column that lists all the Resources/Categories used in that request (forward slash / separated if there was more than one), as opposed to the “Resources array” and “Category array” fields that provide one column for each enabled Resource/Category (whether or not that Resource/Category has been used). If you choose to include “Resources array” or “Category array” the system will only return columns for enabled resources or categories, however, if a statistic for a disabled resource or category occurs in your report, a column will be returned for that disabled Resource or Category.
Output type “Display” allows you to review all the information for the selection of full questions, or DeskStats, or Client data, on your screen.
Output type “Auto download” or “Email the file to me” allows you to analyse the questions or DeskStats for your selected period by any number of the data elements collected, using the features of a reporting product like Excel – for example “how many questions, of what request types, were handled for each client department supported by the library during the reporting period, and what was the cost of providing all of the responses for each department”, or “which staff members were responsible for most of the work done for each client department during the reporting period”.
Data extracts can even be saved for reuse with just a few clicks (see more information about this below). They can be scheduled to run automatically with output emailed to specified email address/es, and they can even be run via an API so that the output can be made available to other applications (see the API Extract function described in this help page).
The Data extract report is available for the Questions, DeskStats, and Client data sources (system administrators only), and for each, the data extracted is different – in fact the data that can be extracted is primarily controlled by the Data Dictionary table relevant to each of those data sources – the label for each column will be the label for that field as you have defined it in the Data dictionary (and your selection of those fields using the Field set functionality provided in this screen).
If you choose Source “Requester data only”, then only the Requester data table will be searched for records meeting your extract criteria and only Requester data fields will be presented in the Field set.
The Date type parameter allows you to choose to select records by the date on which the question was received (Received date) or the date on which it was closed (Closed date), or any question worked on during the selected date period (Journal activity), or any question for which an evaluation (Evaluation date) was received during the selected date period.
Time period: Choose a standard time period such as Last week or Last month, or choose [custom date range] and then set a start and end date. Choosing a time period rather than specific start and end dates will allow your parameter selection to be run again in future without having to select new dates.
A week is usually defined as Sunday to Saturday but your system administrator can change this using Parameter 2.18.
A quarter is defined as the three month periods starting on 1 January, 1 April, 1 July and 1 October.
Calendar year and Financial year options are provided. The Financial year begins in the month specified by Parameter 2.19 (and is not offered if January is chosen here as that would be the same as Calendar year).
“All dates” should be used with caution. This is particularly useful for reporting on open requests, especially scheduled reporting on open requests, as open requests will have come in over a variable extended period of time. Using individual start and end dates will create a more efficient extract, as “All dates” means examining and extracting from the whole database. It can create very large and long running extractions that may even time out, depending on the size of your database. It may be necessary to do your data extraction in smaller lots, such as annually.
Don’t forget that the Open requests and Search screens provide an Extract function that might be a more efficient way to extract open requests.
Other Selection criteria parameters work in exactly the same way that they do for other Reporting screens.
The Extract criteria parameters are:
Sub extracts allows you to choose to create a separate report/extract for each Location, Staff member or Service type.
Selected fields allows you to control the fields that are included in your extract. The fields in the currently selected Field set show here, when this is applicable.
The sort order of the resulting records in determined by the first field (text box, date or code table field) included in your Field set.
See the “Using Field selection” heading below for full details of how to use this Field selection option.
Output method provides options to display the results on the screen, auto download to a file, create a link to the file or email the link to the file to yourself and/or other email addresses.
Display presents the results on the screen.
Auto-download file provides the output in the Output format you select in the next parameter, in a downloaded file.
Create link to download file displays a link to the results file than can be clicked or copied and pasted. Because the file doesn’t have to download immediately, the link will appear faster than the download option.
Email link(s) and Email file(s) these options make it easier to share the results of extracts, save time producing them, and make it easy to pass the results on to others! A lot of the time that you wait for an extract is related to downloading the results, and these options mean you don’t have to wait for the download. This option is never offered for General or DeskStats users.
These options display a confirmation message when the file, in the “Output file format” you choose (Excel, CSV or XML), has been emailed.
Note that an email is only sent if an extract was produced by that run. If the report is run manually, you’ll see a message about there being nothing to extract. If it is run by the background processing, the Batch processing log will show “No results” for that run. If the scheduled run errors out for any reason, the log will show “Failed”.
If you choose Email link(s) the email that is sent just contains a link to the results file – this is the best option if the file is not necessarily going to be viewed, or the file is very large, as without the file attached, the email arrives fast, and takes up much less space in the recipients mail box. The file resides in RefTracker and can be viewed for Parameter 0.3 amount of time (usually 45 days), after which it is cleaned up by the housekeeping. Users who want a permanent copy should view it and save a copy locally. They are advised of how long the file will be retained, in the email they receive.
If you choose Email file(s) the email that is sent includes the file as an attachment. Please note that parameter 8.6 controls how large files emailed to staff from RefTracker can be (in order to minimise use of email server disk space). If the file to be emailed by this process is larger than that specified by parameter 8.6, it will be sent as a link rather than a file.
Sending as a file is the best option if the file is going to be viewed immediately, as the attachment is already downloaded when it arrives.
When using this option an Email address(es) field will display. The signed on user’s email address will always be automatically inserted in this field, but you can add other email address/es (semicolon separated) to receive this particular run of this extract.
If you then create a saved extract from your parameters, any email address/es you have specified will be copied into the saved extract parameters as the saved extract is created, and any changes to the email addresses at that level will only be retained in the saved extract.
When you select any of the options that create a file you have three file type options (each with the option to include HTML or not):
- Export (Excel spreadsheet): This output is specifically formatted for Excel, and automatically downloads for opening with Excel.
Dates and times are exported in the time of the logged on user and appear in a human readable format that is compatible with Excel e.g. 1/01/2016 11:13 AM.
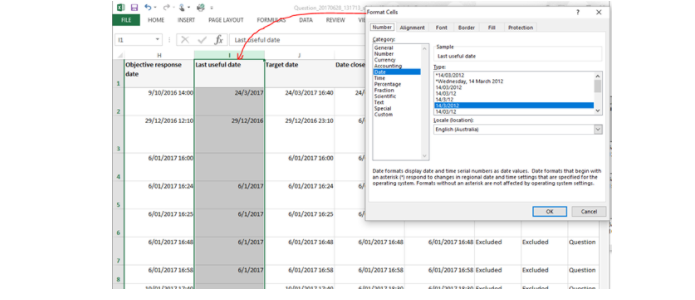
In the Excel output, dates are presented as General format, which means that customers who want to represent dates in different ways can easily do so by selecting the column and choosing Format Cells. Then select the date category and the type of formatting that you want to use. In the screen shot below we have used this method to present the date without the time.
Note that Excel’s date formatting refers to your computer’s specified locale to ensure that the date format, presents by default using the standard date presentation for your Country/Language (e.g. mm/dd/yyyy, dd/mm/yyyy, etc.).
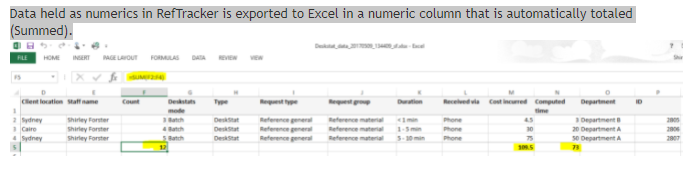
Data held as numerics in RefTracker is exported to Excel in a numeric column that is automatically totaled (Summed).
- Excel cannot support HTML formatting so some HTML formatting is removed for display in Excel – for example hyperlinks in this Excel display can be copied and pasted into a browser to view but cannot be clicked directly in Excel (to see the formatted data and use hyperlinks in the data, view the Display output option).
The format initially shows the first 30 lines of text only in each cell. If you click in a cell containing more than 30 lines, it will expand to show the rest of the data in that cell.
A hyperlink back to the question in RefTracker is also provided for each line. - Export (CSV): This output provides International standard CSV format – for use by other applications. Dates and times are in ISO standard which means that the dates are in the date and time of the logged on user, but also show the UTC offset (in the format YYYY-MM-DDTHH:MM:SS+hh:mm where hh:mm is the offset) e.g. 2016-01-01T22:13:37+11:00. HTML coding used in data fields is included as encoded data as it is generally used for computer to computer transfer of data.
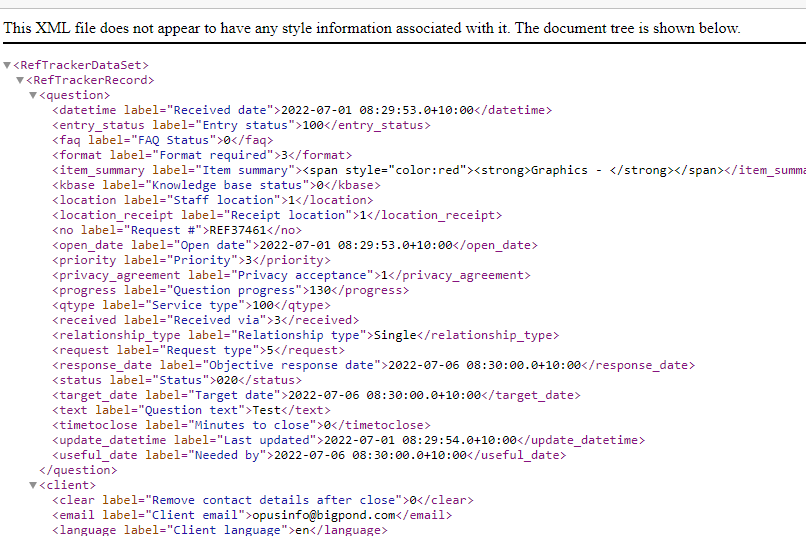
- Export (XML): This output provides International standard XML format – for use by other applications. Dates and times are in ISO standard which means that the dates are in the date and time of the logged on user, but also show the UTC offset (in the format YYYY-MM-DDTHH:MM:SS+hh:mm where hh:mm is the offset) e.g. 2016-01-01T22:13:37+11:00. HTML coding used in data fields is included as encoded data as it is generally used for computer to computer transfer of data.
- Exchange: This format provides data in an XML format suitable for input to the RefTracker Data import process, and is usually used when taking details of requests from one RefTracker system to another that may be configured differently.
Note that this process does not export attachments, and, the fields that can be extracted are limited by the fields defined in the SystemSendFilter.xml file at config/exchange/reftracker/settings (ask for advice from Altarama if you are not getting a field that you want and we will help with any changes that are needed to the SystemSendFilter.xml file).
This option is usually used with the “Unformatted” option ticked.
Typical output for each record, from this option, will be formatted like this:
<[database table name]>
<[database field name] label = “[label used in this system for that field]”>[current value of this field] </[database field name]>
</[database table name]>
Here’s an example
Unformatted: Most direct users of the Data extract function will want this parameter set unticked (the default Formatted option), however, if you use .CSV output, XML output, Exchange output, or you use the data extract function via the RefTracker API, you may want to consider using the unformatted option.
Formatted data provides code table information using the description for the relevant code table entry. This option is the one to use when the output data needs to be viewed by humans!
Unformatted data just provides the code table’s numerical value. You may want to use this option when the output data will be used by another application. It also results in a smaller data set because the code table fields will just contain a number, not a description.
Sample only: Tick the “Sample only” box to limit the displayed output to the first 25 records only. This is very helpful when testing reports, so you don’t have to wait for large data sets to download! Its also useful for displaying scheduled reports/extracts where you don’t want to have the entire report run before you see what it does! It is only applicable when Output method is display.
Convert HTML to text: This parameter allows you to determine if you want the HTML in fields like Question and Answer, included in the output, or whether you would rather see plain text. Some outputs such as Display and Excel can format the HTML nicely and for those the default unticked option is the right selection here. But others like CSV will display the HTML code rather than formatting it. Further, HTML formatted output can take more room than standard text and that may also be a reason why you may want your Data extract output in text format rather than HTML. If you are exporting the data for use in another HTML compliant system you may want to include the HTML and so leave the “Convert HTML to text” reporting parameter unticked, but if you want a human readable output you may prefer to tick the new “Convert HTML to text” parameter. It’s your choice but will usually only need to be changed by programmer/IT users!
Note that you should consider the security/privacy implications of including Client data in any Export/downloaded Data extract report.
Using Field selection
If you want to change the fields that are being included in the output from this report, or its sort order, you can use this Field selection function.
Your system is provided with a Default set of field selections that includes all fields (Request, Requester, Bib and Special fields for the Request and Requester options, and the full DeskStats table for DeskStats). When source is Requester data only, the default Files set ONLY includes the client fields.
You can view all the fields included in this Default selection (using the View link), but you cannot change them. Further, you cannot rename the Default set as it is the base set from which any custom sets you need will be created.
To create a custom Field set, use the Copy link – give your custom set a suitable name, adjust the included fields to suit your requirements, then click the Save button. Don’t forget that the first text box, date or code table (its code number not the description will be used for sorting here) field included in your field set will determine the sort order for your output. Also the Request ID field will often be added to your field set results, automatically, in order to ensure that each record is unique.
Once you have created another Field set, you can Copy any of those custom Field sets to create further customised Fields sets for other purposes.
If you change the Field set, please go out of the Data Extract screen and back in before running the Extract again, so the reporting system can pick up the values in that adjusted field set.
To use this function:

Select the field selection set that you want to use at the Field set drop down list at the top of this box.
The View function is only applicable to the Default Field set, and allows the contents of that set to be viewed but not changed.
Other Field sets provide an Edit function at the same place, that allows fields to be changed for the currently selected Field set.

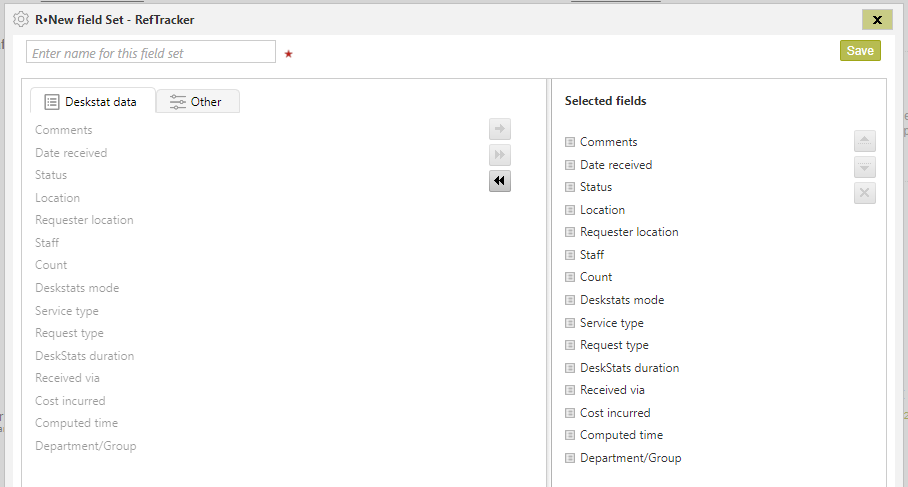
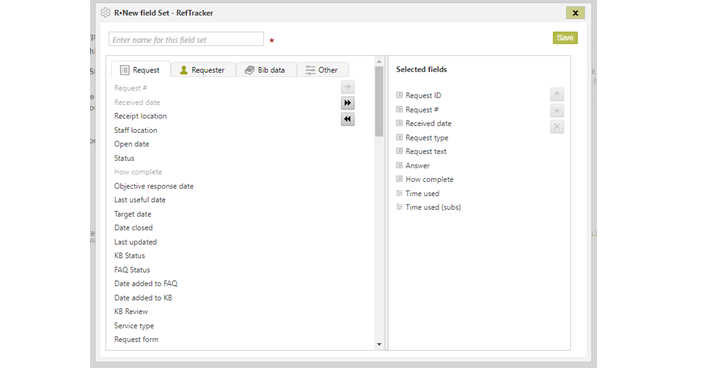
This Edit screen allows you to select the tables and/or individual fields that you want included in your Data extract output.
For the Request and Requester Source options, tabs are provided for the Request, Requester (if you have permission to export client data), ILL (not including the Supplier name and contact details for which you need to use the “Third party/supplier usage analysis report”), and Bib data tables, and the Other tab contains fields not directly in the Request record (such as Request group), calculated fields (like Time and Cost) and special fields (like Category and Resources “arrays” that provide one column for each enabled value, and “lists” that provide all uses in one column).
For the DeskStats option, tabs are provided for the DeskStats data, and the Other tab contains special fields (like Resources arrays and lists).
Adjusting the selected columns
The right hand column shows the fields that have been selected for your Field set.
To deselect all selected fields as you might want to do when initially creating a new Field set from the Default, you can select the first entry in the list, hold down shift and select the last entry, and then either click the X in the controls at the top right corner of the right hand column, or right click and choose “Deselect”.
You can also deselect all fields f a particular type by going to the tab for the type of field you want to remove (for example ILL or Requester tabs) and clicking the double back arrow in the left hand column.
To select an individual field click it in the left column and then click the single arrow icon. It will appear in the right hand Selected fields column with an icon that indicates which table/tab it was selected from. You can also drag and drop the selected field into the Selected fields column. Hold down CRTL or Shift to select more than one field that can be dragged to the place you want them to appear in your right column of selected fields.
To de-select an individual field click it in the right hand Selected fields column and then click the x icon in that column. It will disappear from the Selected fields column, and reappear in the left column (in the appropriate tab). You can also drag and drop the selected field back into the tabs column, but you must have the appropriate tab selected for that field (check the icon next to the field name matches the icon on the tab you are dragging it back into).
To change the position of a field in your Selected fields list click it in the right column and then click the up or down arrow icon in that column, until it appears in the position that you want. You can also select and “drag and drop” selected fields into a new position within the column.
The first text box, date, or code table (sorting will be on the code number not the description), will determine the sort order of your output.
To select all the fields in a table (tab) click the double arrow icon in the left column, and all fields in that tab will be moved into the right column.
To select more than one field CTRL click the selected fields, or hold down shift and select a number of adjacent fields, and then click the single selection arrow, or drag and drop them.
To de-select more than one field CTRL click the selected fields, or hold down shift and select a number of adjacent fields, and then click the x icon in that column to de-select all clicked fields. Alternatively, if you want to de-select all fields from a particular table, you can go to the tab for that table and use the double back arrow.
There is also a right click function that allows selected items (in the right column) to be deselected and moved up and down. This right click function makes it easier to deselect and move items in long lists where the selection arrows are no longer showing on the screen.
When you are happy with the selected fields, click “Save” and you will be returned to the Data export screen, and the selected fields will be listed in the Select fields box.
Ensure the parameters for your Extract are correct and then click Submit to obtain your report with the fields that you selected.
A column will be provided in the output for every field you select, whether data was recorded for that field during the selected period or not, providing a consistent set of columns that can be used for comparative reporting and with Excel macros.
Please note that some fields you did not select may be included in your output in order to be able to create the data for some calculated fields or to be able to achieve the sort order you requested. So, for example, the Received date field may need to be included to be able to present your Data extract in Received date order; and the Received date, Closed date, and Reopen date fields will need to be included, if you include the Minutes to close field, in order to be able to calculate Minutes to close. You’ll find these fields are also helpful in verifying the calculated information.
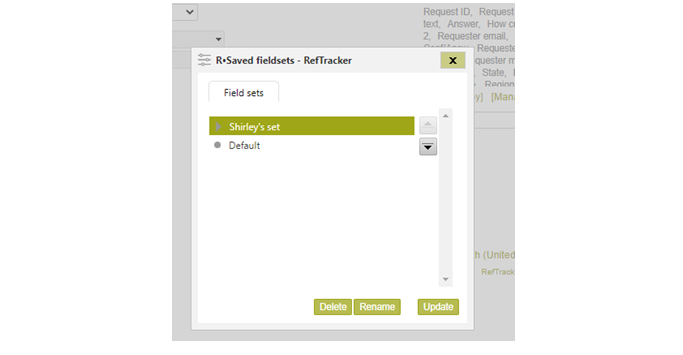
To change the name of the Field set, or delete it, use the Manage function.
The Copy function creates a new Field set by copying the currently selected Field set.
Give this new set of field selections a descriptive name, adjust the selected fields to suit this new need, and click Save.
The Manage saved extract collection function allows field sets to be Deleted, Renamed or Reordered in the selection list. Each time you enter the Data extract screen you will be presented with the parameters you used last time (the Field set at the top of this list is not the one that will be presented each time).
Click the Field set name to see the options available for that set (usually, Delete, Rename, and the ability to change the presentation order of the Field sets).
Don’t forget to click Update to save all your changes!
Creating saved (and scheduled) extracts
Whenever you are seeing extract results in the Data extract screen, the Create saved extract button appears in the top right of the screen.
Click this link and a screen will display that allows you to give the parameters you used for this extract a name so they can be reused.
Supervisors and above can even Schedule the extract to be automatically run at a specified frequency and the results emailed to you or any other email address/es you specify (the API extract function can also do this).
Your saved extract will be able to be run from Reporting>Data extract>Saved extracts sub menu. Scheduled extracts are indicated in that menu list with an indication of their frequency in brackets e.g. (Wk) for weekly, but can also be run manually at any time.
For details of how to save extracts using this option, and manage all your saved extracts, see details in the Saved Extracts help page.
System administrators can prevent staff from using this function by denying it in their user signon Functions tab (Deny “Scheduled reports and extracts” in the Searching and reporting division).