Entering data into request form fields
You can tab between fields for easy movement around a form.
Request forms can be made up of any combination of the following elements:
- Division header – The form is broken into logical parts by background boxes and colouring. The header in each division provides instructions as to how to complete the elements in that part of the form.
- Multiline text entry areas – These boxes are provided where large amounts of text (up to 2 million characters) needs to be typed as a response to that question in the form. To more easily view large amounts of text as it is entered click the “+” sign on the right of the box and it will double in height. Clicking the “–” sign halves its height.
- Drop down boxes – Click the down arrow to see the options available as responses to this question. Click the option in the list most applicable to you to select a response. Entering a character will take you to the first entry starting with that character in the list, if there is an entry starting with that character.
A special tree structure Drop down box layout is used for displaying Request type when Request type is used in a form. When this structure is used in a Request form you can only select values at the lower level of the tree such as gray one indicated.

- Radio buttons – Click the most appropriate option.
- Single line text entry boxes – These boxes are provided where a relatively short response is required (though up to 2000 characters can be entered into them).
- Date, and Date and time fields – See the next section for full information about how to use date and time fields.
Where the Last useful date shows in a form, the date showing in that field on display of the form will be the date by which the library expects to have provided a response. You only need to change the Last useful date field if you need the response by an earlier time.
If this field is set as Mandatory, then the date you enter here will be recorded as the date by which you need this response. It will be recorded as the Target response date, even if you do not change the suggested date showing here, as, by accepting the Mandatory date shown, you have accepted that as the date by which you need this response. - Email address fields – Email address fields can contain one email address or more than one each separated by a semicolon. All email addresses entered will be validated to ensure that they are in a valid email address format such as abc@xyz.com (but we cannot tell if an email address has been miss-spelt of course). Further, the confirmation screen will ask the client to double check that the email address they provided was correct – this this way, it is not necessary to ask the client to type their email address twice!
- Tick boxes – Some RefTracker system functions, that just require acknowledgement, are set up to use tick boxes. Just click in the box.
- Lookups – Some fields are associated with data file lookups. In this staff interface this could be provided via Contacts Lookups or Dynamic Lookups, and in the client interface it can only be provided though Dynamic Lookups.
 indicates a field that will suggest entries form the lookup data as you type characters into this box. Select the suggested entry you want to use from the ones shown below this field.
 indicates a field that will be used to retrieve data from the lookup file to complete other fields.
 indicates a field that fill be filled by one of the lookup fields indicated by one of the symbols shown above. You can type into these fields and even change data automatically inserted in them by the lookup.
 - Notes about completing responses – Some fields may provide notes below the field label. The field label describes the response required and the note provides further details about how to complete this particular form element.
- Mandatory fields – Fields preceded by the mandatory field symbol (usually a tick) must have a value entered into them before the form can be submitted.
- Question field allows formatted text – The Question field (which may have other names in other Request forms) allows HTML and HTML formatted text to be entered – so clients can cut and paste formatted information from web pages into this field, and any formatting (such as dot points and hyperlinks) will be retained – but code entered will be validated to ensure bad code is not entered and it will be encoded so that it cannot be executed. HTML is forbidden in all other fields – an error message on submission will advise that the HTML needs to be removed before the form can be submitted.

- Attach files – If files can be attached to this type of request, an “Attach files” section, as shown in the following screen print, will show. You can use this to either attach a file, using a traditional file selection function, or by dragging and dropping a file (or files), onto the drop zone. Clicking “select file” on a tablet/phone will offer the opportunity to add a photograph11. Attach files – If files can be attached to this type of request, an “Attach files” section, as shown in the following screen print, will show. You can use this to either attach a file, using a traditional file selection function, or by dragging and dropping a file (or files), onto the drop zone. Clicking “select file” on a tablet/phone will offer the opportunity to add a photograph

When you select a file for upload, the name of the file shows above the “Select files” line and the dot to its right changes from red to orange to green, at which point the file is fully uploaded and ready to be attached to the question when you click Submit.

Automatically collected information
When a client completes a RefTracker client interface form, the system can automatically collect the following information about the client, as this information can help with resolving the issue being reported (such as a problem with accessing an online database):
BrowserUserAgent, IP address, and Referring URL (if the form was accessed via a link in a web page outside of the RefTracker client interface).
More about date and time fields
All date fields have a graphical date picker, and where appropriate, a time picker, if the user has JavaScript enabled in their web browser – if JavaScript is not enabled (rare these days) the graphical date and time picker icons do not display, but the date and time can be changed by clicking in the box and typing a different date or time.

If you manually enter a new date in a date field that is not a valid date, or is not within the valid date range, it will be displayed in red and treated as having entered no value at all if you save the form with the date still indicated as an error, which will usually generate a validation error explaining what needs to be changed to fix the date.

To use the date picker function click on the calendar icon and a calendar appears. The calendar will automatically disappear when you choose a date from it, however if you wish to manually remove the calendar display click elsewhere on the page or tab out of the field.Choose another date in the same month by just clicking on the date. Greyed out dates are not valid dates and cannot be selected e.g. you cannot select a Last useful date earlier than today or in the future more than 31 December of the next calendar year. Go back or forward a single month by clicking on the appropriate single arrow in the header.Move 3 months at a time by clicking the double arrows in the header.

Click the month name or year in the header and a menu displays allowing the calendar for other months and years to be selected. Click the values you want and then OK, then select the specific date that you want.The “Today” button in this month and year menu enters today’s date in the date box. Note that dates earlier than today are not appropriate for use in same fields and will be displayed in red with and error symbol.

To use the time picker function click on the clock icon, or in the time field itself, and a drop down of all of the times that are valid for the function you are using appears.Click on the time that you want to select.

Remember me on this computer
The “Remember me on this computer” function allows client contact details to be saved in an encrypted cookie, and automatically inserted into any future forms that this client might use from your RefTracker system, thus making future forms considerably easier for them to complete.
Using parameter 6.9 your system administrator can select not to use this new functionality; to automatically have a cookie created for all users of your forms; or to allow customers to choose whether they want to have their contact details saved via the “remember me” tick box.
This function will be available no matter what level of cookie availability the client has set. It becomes unavailable if cookies are not allowed at all.
When saving contact details if the cookie has been set to Automatic by your System administrator, the client will notice no difference the first time they use a form, but from then on, the latest client contact details they provided will be automatically inserted into each RefTracker form that they use in your system. They will never see the “Remember me on this computer functionality” that appears when the use of cookies is set to Prompt by your System administrator.
When saving contact details if the cookie has been set to Prompt by your System administrator, users will see a “Remember me on this computer” tick box at the end of each form that they use, as shown below.
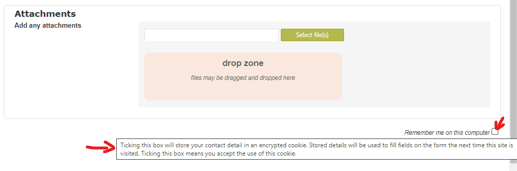
When the client cursor’s over the “Remember me” tick box, a pop up like the one shown above displays. As this is the only use of cookies in the RefTracker client interface, it makes the cookie use very obvious and prevents the need for client’s to read the full Privacy policy link at the bottom of the page to understand what they are agreeing to.
If they tick the “Remember me” box and the “OK” confirmation, the contact details that the client provides in that form, will be saved into an encrypted cookie on their computer (or updated if the cookie already exists), at the same time as their question is saved into RefTracker. This means that the cookie will contain the latest data provided by the client (so a changed phone number will be saved for example), and the data will accumulate, so that, if a later form used does not need a phone number, for example, the phone number information will be retained for future use. Once contact details have been saved in a cookie for any user, whenever the client uses a form from your RefTracker system (either in the same session, or at a future time while the cookie remains on their computer), any contact details required by that form, that are saved in the cookie on their computer, will be automatically filled into that form for them. The “Remember me” tick box will also be automatically ticked, and the explanatory confirmation box shown above will not show, giving the user an easy option of unticking the “Remember me” box to stop saving their contact details on this computer.
The cookie created for your RefTracker system will not be applicable to Request forms for any other RefTracker system that the client might use. Their computer system will be able to have cookies for many different RefTracker systems, should they be a client of many services.
The cookie is also used to set the language that RefTracker will initially display in, for that user. If a cookie cannot be created for a user, then RefTracker will initially display for that user in the default language for that RefTracker system (as set by your System Administrator in the Language code table).
Cookies are specific to the browser that you are using, so if you tick “Remember me” in a form displaying in Internet Explorer, and then use a form from the same system in FireFox, for example, the “Remember me” option will be unticked in FireFox.
A Captcha to stop form filling spambots
Some forms provided by this system may have a Captcha function added to them in order to prevent automatic form filling bots from submitting spam.
If a Captcha is in use it will appear in a separate division at the end of the form – see the example below.

Features of this Captcha implementation are:
- There are only 5 letters/numbers to be entered, and the level of distortion used is minimal making the Captcha as easily read and as possible, while still maintaining its effectiveness.
- The letters shown can be entered in either upper or lower case, once again, making the Catpcha as easy to complete as possible.
- Clicking “Get a new code” will display a new Captcha code – you may want to do this to obtain an image that is easier to read.
- Clicking “Listen to the code” reads the code to you in the NATO phonetic alphabet (“C” is read as Charlie, “E” is read as Echo, etc.) if you are using one of the English locales (languages). Note that because this alphabet is in English, at present this option ONLY displays if the user’s preferred language is English, Cantonese or French In Cantonese the letters are announced in English and the numbers in Cantonese. In French both letters and numbers are announced in French.
- The Captcha will only display once for each use of a form – if validation errors are detected, the form will redisplay with information about the validation errors, but, if the Captcha has already been successfully completed it will not display.
- Note that when a Captcha is included in a form, the form cannot be reused, so anyone using the back button to go back to the form will be advised that the form has expired and needs to be resubmitted. The re-presented form will be a clean display of the form without any data entered.