Single Sign On use and set up
Why use SSO?
Single sign-on (SSO) is a session and user authentication service that permits a user to use one set of login credentials (e.g., name and password) to access multiple applications.
SSO shares centralized authentication servers that all other applications and systems use for authentication purposes and combines this with techniques to ensure that users do not have to actively enter their credentials more than once.
For staff this means a more user friendly experience by making logins quick and simple.
Helpdesk costs can be reduced by minimising the need for resets of multiple passwords per user.
IT departments will also benefit from having a centralized authentication server and the vastly reduced number of user credentials to be monitored and maintained.
For users of the client interface, this can be implemented to prevent use of the client interface features by users that are not entitled to use that service.
RefTracker supports both SAML and OIDC based SSO systems. The following covers use and setup for each of those to different protocols.
SAML
then
OIDC
Using the staff login with SSO
When RefTracker SSO is enabled for staff (Parameter 5.12) and configured for a given staff member signon, and that staff member is logged into the IdP network, and the user’s browser is not already logged into a RefTracker session, the user will be taken directly to the RefTracker page they are trying to access, without the RefTracker login screen displaying.
SSO provides a corporate wide control of which staff can access your RefTracker application’s staff functions, and removes the extra step of having to separately log into RefTracker.
For more details about how your staff will access RefTracker when SSO is enabled see the “Logging in when SSO is enabled” section of the Staff logon screen help page.
Using the SSO with the client interface
When RefTracker SSO is enabled for clients (Parameter 5.13), RefTracker client interface pages will not display unless the user is logged into the IdP network. If the user is logged into the IdP network, they will be taken directly to the RefTracker client interface page they are trying to access.
Clients identified by SSO will also see a link to the View all my requests function in the Check on existing requests screen, making it easier to access this helpful information.
It is also possible to obtain contact information about the SSO logged in client, and place that information in the request form being used by the client.
When an end user/client/requester logs on via SSO a Claim record comes from the SSO provider. That claim record can have values that are used to populate the RefTracker client fields.
The field mapping is defined in the OIDC.XML or SAML.XML config file.
The claim values have to be extracted from the encoded/encrypted data included in the SSO data returned. Here’s an example of an OIDC.xml config file showing how the SSO data e.g. <map.emailaddress> is mapped to the RefTracker field client_email
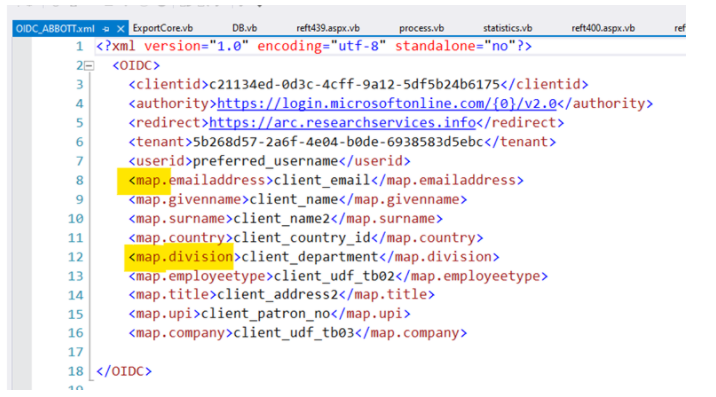
If there is a xmap column for a field that is mapped to a RefTracker code table then the value in the claim will also need to be mapped to the RefTracker code value.
There is a field in the RefTracker codetable table (codetable_external_map) which can be set to 1 if the codetable needs an xmap column. This value needs to be set by an Altarama staff member via SQL.
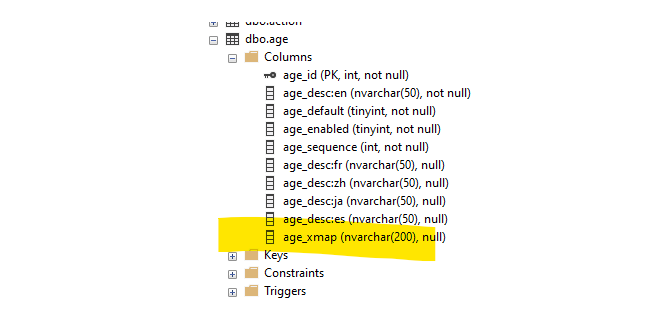
When RefTracker initialises, it will create an _xmap column for any codetable with this flag on.
These columns have a specific convention of {codetablename}_xmap – eg age_xmap
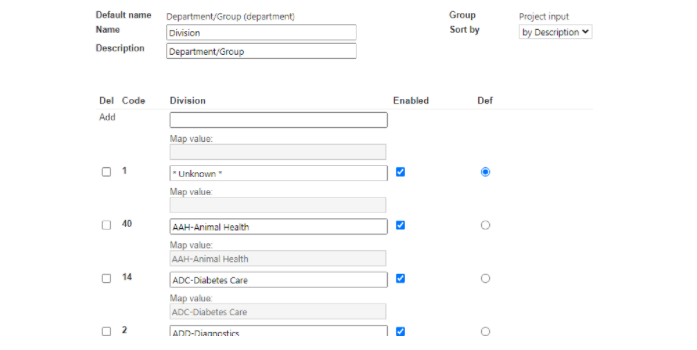
The _xmap column will be presented in the code table edit so that the user can enter the value expected in the SSO claim. That means that the value in the SSO claim can be mapped to a RefTracker code value.
Diagnosing issues with SSO setup
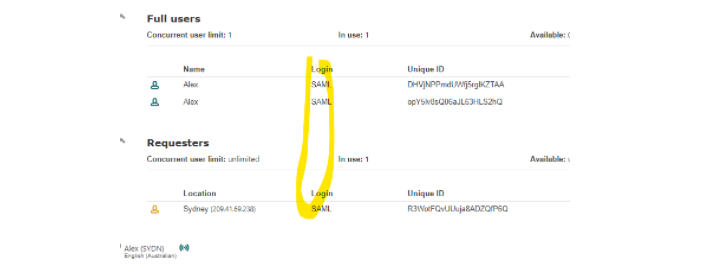
- The System>Concurrent users screen, Login column shows how a user (both staff and client) has been identified at login time:
Also System>Utilities>Information>Systems shows how a user has been logged in.

Use either of these methods to determine whether user access is successfully being controlled vis SSO.
2. To debug SSO access the RefTracker debug system must be turned on – at System>Parameters>80 – Application, parameter 80.5
3. Details of user access are logged for the last three days in the user<date>.txt file at System>Utilities>information>Browse error logs.
4. If debug is on, errors are logged to the <date>.log file in your RefTracker system’s /logs directory. Please report any issues to your RefTracker support representative.
SAML SSO
RefTracker can act as a SAML 2.0 Service Provider (SP), enabling Single Sign-On (SSO) either by initiating a SP login or initiated by a SAML Identity Provider (IdP) of your choice.
This implementation allows staff access to RefTracker to be controlled through a SAML compliant SSO service.
Access to RefTracker’s client functions can also be limited to authorised SSO users.
The tool we have used for SAML is compatible with Shibboleth so we would be pleased to test this with a customer that uses Shibboleth.
To take advantage of SSO, you will first create a trust relationship between RefTracker and your SSO Identity Provider (ADFS, AzureAD, Okta, OneLogin, PingOne, Google, etc). To set this up you will need to be a RefTracker System administrator, and you will need information from your SSO Identify provider.
This section provides the essential settings and procedures that you need to configure an IdP (Customer) to SP (RefTracker) trust relationship.
SSO implementation guide
Here’s a nine step implementation guide:
1. SSO requires that your RefTracker web site is SSL enabled. i.e. uses the https://…. URL prefix. It is also necessary that the web server is running Microsoft .NET Framework version 4.6.2 or later – preferably the most recent version.
2. Obtain the connection information from the SSO IdP provider and provide them with the information they need to register RefTracker as one of their approved applications. This can vary depending on which IdP product your organization is using, resulting in different information requirements.
The minimum information that must be obtained from the IdP provider (the customer’s IT department) is as follows. ASK FOR THIS FROM THE CUSTOMERS IT DEPARTMENT. It will often be provided in the form of a metadata file from which this information can be obtained.
- Type of SAML 2.0 identity provider (IdP) e.g. Azure AD, MVC, OWIN, ADFS, MVC, OWIN, Okta, Google, Salesforce, Shibboleth, WS02 Identity Server, OneLogin, PingOne, Bitium, Centrify.
- SAML IdP URL e.g. https://sts.windows.net
- Single Signon service URL
- A copy of their IdP generated certificate file (.cer file)
At the same time, provide them with the following information: SEND THIS TO THE CUSTOMERS IT DEPARTMENT:
| Setting | Value |
| Entity ID | “https://YourRefTrackerDomain/“ |
| ACS URL | “https://Your RefTrackerDomain/reft000.aspx“ |
| Certificate | “config\certificates\sp.cer” |
(N.B. replace “YourRefTrackerDomain” with your RefTracker domain)
Some IdPs, especially web-based SaaS products, have additional compatibility settings which are less critical but sometimes cause problems if not configured correctly. Here are those additional settings for RefTracker:
| Setting | Value |
| Default Relay State | optional |
| Signature / Digest Algorithm | RSA_SHA256 / SHA256 |
| Request Compression | Yes or No |
| Signed Requests | Yes |
| Encrypted Requests | No |
| Signed Assertions | Yes |
| Encrypted Assertions | Yes or No |
3. Check your web.config file has this.
Ensure your web.config file (located in the RefTracker config/system directory -ask your RefTracker support person for help accessing this file) contains the following within the <system.webServer> element –
Place it just above </system.webServer>
<defaultDocument>
<files>
<clear />
<add value=”default.aspx” />
</files>
</defaultDocument>
If it is already there, make sure the value is set to “default.aspx”.
4. A saml.config file is required in your RefTracker config/settings directory.
This file contains details of both IdP and SP. The contents of this will vary according to the type of SAML connection.
A saml-example.config file has been provided in your RefTracker config/settings directory so that you can copy the settings for the type of connection you need to create into your saml.config file.
Once that is done you need to modify the saml.config file to suit your SAML connection. The ServiceProvider element in the file should only require the RefTracker URL to be changed. However the PartnerIdentityProvider element will vary depending on the information required by your IdP.
Example saml.config file
This example is for a typical MS Azure AD SAML IdP. Other IdP requirements may vary.
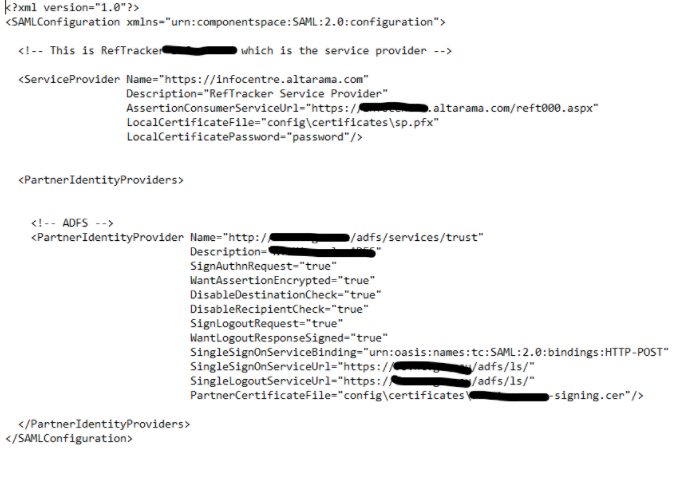
The file contains two main elements:
ServiceProvider – contains details of the RefTracker Service provider such as Name, URL and local certificate.
Just provide the domain of the RefTracker service at the appropriate point in this section.
PartnerIdentityProvider – contains details of your IdP’s URLs and certificate. These values will be provided by your IdP (often in the form of a “metadata file”). Copy the most appropriate IdP provider example information from the “saml-example.config” file and adjust it according to the information provided by the IdP (usually all the lines with blacked out text above will need their values changed to match the ones provide din the metadata file).
We recommend that you take a copy of your saml.config file as samlbackup.config.
5. Two certificate files are required to be stored in the RefTracker root\Certificates directory.
An SSO security certificate file is required by the SP (RefTracker) and must be provided by the IdP.
Your IdP will supply a .cer certificate file which must be stored in your RefTracker \config\certificates directory. Update the PartnerCertificateFile entry in the saml.config file with the name of the certificate file that you are provided.
The default RefTracker certificate is sp.cer and is located in your RefTracker \config\certificates directory. A copy of this file may be required by your IdP.
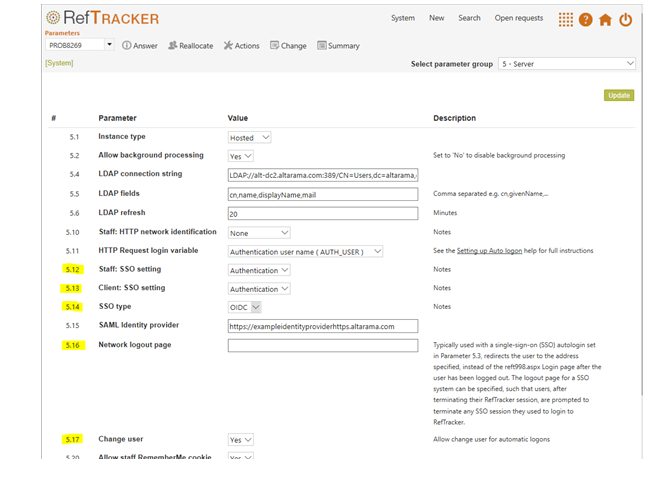
6. Set the RefTracker parameters at System -> Parameters -> 5) Server for your SAML implementation.
Select the RefTracker menu option System -> Parameters -> 5) Server and set the following parameters appropriately for your SAML SSO:
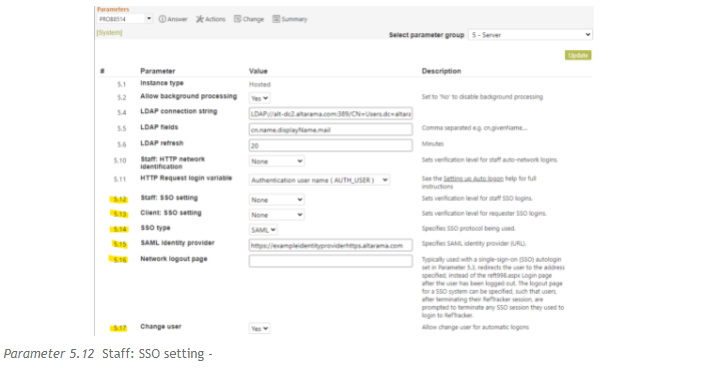
Parameter 5.12 Staff: SSO setting –
None – SSO is not used. Staff log in is through the RefTracker reft998 page.
Authentication – SSO is used but manual login is also allowed.
A call Is made to the Identity Provider to determine who the user is. When redirected back to the RefTracker staff interface, an attempt is made to match the discovered user with a RefTracker staff user. If a match is made then the user is logged in, if there is no match then the user is presented with the option of logging in manually using reft988 as per normal.
Authorisation – Only access through SSO is allowed.
Same as above BUT if there is no match the user is not given the option to login using reft998. In other words, the user has to be known to SSO AND there must be a match against a RefTracker staff record.
Parameter 5.13 Client: SSO setting –
None – SSO is not used. Clients go directly to the client side home page without an SSO check.
Authentication – Access is limited to SSO users and client contact details are automatically inserted in RefTracker forms, if provided.
A call Is made to the Identity Provider to determine who the user is. If the user is identified by the SSO server, any contact details about that user, that are provided by the SSO server, will be automatically inserted in the RefTracker client interface request form.
Authorisation – for future use – currently does the same as authentication.
Parameter 5.14 SSO type – *Important* – set to SAML
You can use this option to turn SSO off when there is an issue with SSO (set it to none).
Parameter 5.15 SSO Identity provider – Contains the URL of the IdP as provided by the IdP e.g. https://sts.windows.net
Importantly, this MUST be identical to the PartnerIdentityProvider Name value in your saml.config file.
Parameter 5.16 Network logout page – Redirects the user to the address specified, instead of the reft998.aspx Login page after the user has been logged out. The logout page for an SSO system can be specified, such that users, after terminating their RefTracker session, are prompted to terminate any SSO session they used to login to RefTracker. It is important to set a value for this parameter when SSO is in use.
Parameter 5.17 Change user – Set this to Yes for users logged in under SSO to be offered the option to log on as a different user after they log out of RefTracker.
Set it to No if, for security reasons, users should not be offered the option to log on as a different user when SSO is in place.
Parameter 5.20 Staff remember me – Set this to No – this fucntion is incompatible with SO use and cannot be turned back on while SSO is in use.for users logged in
7. It is important that RefTracker is restarted at this point. The parameter changes that you have made in point 6 and the new saml.conifg settings will not be picked up until the system is restarted.
8. Associate their SAML SSO user account with each RefTracker user.
During the login authentication process, matching SSO users with RefTracker staff is done by comparing the RefTracker ‘Staff number’ field to the User ID supplied by your IdP.
User ID’s that identically match your IdP will need to be entered in the ‘Staff number’ field for all RefTracker staff signons (that want to use SSO to log in).
You may want to rename the ‘Staff number’ field in your Data dictionary (System>Data dictionary>Systems tables>Staff), to reflect this use e.g. ‘SSO staff ID’.
Add each user’s SSO identifier to the Staff number field (for every user). It might be an ID number, or ID name, or an email address, for example.
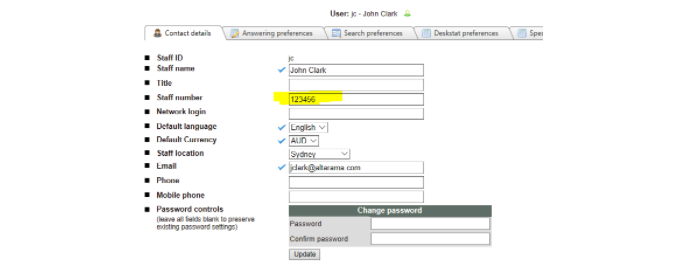
Click Update to save your change.
This page requires the Password fields to be complete. If a password has already been provided, you do not need to change it. If you are asked to provide a password after clicking Update, you can provide a dummy password. This RefTracker password will not be used when signing on via SSO (but can be used if you have chosen authentication allowing manual sign on as well as signon through SSO.
9. Have all users test their login!
OIDC SSO
RefTracker can be incorporated into an OAUTH (Open Authentication) based SSO system that supports OIDC (OpenID Connect) functionality.
This implementation allows access to RefTracker to be controlled through an OIDC complaint SSO service such as Microsoft Passport or Azure AD.
We have found that Microsoft Passport and Azure AD implementation can be set up using the SAML instructions above – so try that if applicable!!!
Optionally it can be used to control access to the RefTracker client interface pages, and to automatically insert the end user’s contact details into RefTracker client interface request forms.
To set up and take advantage of OIDC SSO, you will need to be a RefTracker System administrator, and you will need information from your SSO Identify provider.
This section provides the essential settings and procedures that you need to configure an IdP to SP trust relationship.
OIDC SSO implementation guide
The following sections are intended for IT and SSO administration.
IdP implementation using Azure AD
1. SSO requires that your RefTracker web site is SSL enabled. i.e. uses the https://…. URL prefix. It is also necessary that the web server is running Microsoft .NET Framework version 4.6.2 or later – preferably the most recent version.
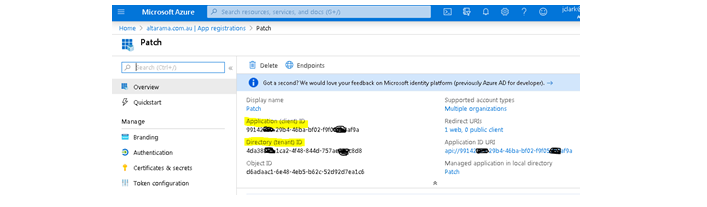
2. To configure the IdP for your application, a registration procedure must be completed.
For example, when using Azure AD as an IdP, and to register your instance of RefTracker, follow the instructions in the Microsoft document found at –
https://docs.microsoft.com/en-us/azure/active-directory/develop/quickstart-register-app
3. Once RefTracker is successfully registered, Azure will generate a Client ID and a Tenant ID. Take note of both these values as they need to be provided to Altarama for inclusion in the OIDC setup at the RefTracker end. Please contact your RefTracker support representative to have this applied to your RefTracker implementation.
RefTracker SP configuration
OIDC Configuration File
The SSO component incorporated in RefTracker is configured using an xml file: OIDC.xml
A sample of this file can be found in your RefTracker root\config\settings folder.
N.B. after modification it must be saved to the same directory. We recommend taking a copy of it as oidcbackup.xml
Example OIDC.xml file
<?xml version=”1.0″ encoding=”utf-8″ standalone=”no”?>
<OIDC>
<clientid>c21134ed-0d3c-4cff-9a12-5df5b24b6175</clientid>
<authority>https://login.microsoftonline.com/{0}/v2.0</authority>
<redirect>https://arc.researchservices.info</redirect>
<tenant>5b268d57-2a6f-4e04-b0de-6938583d5ebc</tenant>
<userid>preferred_username</userid>
<map.emailaddress>client_email</map.emailaddress>
<map.givenname>client_name</map.givenname>
<map.surname>client_name2</map.surname>
<map.ctry>client_country_id</map.ctry>
<map.division>client_department</map.division>
<map.title>client_address2</map.title>
<map.upi>client_patron_no</map.upi>
<map.company>client_udf_tb03</map.company>
</OIDC>
The file contains two main elements:
1. The first five entries contain the minimum configuration details to implement the SSO connection.
<clientid> Contains the Client ID generated by the IdP (Azure in this case).
<authority> URL of the IdP authority.
<redirect> URL of your RefTracker instance.
<tenant> Contains the Tenant ID generated by the IdP
<userid> The name of the Attribute returned by the IdP that contains the verified user id.
2. Extra Attributes (or Claims) that can be returned by the IdP in the ID Token.
These entries take the form of a mapping between IdP attributes and RefTracker fields –
<map.IdPAttribute>RefTrackerField</map. IdPAttribute >
When implemented these returned values can be used to automatically populate the end user’s contact details in RefTracker client interface request forms.
RefTracker application configuration for OIDC SSO
Database Parameter Configuration:
Select the RefTracker menu option System -> Parameters -> 5) Server and set the following parameters:
5.12 Staff: SSO setting –
None – SSO is not used. Staff log in is through the RefTracker reft998 page.
Authentication – SSO is used but manual login is also allowed.
A call Is made to the Identity Provider to determine who the user is. When redirected back to the RefTracker staff interface, an attempt is made to match the discovered user with a RefTracker staff user. If a match is made then the user is logged in, if there is no match then the user is presented with the option of logging in manually using reft988 as per normal.
Authorisation – Only access through SSO is allowed.
Same as above BUT if there is no match the user is not given the option to login using reft998. In other words, the user has to be known to SSO AND there must be a match against a RefTracker staff record.
5.13 Client: SSO setting –
None – SSO is not used. Clients go directly to the client side home page without an SSO check.
Authentication – Access is limited to SSO users and client contact details are automatically inserted in RefTracker forms, if provided.
A call Is made to the Identity Provider to determine who the user is. If the user is identified by the SSO server, any contact details about that user, that are provided by the SSO server, will be automatically inserted in the RefTracker client interface request form.
Authorisation – For future use only – currently does the same as authentication.
5.14 SSO type – *Important* – set to OIDC
5.15 SSO Identity provider – Not applicable to OIDC SSO.
5.16 Network logout page – Redirects the user to the address specified, instead of the reft998.aspx Login page after the user has been logged out. The logout page for an SSO system can be specified, such that users, after terminating their RefTracker session, are prompted to terminate any SSO session they used to login to RefTracker. It is important to set a value for this parameter when SSO is in use.
5.17 Change user – Set this to Yes for users logged in under SSO to be offered the option to log on as a different user after they log out of RefTracker.
Set it to No if, for security reasons, users should not be offered the option to log on as a different user when SSO is in place.
It is important that RefTracker is restarted at this point. The parameter changes that you have made here will not be implemented until the system is restarted.
Create OIDC SSO user in RefTracker:
The procedure is exactly the same as for for SAML – see above.
Hints for resolving issues with SSO setup
- Setting parameters 0.100 and 0.101 to the https version of your RefTracker URL will resolve an issue with browsers blocking non-https elements on a page that can prevent a redirect provided by SSO from happening.