Email import process

The Import email process automatically imports emails from the accounts that you set up in Systems>Batch process menu>Data import/export>Email importing. There will be one instance of the email Import process for every Email account that you set up in that Email importing screen. The instances are automatically created when you add a new entry to the Email importing screen, however they will be set to Disabled until you come into this function and Enable the process to start the automatic importing of emails.
Move between the instances by selecting them from the “Select process and instance” drop down in the top right of the screen.
See Background processing for details of how to use the Background processing screens.
See Email importing for details of how to set up and use email importing, and about dealing with issues with email importing.
The Overview tab for each instance summarises; the last run, the projected next run and allows you to individually stop and start (Enable/Disable) the automatic importing that email address.
All of the tabs of this screen provide and “Execute now” button that will run the import task immediately.
Should there be any issues with the email importing process, such as the process failing to run at all, or an imported email being unable to be processed, the Active system administrator with be sent an email containing the details of the issue, including the contents of any email that could not be imported. In this way, the Systems administrator can feel confident that they will be advised of any issues in relation to the email importing processes so that they do not have to manually monitor these Email Importing screens.
The Email importing processes work on the email addresses that are set up using Systems>Batch process menu>Data import/export>Email importing, there for the Parameters tab provides a link to that page.
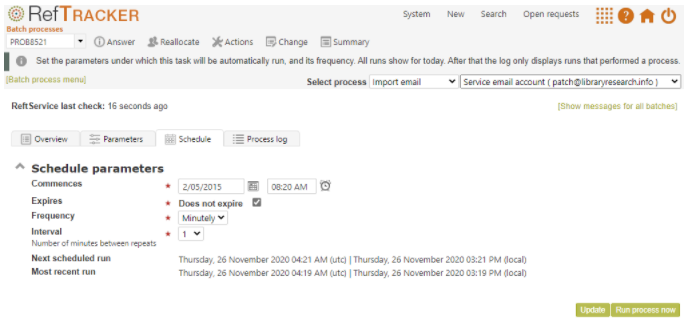
The Schedule tab allows the frequency with which email is picked up from this email account to be set. An interval of one hour for the service email account and 15 minutes for new question accounts is recommended in most instances as it is desirable that your clients use forms to enter questions where they can as forms provide better statistics and reduce the need for clarifications. However some customers rely on being able to import emails (usually high intensity libraries like law libraries), and if you are one of those customer you can set you import interval as low as 1 minute which will provide the same level of responsiveness as dealing with the email though and email client.
The Process log tab records the results of each run of the background process for this email account. As the Email import process can also be run manually, the best place to go when looking for emails that have been imported for a particular queue is System>Batch process menu>Data import/Export>Email importing, as it only shows occasions when there was activity, and it show emails imported when the import process is manually run.
Whenever a run finds emails in the nominated email account, the Process log will provide a “View mail log” link. If the process was manually run by a staff member using the “Import emails now” function in the System>Batch process menu> Data import/export> email importing screen for that email account, the staff member’s name will appear in the “Staff” column. If the process was run by the background processor, no name appears in the “Staff” column.
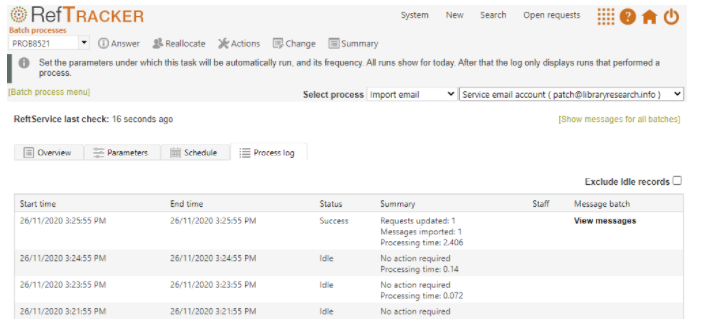
Messages imported is the number of email messages that were picked up from this email account. For each of these imported messages, RefTracker will either save it as Pending, Reject it, Add it as a new question or use it to Update an existing question. The summary column notes how the imported questions were handled (Update, Reject, Pending, Messages moved, and Add) should total to the note about the number of Messages imported that is showing in the same line. e.g. 3 Updated +6 Pending = 9 Imported
Requests updated/added is the number of email messages that were correctly imported into to RefTracker as new questions or question updates according to the type of account this is.
Messages rejected is the number of messages that were picked up but that could not be processed. They may have statuses of either Rejected or Problematic. An Alert email containing the contents of that email will have been sent to the email address specified in parameter 1.3 “Mailbox for email Administrator alerts”, so that the email can be manually addressed. The subject line of that email will provide more details about why the message was rejected.
Messages moved is the number of messages automatically moved to the new question email importing address specified at parameter 8.4. This only occurs If a new question email importing address is specified in parameter 8.4 so that emails arriving at the Service email address with no RefTracker question number in the subject line are automatically processed as new questions. Questions handled in this way will include information about the address they were moved from, in the “Other imported data” field.
The “View messages” link that appears whenever there was email picked up, takes you to the same Email importing log summary page that van be viewed from the [view all messages] link in the View batches section of the System>Batch process menu> Data import/export>Email importing screen (where the details of the email account being imported from were set up).
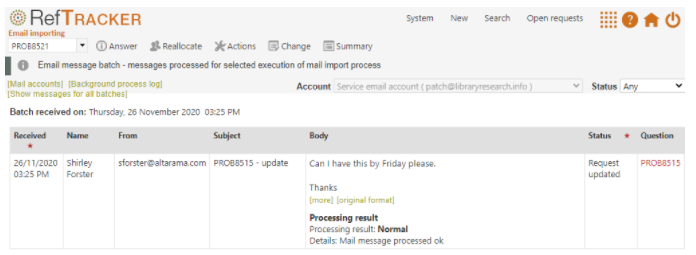
This screen summarises the emails that were imported from that account at that time and how RefTracker processed them. Full details about the information presented in this screen are available in the System>Batch processing>Data import/export>Email importing section of this manual.
The [Show messages for all batches] link (in the middle of the table heading) shows all recently imported messages and their status – a handy way of seeing the most recent traffic! And where any recent emails were unable to be imported to the Service email address, the handy [Send to. . .], [Resubmit] and [Reject] links appear!
Note that the Status drop down option can be used to see all messages of the same status, such as all Pending messages, but make sure that you have previously selected [Show messages from all batches] or you will only see the ones in that status from the current batch!!!