Other Code tables
Some code tables in RefTracker are provided to supplement specific functionality and workflows in RefTracker. They provide library defined information that can be used by these functions or workflows.
Statistics cannot be obtained in relation to any of these code tables, as they are not associated with specific questions. These code tables are:
- Bookmarks
- Organisations
- Email templates
- Print templates
- QuickText and QuickText groups
- International currency codes
Each of these code tables will now be discussed in detail.
If your organisation is licensed for the optional RefTracker Dynamic Lookups module, a Data Sources code table will also be showing here – it is discussed in the separate Dynamic lookups documentation.
Bookmarks code table
NOTE: – The QuickSearch function has been removed (as of release 3.4) – so this code table is currently not in use.
The following information has been retained as the code table has not yet been removed, even though it is not currently in use. It will be retained for a while in case it can come back into use.
The Bookmarks code table determines the values that will appear in the drop down box associated with the QuickSearch function in the header of every RefTracker page.
Entries in this table, with a term specified in the Query column will appear in the AutoSearch part of the QuickSearch drop down list, and will automatically perform a search of the resource based on the text defined in the QuickSearch box. All other entries will appear in the Bookmarks section of the QuickSearch drop down list and will bring up the specified web site as soon as that drop down list entry is clicked on. As AutoSearch and Bookmarks in this list open the resources in a separate window and at the right page, for the cost of just two clicks, you should include as many as possible of the web accessible information resources that your staff use regularly to research questions, in this code table.
Bookmark: enter a descriptive name for each information source (max 20 characters).
URL: enter the URL (max 2000 characters) of this information source e.g. for Google http://www.google.com or www.google.com.
Query: enter the query term that needs to be added to this site’s URL to achieve Autosearch (max 2000 characters) where {search term} automatically inserts the QuickSearch text to be searched for. For example to AutoSearch Google the full URL required is http://www.google.com?q=\{searchterm} so the entry in this column for Google is q={searchterm}If AutoSearch is available for an information source it provides additional productivity for your staff so check to see if each new resource you add can be AutoSearched. To determine if a resource can be AutoSearched enter something obvious into the search box of the resource e.g. FRED. When the result page appears, check the URL of the results page and see if your obvious characters (FRED) appear. If they do, cut and paste the URL into a new web browser window and press Enter. If you now see the same results in this new window as you saw in the previous window, it is likely that this resource can be AutoSearched (some resources have temporary URL’s that time out and you will only discover that the process is not working when you try it again after the time out period). As a further check you might like to try replacing your special character (FRED) with something else (e.g. MARY) and seeing if that brings back different results. If your second window provides the correct results it is worth setting that resource up for AutoSearch and seeing if it works. To set it up, go to the Bookmarks code table, Add a new entry in the code table using a descriptive name. Cut and paste the URL from your resource test window into the URL field of your new Bookmark code table entry. Delete all the characters to the right of the “?” including the “?”. Then paste the same URL in the Query field and delete everything to the left of the “?” including the “?”. Finally, in the Query field, locate the distinctive characters that you entered as the search criteria (FRED), and replace them with {searchterm}.
For example, if you search for FRED in Google, the resulting URL is: http://www.qoogle.com?q=FRED
The Bookmark entry for this becomes
Bookmark: GoogleURL: http://www.google.com
Query: q={search term}
The question mark “?” appears nowhere in the Bookmark code table entry and FRED is replaced by {searchterm}. Sometimes, if this simple technique does not work, you can describe what you are trying to do to your online information provider and they will be able to give you a different URL that will provide the search results that you want.
Exercise:
Enter the information sources that your staff use regularly, and their respective URL’s. Research whether AutoSearch is available for each source, and add the Query term that makes AutoSearch work with each information source (as described under Query, above), where it is applicable.
Organisations code table
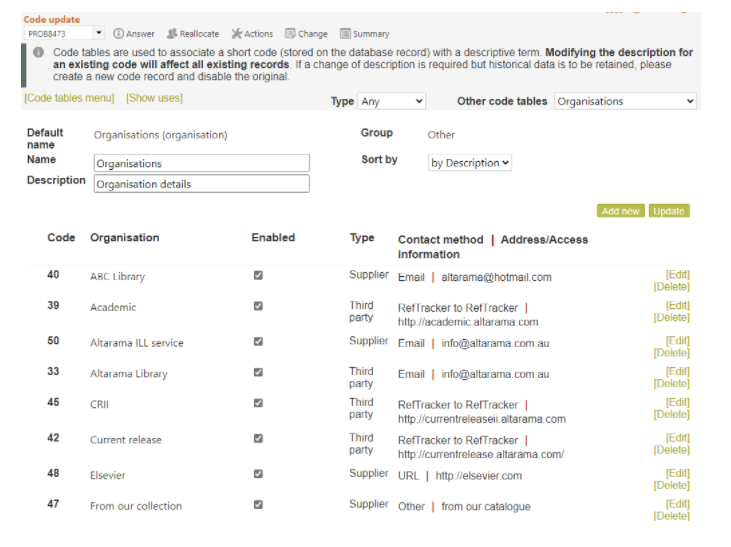
The Organisations code table provides the values that appear in the Organisations drop down box in the Third party screens. It associates contact information with an organisation’s (or individual’s) name, and the third party function that this listing is used for, so that third party communications can be quickly referred to these Organisations without having to look up, and individually enter, their email, Relais, or RefTracker to RefTracker contact details each time.
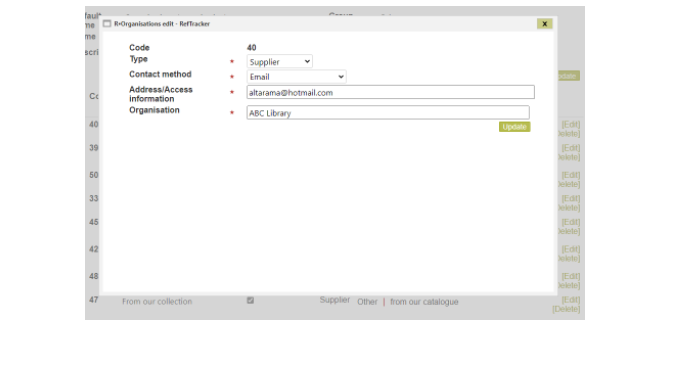
To add a new entry use the “Add new” button, or to edit an existing entry use the [Edit] hyperlink on that entry’s line.
Type: choose the type of contact that this listing will be used for. Where there are no entries enabled in this code table for a specific Type, that Type of contact will not be offered in the Third party and ILL/Doc del screens:
Supplier is an organisation used in the ILL/Doc del screens.
Third party is an organisation used in the Refer and Redirect screens.
Contact method: enter the contact details for this type of contact to this Organisation
Email: where the Refer, Redirect or ILL/Doc needs to be sent to this Organisation as an email. We highly recommend that you must have at least one entry enabled with Type Email so that this option is available – when available, emails can also be sent to other (one off) email addresses using the Alternate email address line.
Relais: Where the ILL will be sent to a Relais XML web service provided by this Organisation for automatic creation of an ILL request in a Relais ILL system.
RefTracker to RefTracker: – Where the Redirect will be sent to a RefTracker to RefTracker XML web service provided by this Organisation for automatic creation of a RefTracker request in that system.
URL: Where the Supplier will be contacted outside of RefTracker. recording the URL for their service here can make accessing the service easier.
Other: This allows other information about the Supplier to be recorded, that might be useful in explaining why this Organisation might be used.
Address/Access information: enter the contact details for this type of contact to this Organisation
- email address for this organisation or individual – RefTracker will be able to use this information to send an email to this Supplier
- URL of the Relais web service via which this Organisation accepts questions using the Relais XML web services format, normally in the format http://<organisationDomain><:80>/<webServicesSystem>/AddRequest. RefTracker will be able to use this information to send an email to this Supplier. See the following section for further important information about the Relais interface mapping that is used to make this interface work.
- URL of the RefTracker to RefTracker web service via which this Organisation accepts questions using the RefTracker XML web services format, normally in the format http://<organisationDomain>. For example http://playground.altarama.com for the Altarama system provided for customers to try things in. See the following section for further important information about the RefTracker to RefTracker service that is used to make this interface work. We highly recommend that for every organisation that you set up as RefTracker to RefTracker type, you should also set up parameter 9.10 for that organisation, so that questions can be transferred back to you from this organisation, if necessary.
- URL of a supplier that will be used outside of RefTracker to supply an item
- Other information that might be useful in determining which Organisation code table entry to be selected in the ILL/Doc del screen.
Organisation: enter the name of the organisation or individual (max 100 characters – which could allow for some description of primary reason for using this Third party or Supplier).
Exercise:
Enter the names and contact types and contact details for Organisations that you use regularly for referrals, re-directs, and ILL’s. Usually this will be done as you find new organisations that you can send third party requests to.
More information about using the Relais interface
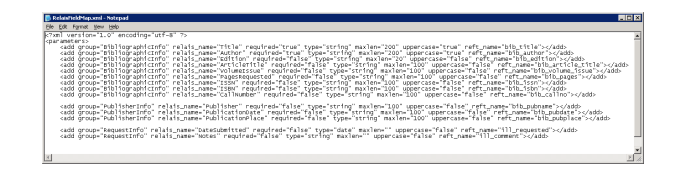
The Relais interface is a web service that accepts an XML file which is formatted from the information stored in RefTracker about the question for which the ILL request is being sent. The schema for this service is provided at reftracker/config/exchange/relais/schema/addrequest.xml The data in RefTracker is mapped to the Relais service using the information in the file reftracker/config/exchange/relais/settings/fieldmap.xml This file maps the RefTracker fields to the Relais supported fields using the RefTracker data dictionary variable names. You should not need to amend this file, however you can do so by using the RefTracker file upload/download function available under System>Utilities>Administration utilities to download it, edit it using Notepad, and then upload the modified file to the same place. Ask your RefTracker or Relais supplier for help if you need to modify this file.
More information about sending requests to Relais ILL systems is provided in the “Sending ILL requests to Relais ILL systems” section of the ILL/Document delivery workflow page in the Staff manual.
More information about using the RefTracker to RefTracker interface
Some questions coming into your organisation may be better answered by another organisation that also uses RefTracker, or through a separate RefTracker system that you use. When that is the case you can pass the question between your system, and that other system, by using the RefTracker to RefTracker Redirect function, sometime known as “R2R”.
The process uses The RefTracker API addquestion web service and passes the information in an XML format that allows the receiving system to recognise any information that is held in a compatible format, so that it is mapped to the same fields. Where information cannot be automatically mapped, it is still passed to the receiving system, but arrives, with the label from the sending system, in a field specifically designed to contain information specific to the sending system. For information about how to set up the RefTracker to RefTracker function and its mappings see the setup information in this help page.
The question is created using the “RefTracker to RefTracker” request form, so it is important to check that the RefTracker to RefTracker form is set to create a question with an appropriate Target date and with appropriate allocation. How you set up this form creates a starting point for these questions. It is most likely that after examining the Correspondence and Details tabs for a question newly arrived from another RefTracker system, the first thing that a staff member will do, is to use the Change screen to adjust the fields and attributes of that question – perhaps even the form that is used with it. You can force this review process by including a mandatory field in your RefTracker to RefTracker form, that will not be filled by the RefTracker to RefTracker import process. Whenever a question is created by an import process and not all mandatory fields are filled, the question is placed in “Incomplete” status, and anyone accessing the question will be automatically taken to the Change screen where a validation message will highlight the missing information. The question can be worked on, to obtain the missing information (such as by sending a Query to client) but each time a staff member works on the question they will be taken to the Change screen and so reminded that the additional information still needs to be obtained.
You control the Organisations to which you will be able to send questions in this way by adding them to your Organisation code table. You control the Organisations who can send questions to you by adding their domain to parameter 9.10. We highly recommend that ALL organisations that you add into this code table for the RefTracker to RefTracker transfer method should ALSO be added at parameter 9.10 so that questions you transfer to the organisation can be transferred back to you when necessary. If you will be regularly sending information then co-operation in terms of consistent use of fields used for saving question data in forms, will result in better mapping results.
The data that you will accept via RefTracker to RefTracker question transfers is defined by the sendfilter.xml, receivefilter.xml and systemfilter.xml files in the reftracker/config/exchange/reftracker/settings directory
It is unlikely that you will need to change anything in these files.
More information about sending requests to other RefTracker systems using the RefTracker to RefTracker web service is provided in the “Redirecting questions to other RefTracker systems” section of the Redirect page of the Staff manual.
Email templates
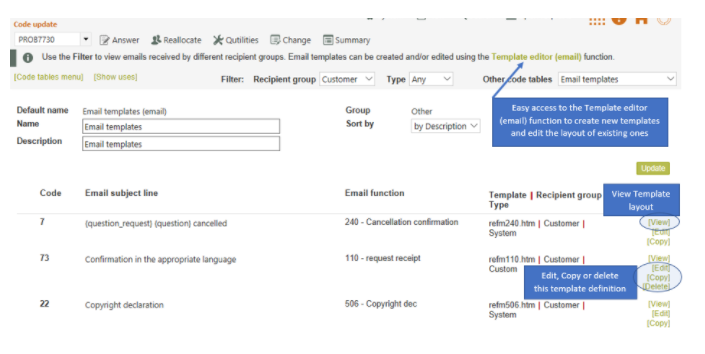
The Email templates code table provides definitions for all of the email templates known to your RefTracker system. Every template must have a definition in order to provide the Subject line it will use, and to set its purpose, so every email template used by RefTracker appears in this page. So, the Email templates code table is a good place to come to find the filename for a template that you are looking to edit. Find the template that you want to modify by matching its subject line to those shown here, or by finding the appropriate Email function.
Definitions provided by RefTracker are called Master definitions and those created by you are called Custom definitions.
As there are so many email templates, they can be viewed by their “Recipient Group”. The Groups are Client, Internal, Staff and Third party representing the party who will receive that email template. Usually only Client and Third party templates go outside your organisation and so they are usually the only ones that your organisation will want to change.
NOTE that the system remembers the Recipient group that you last selected, so always be sure that the right Recipient group (or “Any” to see all templates) is selected, when you enter this screen.
If you are not seeing the template you want, try another Recipient group, or Any to see them all.

The Email templates code table allows you to view the template and edit its definition. To change the layout of a template you need to go to System>Utilities>Administration utilities>Template editor (email).
There is more information about email templates and how to edit them at Customising the email templates and Qprint templates.
In the System>Request forms>Options function screen for each Request form, you can define specific email templates to be used in relation to questions arriving using that Request form (i.e. for specific types of questions coming into your system). New templates must be added to this Email template code table, before they can be used in Request forms.
Your system is distributed with a one email template for every purpose in RefTracker.
In this page you can View a copy of the template referred to by the definition, Edit the definition, Copy the definition to create a new custom one, and Delete custom definitions. To add a new template, you need to copy a template of the type you want to create and then edit it to meet our needs.
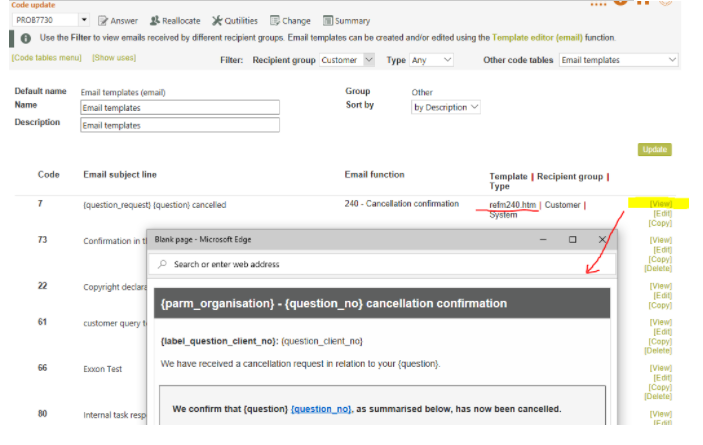
View the template
If you click the [View] option of a definition in this page, you will be shown a copy of the template that the definition refers to. This is a view of the html file referred to by this definition. The name of that file is shown as the Template information provided in the definition – refm240.htm in the example shown below.
All email templates can be edited. To edit an email template go to System>Utilities>Administration utilities>Template editor (email) and edit the template with the Template file name that you want to edit.
Edit the template definition
Click the [Edit] option to change the definition. Where the definition is a Master definition, only the Subject line can be changed.
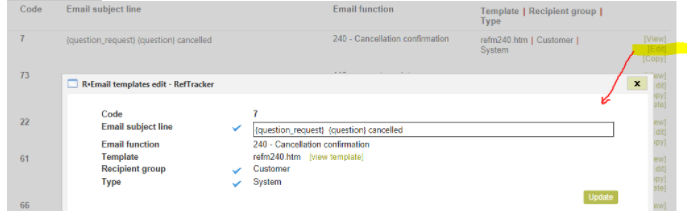
Email subject line: The Email subject line defined in this code table definition will be presented to the recipient in the format {question number}\{Client Ref#}\{transcript #} {subject line}, where subject line is the text set in the Subject line with all variables substituted for the current question, for example “Question #RT2230\M1234 New book request cancelled”
The subject line will be cropped after 78 characters as this is the maximum that can be correctly handled by some email systems (longer subject lines run the risk of being classified as junk mail).
Note that RefTracker variables (as defined in the Data Dictionary) can be used in the subject line as shown by the use of the {question_request} variable in the screen print above ({question_request} inserts the Request type of the question to which this email refers).
When an email is imported into RefTracker the Subject line of that email is imported into a separate field (Called “Subject line” with variable name {question_subject}). The RefTracker Question field is populated by the Body of imported emails.
This means that the client’s Subject line is available for use in the RefTracker Email subject line definition by including its variable {question_subject} in the email template’s Email subject line definition. For example the Subject line for a response from RefTracker, with Email subject line definition of “Response – {question_subject}”, might be
ASK1234 Response – Subscription request
Where the subject of the client’s email was “Subscription request”
Note that the standard for Subject line maximum length is 78 characters so the client’s Subject may be truncated in the Subject line as it needs to be preceded by the RefTracker Question number and Reference number if one exists.
If the email template is a custom template, you can also change the Email function and the Template (file name).
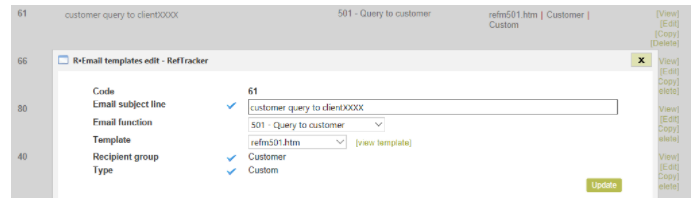
Email function: This is the function that this template will perform in RefTracker. When adding a new template you need to associate the correct function – for example, if you are adding a new answer email template select “500 – Question response” here.
Template file name: This is the name of the file that is this email template. It is the filename to edit (using System>Utilities>Administration utilities>Template editor (email) if you need changes in the layout of this template.
If you have created a new template using the Template editor (email) function, the name you gave the file will be appearing in alphabetical order in this field, when you drop it down.
Copy the template definition (to create a new template definition)
Create a new template definition by copying one that is similar to what you want (has the same Email function). You must copy one with the right Recipient group as Recipient group cannot be changed, so its a good idea to select the right Recipient group using the filter at the top of the page, so that only definitions of the right type are showing, before selecting the one you want to copy.
Click Copy and then edit the Email subject line, Email functions and Template to meet your needs.
NOTE that the email template file that you want to use must already exist before you create the definition for it. So the process for creating a new template is:
- Create the template. See the Customising the email templates and Qprint templates section of this manual for information about how you can amend the layouts of email template files. Whenever a new template is added to the reftracker/templates/email/local directory using the System>Utilities>Administration utilities>Template editor (email) function it automatically appears in this drop down list in this code table so that it can be selected and added to this code table. The name of your new template must start with “refmu” in order to identify it as a user defined email template, but “refmu” can be followed by anything, eg “refmu110ITconfirmation.htm”. Use the Template editor (email) hyperlink in the
 section of this screen for easy access to the email template editor.
 - In RefTracker, go to System>Code tables>Other>Email templates
- Find the master template for the template for which you are creating a customer template, and click [Copy].
- On the “Email subject line” line, define the text to appear in the Subject line when your Custom template is used. RefTracker variables (as defined in the Data Dictionary) can be used in the subject line e.g. {question_request} inserts the Request type of the question to which this email refers. Where a variable will not always have a value, surround it with RefTracker delimiters to ensure nothing gets included when it has no value e.g.

- In the “Email function” line choose the function that this template will be used with (for example, “110 – Question receipt” if the confirmation email sent to clients).
In the “Template name” column select the template that you created, from the drop down list – the list is created by showing all of the files in the reftracker/templates/email/local directory that start with “refm”, so, once you have loaded your new template, it will appear in this list the very next time you visit this screen. - Then click on Update. Your new template is now ready for linking into the appropriate Request form.
Delete the template definition
Use the [Delete] option if you need to delete a Custom template definition. Master template definitions cannot be deleted.
Print templates
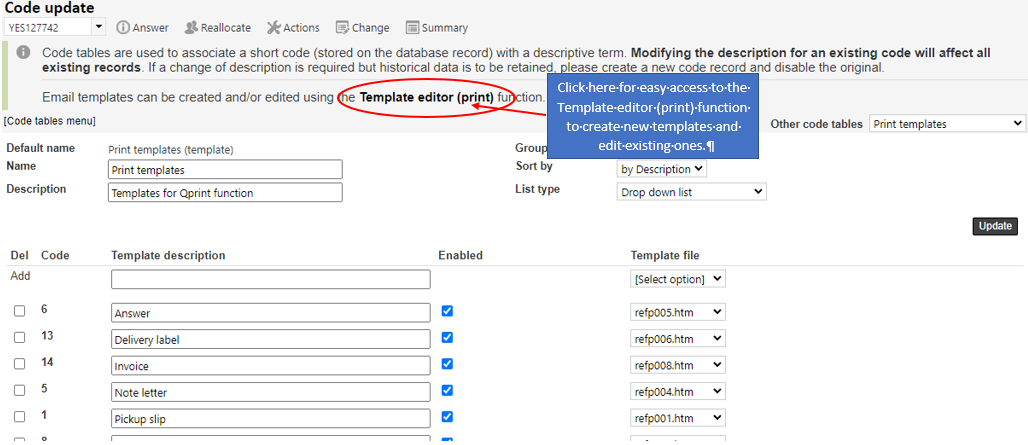
The Print templates code table provides the information used to create the Qprint dropdown list. Qprint allows information about the current question to be printed in library defined formats, for example, Pickup slip, answer letter and staff worksheet.
Later in this manual we cover how to create additional Print templates and amend the example ones provided with your system. The Qprint templates code table is where you tell RefTracker which of the available templates you want accessible in your system, and what they will be called. You must have placed your new template into your reftracker/templates/print/local directory before you can add it to your system using this Print template code table. The name of your new template must start with refp in order to identify it as an email template, but “refp” can be followed by anything, e.g. “refpInvoice.htm”.
Template description: enter the name that you want staff to be able to recognise the layout produced by the template referred to by this entry.
Enable: templates ticked in this column are available for use in Qprint. Those unticked are disable and so not in current use. You can delete templates from this list, but it is probably best to simply disable them, so they can be reinstated if ever needed later.
*_Template file:_* this is the name of the file containing the print template in the reftracker/templates/print directory. Whenever a new template is added to the reftracker/templates/print/local directory using the System>Utilities>Administration utilities>Template editor (print) function it automatically appears in this drop down list so that it can be selected and added to this code table.
To add an entry to the print templates code table:
- Create the template. See the customisation section later in this manual for information about how you can amend the layouts of these email templates. Whenever a new template is added to the reftracker/templates/email/local directory using the System>Utilities>Administration utilities>Template editor (print) function it automatically appears in this drop down list in this code table so that it can be selected and added to this code table. The name of your new template must start with “refmu” in order to identify it as a user defined email template, but “refmu” can be followed by anything, e.g. “refmu110ITconfirmation.htm”.Use the Template editor (print) hyperlink in the section of this screen for easy access to the email template editor.
- In RefTracker, go to System>Code tables>Other>Print templates
- In the Add line
– give your print template a sensible name – this is the name that will appear in the Qprint drop down list
– In the “Template name” column select the template that you created from the drop down list – the list is created by showing all of the files in the reftracker/templates/print/local directory that start with “refp”, so, once you have loaded your new template, it will appear in this list the very next time you visit this screen. - Then click on Update. Your new template is now ready for use in Qprint.
Exercise:
Investigate the templates currently available in your system. Disable any templates that produce prints that are not applicable to your library. Think about any other print layouts that your library might find useful, and any changes to the existing layouts that might make these prints more useful for your library, and make a note about the need to make these improvements when you get to the email template editing part of this manual (later in this document).
Note that templates only print the information available in the current question, so, an address label print may appear to be empty, if you have chosen to use it with a question that has no address information stored for it.
QuickText and QuickText groups code tables
The QuickText and QuickText groups code tables work together to provide the RefTracker QuickText function. They provide standard clauses that can be inserted into RefTracker work with just a couple of clicks, saving time and ensuring that staff use the same terminology for specific situations.
If appropriate to your workload, you can provide a vast array of QuickText that provides standard responses, or part responses, that your staff can use to build appropriate responses. Customers who do this, often have hundreds of QuickText causes, carefully presented in groups and in a specified sort order to make it easy to find the right clause to construct a response from.
For example: Separate QuickText is provided for each action box in RefTracker except that the Answer and Partial answer boxes show the same “Answer” QuickText. This is because the same QuickText is often used when providing Answers and Partial answers. Making the same QuickText available in both these locations makes using and maintaining this QuickText easier as it only needs to be maintained in one place.
If you have some text that is only used for Partial answers you can use one of the following techniques to make it easy to find:
- Provide separate QuickText groups for Answer and Partial answer and put the ones that are specific to Partial answer only in the Partial answer group and those applicable to both in the Answer group.
- Give the ones that are only applicable to Partial answer a shortname that includes a word like “partial”, and grouped them together using the Sort key, so they are clearly indicated. This will also allow them to be easily found using the word search mechanism in the QuickText screen by searching for “partial”.
For details of how to use the QuickText function go to the QuickText page in the Staff manual. This section is about how to set up your standard clauses.
The QuickText groups code table:
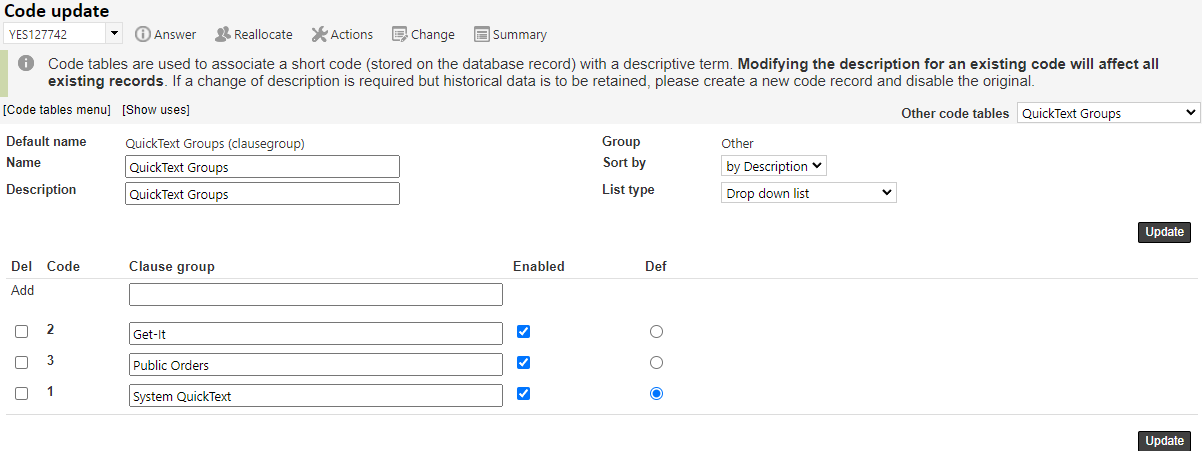
The QuickText group code table allows you to organise your QuickText into logical groups according to the types of work that your staff will be doing. QuickText Groups ensure that all the QuickText for a particular type of work appears together. You only need to set up QuickText groups if you have a lot of QuickText and want to organise it so that all the QuickText for a particular type of work appears together. If this table only contains the System QuickText entry, then no group options will be displayed in QuickText in your system.
However, even if you only have a small amount of QuickText, we recommend you consider at least one separate group for your Answer QuickText, to separate it form the System supplied QuickText which will be less relevant.
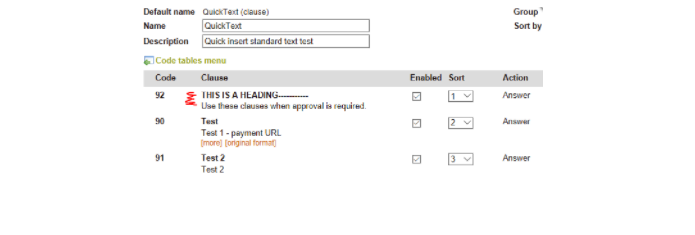
When creating your clauses within these groups you can effectively create subgroups by creating clauses that are just for the purpose of providing headings within those groups. Here’s an example where the heading is provided by the shortname for the clause and the purpose of this sub-group of QuickText is provided by the text of the clause.
The QuickText code table:
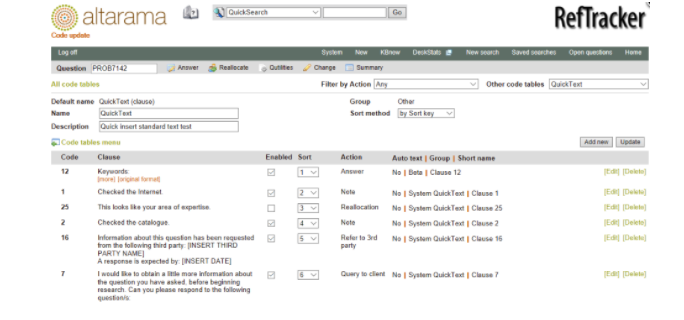
The QuickText code table uses an Advanced code table structure that is different to most other code tables.
To edit an entry click its [Edit] link to the right of that entry or double click in the grey area that appears when you cursor over the text in the Clause column. A subwindow will then display that allows all attributes of that QuickText entry to be changed.
Importantly this subwindow editing function provides all of the word processing like editing features available elsewhere in RefTracker, providing flexible options for formatting your QuickText, such as bolding and even inclusion of images like logo’s, and hyperlinks to attachments.
The details provided below about adding an entry are also applicable to editing an entry.
To delete an entry click its associated [Delete] link. A confirmation popup will display.

Click “Yes” in the popup to confirm you want that entry deleted, and that QuickText entry will be gone.
To change the sort order of your QuickText entries, select the “Sort method” that you want and click the “Update” button. If you have selected Sort key, a Sort column will appear. To change the position of an entry, change its number on the Sort column to the position where you want the entry to appear and click the Update button (e.g. choosing 6 will make that entry the 6th in the list.
You can also sort by Code (the order in which the clauses were added to this code table), and Shortname so it is important to provide good shortnames. Sorting by description is not available in this code table as sorting on the clauses themselves does not provide a useful sort order.
Staff operators can view QuickText clauses by the sort order that you set in this code table (usually used where QuickText is heavily used), or by the clauses that they use most commonly (usually used when there are only a small number of QuickText clauses). They can even search for the right QuickText clause.
A sort filter on the top line of the QuickText code table page, allows you to view your QuickText by a specific Action – in other words you can use this tool to see and edit just the QuickText that will display to staff for a particular QuickText Action, such as all the QuickText for the Draft answer box/action. Just select the function for which you want to see all the QuickText entries and the page will redisplay with just that type of QuickText.
NOTE that the system remembers the Action filter that you last selected, so always be sure that the right Action filter (or “Any” to see all QuickText) is selected.
To add a new Quick text entry click the “Add new” button. See details below about how to fill out the fields in this sub-window that then displays.
Adding a new QuickText entry (or editing it)
You can set up an unlimited number of QuickText entries for each QuickText enabled field, with the ability to associate them with groups, so that no matter how many you add they can still be used efficiently by staff.
QuickText entries can be up to 2 million characters in length, so it is possible to insert whole standard documents in this way! The length of a QuickText entry does not effect the number of entries that can be effectively used because only the first parameter 3.5 line (hard returns) of each QuickText item are shown in the QuickText subwindow – which means even long entries can be included efficiently.
The QuickText editing subwindow that displays when you click “Add new” or [Edit] looks like this:
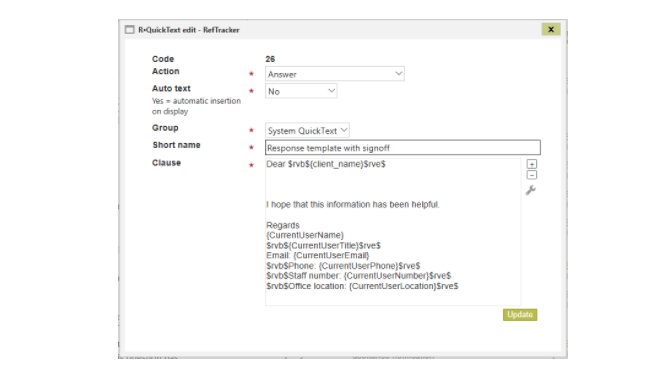
Here are the details of how to use each field –
Code: A system code that is unique to each QuickText clause. It is not changeable.
Action: Each QuickText enabled field is listed in this drop down box, so choose the Workflow field where you want this text to be able to be used. The action name is indicative of the RefTracker page/workflow and field where it is used e.g. Answer is the Answer box in the Answer screen; Question is the Question field in new forms; Query to client is the Query to client box in the Answer screen, Request text is the Request/Question field in the New question or Internal task function, etc.
Auto Text: Choose Yes to have the text in the Description field automatically inserted in the Action field (this can be a good efficiency feature – for example, an entry like “Can you take this over please.” Auto inserted in the Reallocate Action will save your staff from having to enter anything in the instructions field unless they specifically need to provide more details). Note that only the first entry for each Action that is marked Auto Yes, will be Auto inserted. All entries (both Auto Yes and No) appear in the QuickText window when a librarian double clicks in the QuickText enabled field. Even when an QuickText Auto entry has been automatically inserted in a field, other entries can be accessed by clicking the QuickText icon or using CTRL/ALT/Q.
Group: This is the QuickText group to which this QuickText belongs. The group selected here determines the group that this entry wil be displayed in, in the QuickText selection screen. Groups help to collect QuickText by topic or team that uses it. See the information above about QuickText groups and about how they are used with QuickText here.
Short name: A short description of the purpose of this QuickText entry, that will allow the right entry to be easily selected in the QuickText sub window. It should describe what the clause should be used for (maximum 100 characters). If you have a number of clauses that are designed to be used sequentially to construct a response it is a good idea to give the the same name followed by a number or additional clause to describe the order or use so they sort alphabetically in the right order, or be sure to use the “Sort order” sort method for this code table. You can have more than one clause with the same shortname.
The short name is included in the QuickText search function so a helpful short name can help the clause to be found by searching, not just visually.
Clause: Use this field to define the text to be automatically inserted. The text you define here, together with the clause’s short name are what is searched by the QuickText search function.
Note 1. To ensure font sizes are all the same, use the “Paste plain text” button when pasting text into this field.
Note 2. You can use the Enter key in this field to indicate a forced new line. When appropriate, use new lines at the end of your QuickText to have the clause inserted as a separate paragraph with the cursor positioned two lines down ready to start the next paragraph.
Note 3. This is a Format enabled field so when you click in the Clause field the editing buttons will display. If your formatting is not right, you can edit the HTML by clicking the “Spanner” icon to the right of the Clause field. Be sure to click the “keyboard” icon in the same place to save any HTML changes that you make.
Note 4. If you need to add an attachment to this clause you should do it by loading the attachment to a RefTracker question (you can create one question marked “DO NOT DELETE” specifically to hold these attachments), then right clicking on that attachment to copy its permanent link. Then paste that link into your QuickText entry.
Note 5. You can use RefTracker variables in your QuickText entries. As the QuickText entry is inserted, the value for that particular question for the variable you define will be substituted, allowing the QuickText to be personalised to the client or customised to suit each specific question. The variables you can use are defined in the Variable column of the System>Data dictionary screens, and RefTracker delimiters can be used with them. For example, you could include variables like {question_no} that will insert the Question number for that question, or a delimited variable like $rvb${client_name}$rve$ that will insert the client’s name, if it has been collected for this question, else nothing will be inserted. The variables in the staff Data dictionary table will refer to the staff member currently assigned this question.
Importantly, variables have been provided specifically so that details of the logged on staff member can be automatically inserted using QuickText. As questions are not always allocated when QuickText is used, we provide some special {CurrentUser*} variables for use in this scenario. See the next point for details.
Here is an example QuickText entry that uses these variables:
Dear $rvb${client_name}$rve$
I hope that this information has been helpful.
Regards
{CurrentUserName}
{CurrentUserEmail}
$rvb${CurrentUserPhone}$rve$
$rvb${CurrentUserTitle}$rve$
If you ALWAYS use signoff’s, a better way to implement them is to include the signoff details in the email template. Ask your RefTracker support representative for help if you need help with how best to implement signoff’s for your service. More information is provided about variables and delimiters in Customising email header, footer and signoff later in this manual.
You can use RefTracker variables in QuickText and email templates. Click here for information about using variables for changing terminology and utilising values stored in RefTracker.
Exercise:
Decide on the standard text that should be made available for each of the QuickText enabled fields, and enter it in this code table. Often the best approach is to make some obvious changes to the distributed examples at system setup time, and then wait for staff suggestions about what would make useful QuickText entries!
International currency codes code table
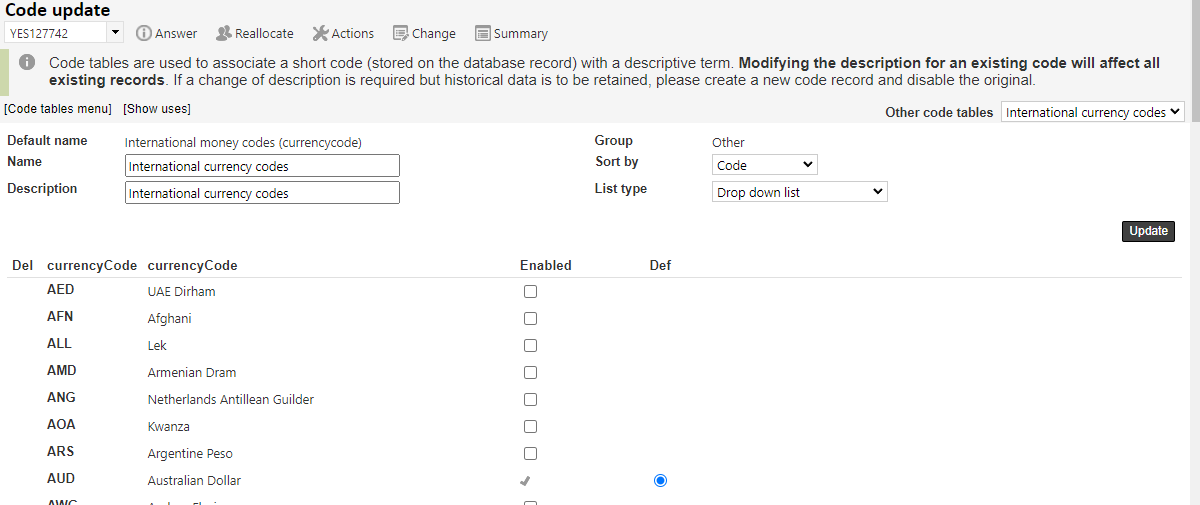
The International currency codes code table allows you to enable the International currencies that will be used in your system to record costs. For this code table to be effective, the Cost type code table must be enabled.
If you are going to record costs in your system in more than one currency, you will have to set up this code table by enabling all of the currencies that costs might need to be recorded in, and setting the most common currency as the default. Note that each individual staff member will be able to choose what their own default currency will be, using My preferences.
When setting up a new system, enable the additional currency/ies that you need, then change each staff user’s signon to the relevant currency, then disable any currencies you are not going to use and set the default currency to the most commonly used currency. You cannot disable a Currency that is in use in a staff signon.
If you only have one currency enabled in your system then your staff will never be asked to select a currency, but if you have more than one currency enabled, users will be able to select a currency when they enter costs (the default currency that they see at these places is the one selected for each user in their signon/My preferences). Even if you only operate in one country you may need to enable other currencies if you are being billed in other currencies for some of your research costs.
If a list of journal entries is all in the one currency, RefTracker will total the entries and show them with the appropriate currency code. If a list of journal entries includes entries that involve different currencies, RefTracker indicates the total as ” –.-” (such as is the Journal tab of the Summary screen), as the systems does not have any currency conversion rates.
Exercise:
If costs will be collected in your RefTracker system, ensure that this code table has all of the currencies enabled that costs might need to be recorded in.