Question answering code tables
The following code tables are used in answering questions. Each is described in detail later in this section:
Billing rate
Category
Cost type
DeskStats duration
Evaluation rating
Expertise
ILL Request level
Payment type
Progress
Resources
Review period
Service type
Specialty
Status
Status group
Time type
Billing rate
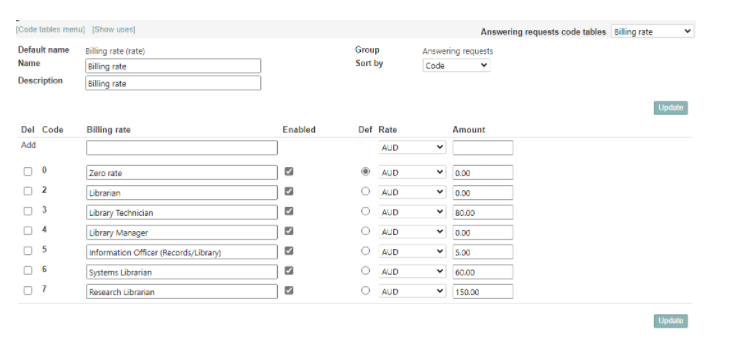
The Billing rate code table is used to set each type of staff member’s charge out rate, so that RefTracker can calculate the cost of librarian time spent on answering questions. Billing rates are associated with staff by selecting the appropriate rate in each user’s signon. If you use more than one International currency code, this screen will allow you to associate the appropriate International currency code with each entry in this code table.
A Function can be used to Deny the staff member the ability to change their billing rate themselves. A fuller discussion of RefTracker’s ability to calculate the cost of staff time spent answering questions, and how to set it up, has been provided at Cost of librarian time spent answering questions.
If you do not need to know the cost of librarian time spent on answering questions, this code table should contain just one entry – the zero rate, or the Billing rate code table should be disabled.
If your library does want to know the cost of librarian time spent on answering questions, the different charge out rates for each of your staff members should appear in the Amount column of this code table together with an appropriate description of those rates in the Billing rate column.
Decimal parts of an amount of money are indicated by “.” – using the number pad on your keyboard will make entering costs easy – only numerals and the point (.) character can be entered in the “Cost incurred” field.
If more than one currency is enabled in your system, you will be able to select the currency for the entry you are adding from a drop own list of the enabled currency codes.
Note that this table operates system wide so if you operate in different countries you need to think about where the reporting will be done. If you report locally you should have rates for each of your countries in their own currencies in this code table. If you report globally, then you should standardise on the currency of the reporting location and enter all rates in this code table in that currency.
Exercise:
Think about the billing rates used by your library and amend the Billing rate code table to reflect your requirements.
Category
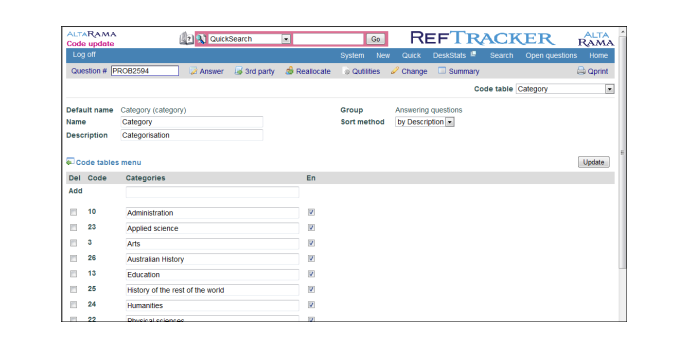
The Category code table determines the values that will appear in the drop down box for Category in the Closing confirmation screen. The Category drop down box is a multi-select box which means that staff can select more than one value from the drop down list, by holding down the Ctrl key whilst they make their suggestions. Category is used to attach classifications to the question as it is being closed such as a subject or an authority search term. The Category classifications can be used for searching and for statistical purposes.
As Category works via a drop down list it cannot be used to hold the entire authority file from a library management system, but it can be successfully used to manage up to a hundred or so classifications.
Notes:1. You can change the name of this code table (and hence the label that appears next to it in the Question closing confirmation screens), by changing its name in the Processing options section of this screen.2. You can set this code table to Mandatory, Optional or Disabled in the Code table summary screen, according to how you want to use this code table. Disable completely removes the ability to select from this code table, from the question closing processes in the Answer, Quick and Third party screens. Optional makes its use in these screens optional.
Mandatory, means that at least one value must be selected from the drop down list created by this code table every time you close a question using the Answer, Quick or Third party screens.
Exercise:
Think about the concept of Categorisation. If you want to use it in your library set this code table to Optional or Mandatory as appropriate to your use of it and put the values that you want to use, in this Category code table.
Cost type
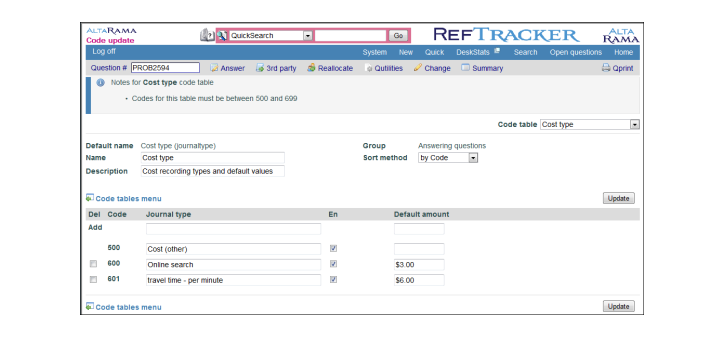
The Cost types code table allows costs that are regularly incurred by your library to be defined for easy reuse in the Record costs screen and in the Journal entry batch load process. If you use more than one International currency code, this screen will allow you to associate the appropriate International currency code with each entry in this code table.
If you disable this code table the Record costs screen will disappear from the Actions screen.
If you want to record costs, but not allow certain staff to see the costs that have been recorded, you can do that by Denying those staff access to the View cost (others function) in the Functions tab of that user’s signon.
Collecting costs incurred in developing responses
Costs can be incurred in a number of ways as you develop responses to requests. RefTracker allows to you collect these costs so that they can be used for billing, or simply for measuring the costs of services provided so that users can judge their cost effectiveness.
If you do not want to collect costs in RefTracker, disable the Cost type code table.
If you do want to record costs in RefTracker:
- Ensure that you have entries for regularly incurred costs, in your Cost type code table. These entries are used by staff in the Record costs screen to enter regular and ad hoc costs incurred for each question.
- Set up the Billing rate code table with your staff’s hourly rates, and ensure that every staff member has the appropriate Billing rate selected in their user signon/My preferences. These Billing rates are used to multiply time spent in a question by that user’s billing rate so that a cost for that user’s work is added to the costs incurred for that question.
- Costs can also be entered using the System>Batch process menu>Data import/export>Time and cost journal entry import. This process imports time used and cost incurred in relation to specific RefTracker questions, provided by online database vendors in COUNT compliant reports.
- Costs incurred display in the Summary screen Journal tab of each question. The total costs incurred for the question show at the top of the Journal tab and in the Details screen (as long as they have all been recorded in the one currency).
- Costs can be entered in multiple currencies if the applicable currencies have been enabled in the International currency codes code table. Each individual staff member can set their most commonly uses Currency in their My preferences.
Costs incurred in RefTracker can be billed using:
- the one off invoice template provided by the RefTracker Qprint function
- the System>Batch process menu>Data import/export>Data export “Staff time journals since last run” routine, or your organisation’s customised version of this routine, that takes the cost information recorded in RefTracker and creates an XML formatted file that is suitable for transfer to your time recording or billing system.
Exercise:
If you want to record costs, think about the costs that are regularly incurred by your library and create entries for each of them in this code table.Have you set up the Billing rate code table?Do you need to enter costs in multiple currencies, of so you will need to set up the International currencies code table and get your staff to choose their most commonly used currency in their My preferences.
DeskStats duration code table
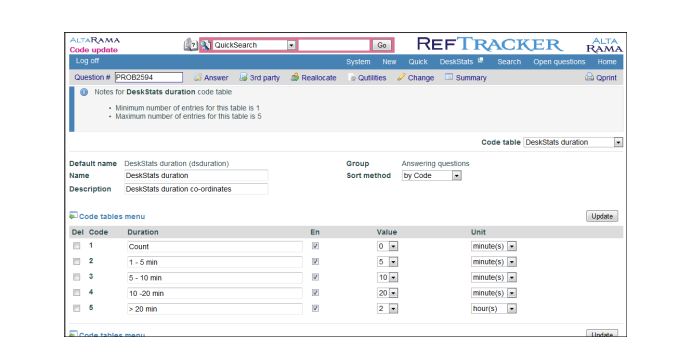
The DeskStats duration code table determines time periods that will appear in the data entry grid of the DeskStats screen. The DeskStats screen allows information to be recorded about the time taken to deliver answers to short service reference questions – i.e. those questions that do not require follow up work – are completed “on the spot”. In this way statistics can be obtained about the amount of time being taken to answer “on the spot” questions.
You may have a minimum of 1 and a maximum of 5 entries in this table. The DeskStats screen will always show five columns but if you define less than five entries in this table, then the columns you do not define will be set as inactive in the DeskStats screen, which means that they cannot be clicked by mistake!
For the columns you want to use in the DeskStats screen enter a Description of the time period to be used as a column heading, and for each entry select a Qty and Period to be used as the average time taken to answer a question entered in this column. For example for a column described as “10-20 min” you might select a Qty of “15” and a period of “minutes”. RefTracker automatically multiplies the number of services recorded in DeskStats by the value and unit you select and stores it in minutes in a “Time used” column in the record of that transaction so that the total time spent delivering services recorded in DeskStats can be easily calculated. It also multiplies the time used by the staff billing rate for the signon that recorded the service and stores that in “Costs incurred” column in the record of that transaction so that the cost at the time the service was provided is saved.
To use DeskStats to count instances of a service, such as door counts or counts of photocopies provided, set a Duration description to “Count” with its Value set to “0” and Unit set to “Minutes”. Because you have set the multiplication factor to zero, values entered in this “Count” column will not have values calculated for Time used or Cost incurred, ensuring that these counts are correctly handled differently to normal DeskStats.
Exercise:
Think about the duration periods best suited to covering the time that your staff spend on services completed “on the spot” and amend the DeskStats duration code table to reflect them.
Evaluation rating
The Evaluation rating code table controls the evaluation choices that a client can made if client evaluation is included in the response email. See the Other options tab, Edit options mode, of the each Request form. All forms use the values set in this code table.
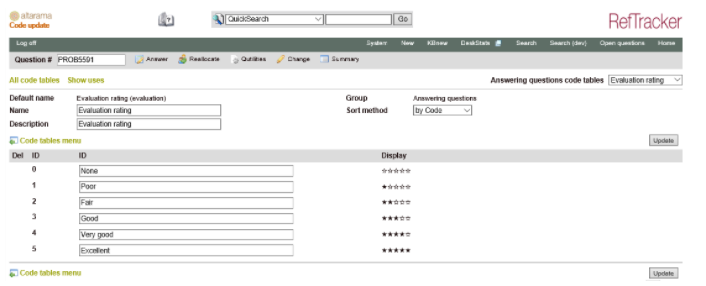
There must be six entries in this code table, with None being the value recorded when no rating has been received. The descriptions must reflect the increasing star ratings, but you can make terminology changes like changing “Excellent” to “Awesome”, for example.
The colour in which these options appear in the Response email is controlled by the email.css file in the css colour set directory you are using.
Because this function is based on a code table it is easy to obtain Evaluation rating statistics – just choose Evaluation rating as the x or y axis for the report that you want – for example a Code table by code table report of Allocated staff vs Evaluation rating will give a good picture of client appreciation by staff member.
Note that clients can also add an Evaluation comment, which being textual cannot be reported on via the tabular reports – but, in the Data extract (reporting) report you will see the Evaluation rating and Evaluation comment in adjoining columns of the question that they refer to. Also Evaluation comments are immediately passed on by email to the staff member that you select in the Allow evaluation parameter of each Request form’s Edit options screen Other options tab, so that any necessary action can be carried out as a result of that comment.
Expertise code table
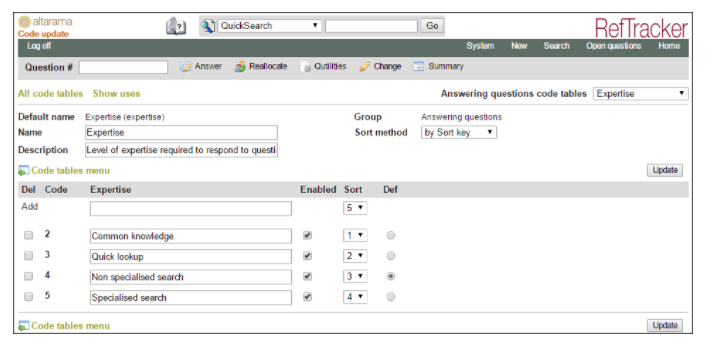
The Expertise code table determines the values that will appear in the drop down box for Expertise in the Closing confirmation screen. You can create as short or long a list as you require, but experience shows that a list of up to 20 entries works well. You can use whatever values you desire, but remember that the values you use will be the values upon which you can obtain statistical analysis about the level of staff expertise that was required to answer questions.
Some libraries use this field to indicate a level of difficulty in providing the answer which might be quite different to the level of expertise required to answer it, or the amount of time taken to answer it. You may wish to set the entries in this code table to reflect a READ scale, for example.
If you wish to use this field for a different purpose, you can change its name (and hence the label associated with it in the Question closing confirmation screen) by changing the Name field.
If your library does not want to use the Expertise concept, you can remove it from your RefTracker system, and hence from the Question closing confirmation screens (Answer, Quick and Third party), by disabling this code table in the Code table summary screen. If Expertise is important to your library, setting the Expertise code table to Mandatory in the Code table summary screen will force your staff to always select an entry from this table when closing questions.
Exercise:
Think about the expertise levels that your staff can apply to answering questions and whether you want statistics about the levels of staff required to answer your question workload. If not, do you want to apply this field to indicating the level of difficulty of the question? If you want to use either of these concepts, amend the Expertise table to reflect the staff levels you have. Then go to the Code table summary screen and set the Expertise code table to Optional or Mandatory. If you do not want to use this concept, go to the Code table summary screen and set the Expertise code table to Disabled – the Expertise drop down box will then be removed from the question closing screens (Answer, Quick and Third party).
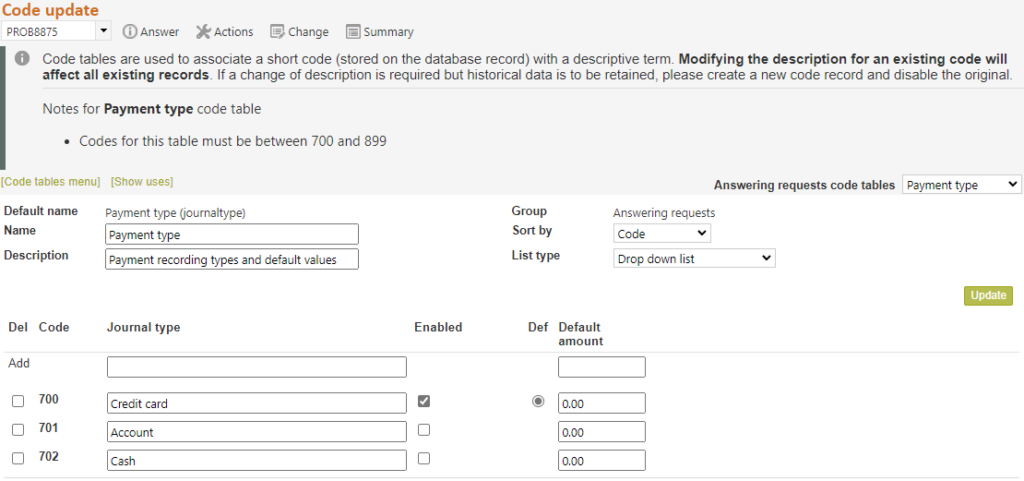
Payment type
This code table define the different ways that end users can pay for services.
ILL Request level
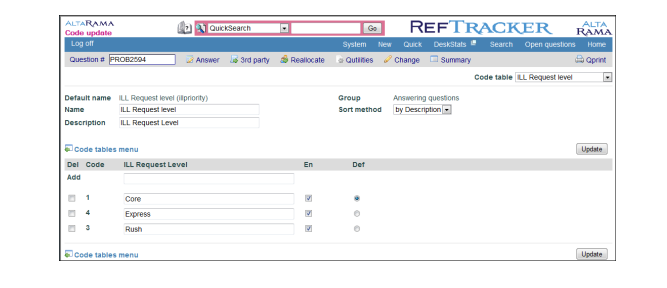
The ILL request level code table is used in Third party ILL order by email process to indicate the level of urgency of the ILL. You can create as short or long a list as you require, using whatever values you desire, but remember that the values you use will not only indicate urgency, but will allow you to obtain statistics on the level of urgency associated with your ILL requests processed through RefTracker.
If your library is not going to use the ILL request process in RefTracker there is no need for you to set this code table.
If you want to use the ILL request process but do not want your staff to be entering urgency information, you can Disable the ILL request level field in the ILL table of the Data Dictionary.
Exercise:
Think about the ILL request process and whether you want to use the ILL request level field. If yes, set up the values in this code table. If no, you may wish to Disable the ILL request level field in the ILL table of the data dictionary, but it is not essential to do so.
Progress code table
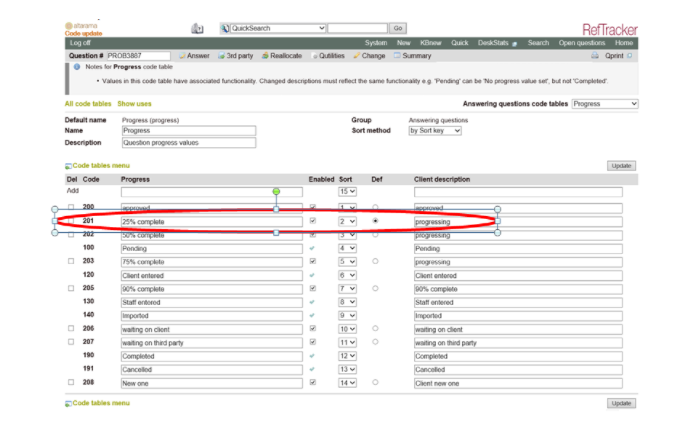
The Progress code table defines the values that librarians are able to use to indicate the level of progress that has been achieved on providing an answer to a question (using the How complete drop down box on the Answer screen, and other screens where it appears). Sometimes these statuses refer to internal steps that clients should not be able to see so this code table also allows an equivalent “Client description” to be provided, that clients can see as the second part of the status description provided in the client interface “Check on existing question” screen – so that the client may see something like “Progressing” when an internal only status like “Request denied” has been selected.
The default entry in this code table is the value that will be automatically assigned to a question when a staff member first works on that question – in other words the first level of progress made. Staff can, of course, choose other Progress values, both initially and as the response progresses. Because the Progress/How complete field that uses this code table is defaulted in this way, you will see that it is highlighted with the coloured tab to the left of the field, each time it occurs, in order to remind the staff member that they should review and update this value when appropriate.
You can have as many or as few of these Progress descriptions as you like. Some libraries like to use the concept of % complete, but other libraries prefer values like “Started, “Progressing”, “Almost complete”. You can even add values specific to the processes that go on in your library, e.g. “With the client”, “Awaiting delivery”, etc.!
The table includes some system entries that cannot be deleted, but can be renamed. If you are renaming any of these entries you must be careful to provide new names that reflect the original intention of these entries as RefTracker knows what these system statuses mean and uses them for appropriate functions.
When you add a new entry to this code table you need to add BOTH a “Progress” value and a “Client description” value. Set them to the same text unless there is a specific reason that clients should not see the new status you are adding.
For the circled entry above – the staff member sees:

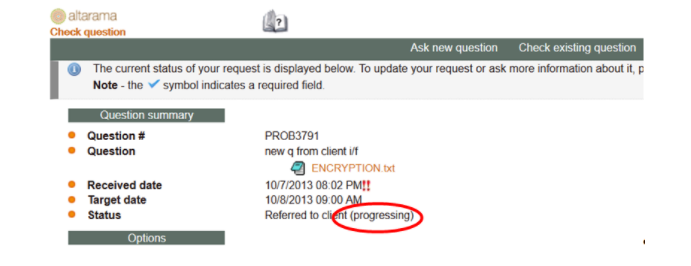
And the client sees:
Exercise:
Think about the progression statuses appropriate for your organisation and amend user defined entries in the Progress code table to reflect them. The default entry in this table will be the first value assigned to each question as work is first recorded in relation to this question.
Resources code table

The Resources code table determines the values that will appear in the Resources section of the DeskStats and Answer screens. It is normally used to allow staff to record the Resources that they found useful in providing the response, in order to be able to determine which Resources are worth renewing in future. Importantly it gives statistics about the Resources that were useful (as opposed to the statistics provided by the Resources themselves that just say how many times they were accessed (whether they were useful or not!).
You can decide not to use the Resources sections of these screens at all in your system by setting this code table to Disabled. Set it to Optional if you want to use this concept in either DeskStats, Internal tasks, or full Request service requests, or any combination of these. You could set it to Mandatory at this level, but choosing Optional at this level allows separate decisions about Mandatory to be made for each use.
After making a change to the availability of the Resources code table, a confirmation screen shows and in that screen you can choose to set its use in the DeskStats table to Mandatory, should you wish to ensure that staff ALWAYS include information about the Resources that they find useful in providing responses recorded via DeskStats.
The Question type column of this code table allows you to determine whether each entry will be available for use in requests, internal tasks, DeskStats or any combination of these.
Having no entries in this code table set to All or DeskStats will result in Resources disappearing from DeskStats for all your users.
Having no entries in this code table set to All or Internal tasks will result in Resources disappearing from DeskStats for all your users.
Having no entries in this code table set to All or Questions will result in Resources disappearing from the closing section of your Answering screens for all types of Requests.
As long as this code table is available and there are some entries in this table with Question type set to All or Requester service (requests), you can then decide, Request form by Request form, whether Resources should be Disabled, Optional or Mandatory for that form.
To set use of Resources for each Request form go to System>Request forms and then the Edit options screen for the particular form. In Edit options you can determine whether Resources should be Disabled, Optional, or Mandatory for that form. Note that if you choose to set Resources to Mandatory for any form staff will need to enter details of at least one Resource (which could be named “None applicable”) EVERY time they use the Answer screens with the form that you have specified as Resources Mandatory.
When the Request form for a question has Resources enabled an additional tab will appear in the Summary screen – the Resources tab – that summarises all the Resources used for that question. Organisations that record numbers in Resources entries, and those who use it as a record of “Places already looked” will find the Resources tab very useful . If you rename this code table to reflect your use of it, the Resources tab name will correspondingly change it name.
The entries in this code table can be generic resources (Such as “Online search”), or you can list specific resources individually (e.g. subscription databases where you want to check that their level of usage warrants their renewal cost).
Exercise:
Think about whether you want statistics about the effectiveness of specific resources in answering the questions submitted to your library, and if you do, set the values in this Resources code table to reflect the items on which you want statistics. When recording information about Resource usage your staff will be able to simply tick that a Resource was used, or provide a description of up to 2000 characters about its use.
Review period code table
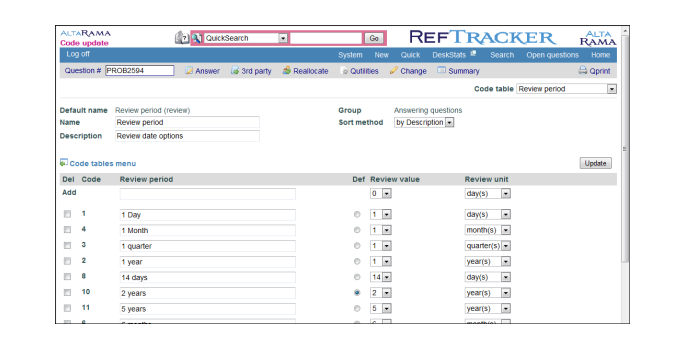
The Review period code table sets the knowledge database review periods that will be offered in the Question closing confirmation screen. These review periods will determine when the question in the knowledge database will be indicated to a system supervisor as needing review for continued relevancy or accuracy so that a decision can be made about updating the entry or removing it from the knowledge base.For each entry in this table a descriptive name and the length of time associated with it must be set. The length of time is set with a unit and a period e.g. 5 years or 30 minutes. NOTE that the unit value of zero (0) has the special meaning that the question is never to be indicated as due for review.
Exercise:
Think about the review periods that are appropriate for the sort of material that you will store in your knowledge database and amend the Review period table to reflect them.
For library’s doing their initial system set you should NOT presume the distribution values for this table are ideal. The distribution values have been designed to show you the range of values that can be achieved, rather than to provide sensible values for this table.
Service type
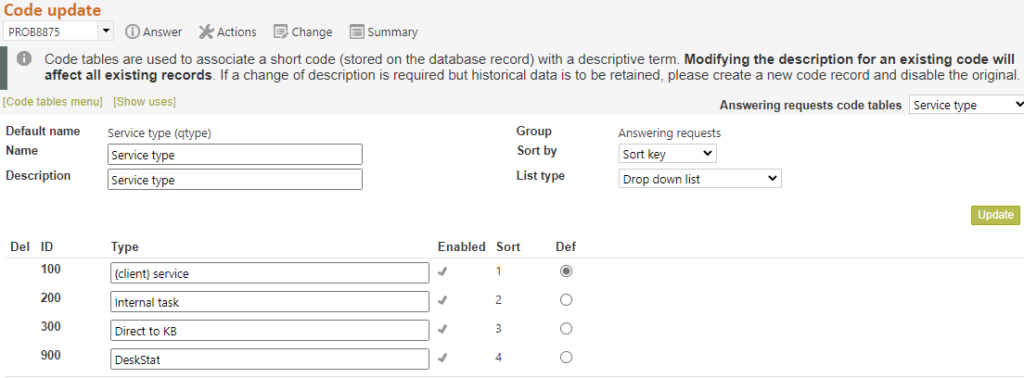
The Service type code table determined the names of the various types of work that can be handled by RefTracker. It allows separate statistics to be able to be generated for these different types of work – services provided for end users (Requester service); services performed in support of the services to end users but not for end users (Internal tasks); requests created for the purpose of the KB – not for end users (Direct to KB); and DeskStats services performed on the spot (usually for end users).
Specialty code table

The Specialty code table allows you to set possible staff specialisations/skills. The purpose of these specialties is to assist other staff in allocating questions to the most appropriate staff member when using the Re-allocation screen. Specialisations supplement the Request type associated with each staff member and so is usually used to refer to specialisations outside of the day to day activities covered by Request types. The values in this table are displayed on the Re-allocation screen as a visual cue only, they are not actually used by RefTracker as part of any automatic allocation procedures, so use of this table is optional. In fact, if this code table is Disabled, the Specialties column will disappear from the Reallocate screen, and the Specialties tab will disappear from My references and the user signon management screen, removing this concept from your system.
You can add a new specialty to this list, whenever you need to add a new staff member with skills that are not already on the list.
The default for this code table is Mandatory, but Optional will also enable for this code table.
Using Specialties for staff notes
Some customers use Specialties to provide other information about staff to help with question allocation, such as days the staff member doesn’t work and maximum number of questions that staff member should be handling at any time. To do this create entries like the following that can be selected in each applicable staff member’s signon:
X Doesn’t work Monday
X Doesn’t work Tuesday
X Doesn’t work Wednesday
etc.
1 Maximum allocated question
2 Maximum allocated questions
3 Maximum allocated questions
etc.
Exercise:
Think about the areas of specialisation that your staff members have outside of the areas already covered by your Request types, and amend the Specialties table to reflect them. The distribution values have been chosen to cover wide ranging of specialties. You may well prefer to use much more closely defined specialty areas.
Status code table
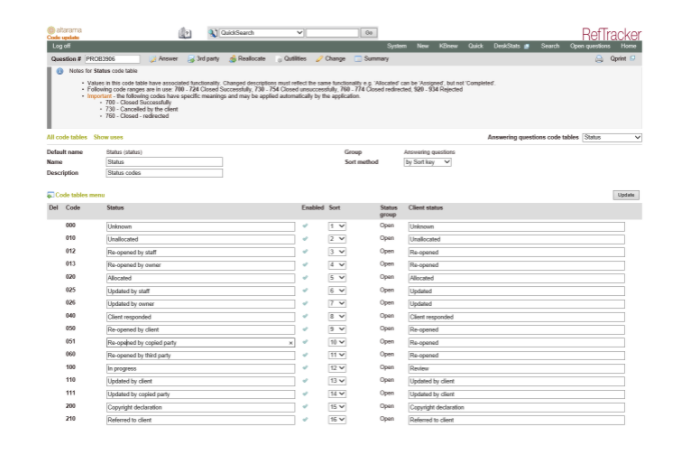
The Status code table defines the status that the system automatically applies to questions as they are handled by different processes, as well as the various closing statuses. It is used to express the first part of a two part status description e.g. Allocated (50% complete), where the first part of that description is controlled by the information in the Status code table, and the second part is controlled by selections from the Progressing code table. The statuses are applied as the questions is worked on by staff – some time automatically, and sometimes as a result of choice made in the “How complete field”.
Status – is the Status description seen by staff.
Enabled tick box – System and default statuses that the system MUST have are unchangeably ticked. Entries that you can choose not to use can be unticked. To add a new entry, rename a disabled entry and this tick this box to enable it.
Client status – allows values for the Status part of the status description, to be different for clients to those seen by staff.
An example of a status that has been set to be different for staff and clients can be seen in the Status table where the client simply sees “Review” when the staff member sees “Review by supervisor”. You might also use this capability to use softer language, for example you could show the clients “Closed” rather than “Rejected”, or you might use it to send statuses to clients using local terminology.
NOTE the warnings at the top of this screen that values in this code table have associated functionality. You can amend the entries but your replacement text MUST have the same meaning. When creating new entries you must choose to enable an entry of the right type!
Most customers will want to take advantage of the ability this code table provides to remove some of the standard Closing statuses, and/or add some new ones that are more specific to your own requirements (for example you may want to add something like “Closed partially successful”).
This code table is a little different to most in that there is no add line – new statuses are added by enabling currently disabled entries – similar to how you add new fields to the Data Dictionary.
This approach has been taken because there are a number of different types of closing statuses. When changing or adding statuses you need to be careful that you are changing or adding the right type of closing status. The types that can be changed are:
- Closed successfully
- Closed unsuccessfully
- Closed redirected (these closing statuses are the only ones that appear in the Redirected to third party and ILL screens)
- Rejected (these closing statuses only appear in the Reject screen)
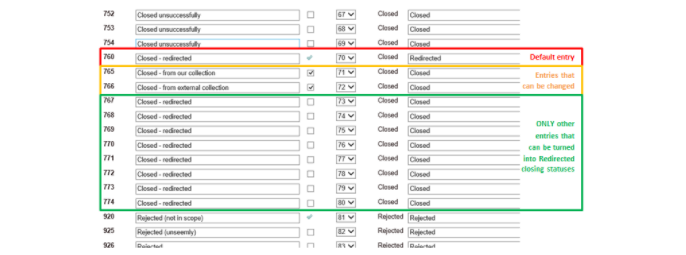
For each type of status there is one mandatory status indicated by an unchangeable tick  in the enabled column. These mandatory statuses can have their description changed, as long as the new name has a similar meaning: for example “Closed – successfully” can be “Closed – needs met” but not “Closed – needs not met”.
Following each mandatory closing status there are a fixed number of other code table entries of that type that you can rename and enable according to your needs.
To enable a new closing status, find a disabled entry of the correct Type that you want (“Closed successfully”, “Closed unsuccessfully” or “Closed – redirected”, or “Rejected”) and enable it by ticking the box in its Enabled column, giving it the name that you want staff to see, and giving it an appropriate Client description (what the client will see), and then clicking on Update.
Statuses in the Closed successfully range (700-729) will allow clients to see the answer in the client interface “Manage this question” function. Further the client can never see the text in the Answer field if Response method is “No response required”.
Any other status ensures that the client cannot see any text entered in the Answer field, in the client interface. Further the staff member determines whether the Answer text should be sent to the client by email , with their selection at “Client contact confirmation”.
The following screen shot shows the entries for the Redirected statuses. There are equivalent blocks of entries for the Closed successfully, Closed unsuccessfully, and Rejected closing statuses.
If you change the name of an entry n this code table that has been previously enabled, your change will act retrospectively.
You can apply the sort key sort order to this code table – but if you are doing so please check the Information at the top of the page against the code for the status you are changing to ensure you are using a status with a code number in the right range for the type of status that you want. For this reason we would recommend that this table is normally used in “By code” order.
Exercise:
Check the closing statuses and amend to suit your needs.
Check the client descriptions for all entries to ensure that they suit your organisation.
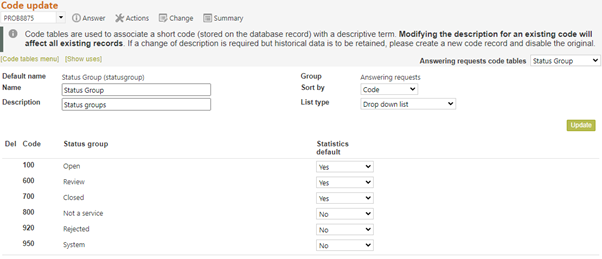
Status Group
Status groups allow Status types to be collected into like groupings, so that entire groups can be selected for searching and statistics.
The Statistics default column in this code table controls which statistics should be included in statistics by default. The Not a service and Rejected (and System) options are set to No so that they are NOT include in statistics or Data extracts by default, because they are not actually services to end users.
Time type
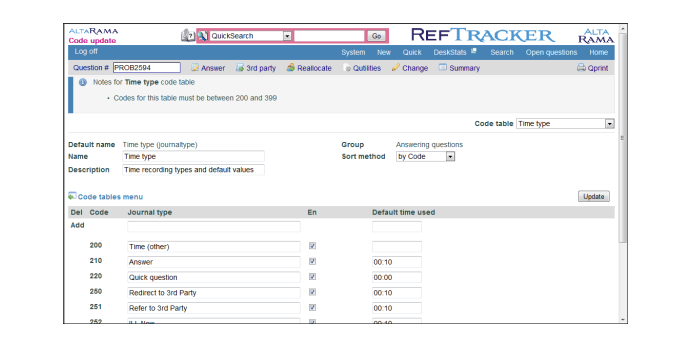
The Time type code table allows staff “Time used” that is regularly incurred by your staff when answering requests to be defined for easy reuse in the Record time screen and in the Journal entry batch load process. For example, staff may regularly spend time searching the stacks. This is a function that occurs when they are not using any other RefTracker screen. Setting up a Time type of “Searching stacks”, will allow staff to easily enter the time spent doing that activity, using the Record time screen.
This code table also defines the default values for the Time used field in the standard RefTracker request answering screens – for example you can set a default time of 1 minute for the Quick screen so that staff only have to change it if they happen to spend more than one minute handling a Quick question. Setting the default time for New to 00:00 is good if you use it to enter things like surveys, or your staff do not try to work on the response when using the New screen.
You can separately set default amounts of time for each RefTracker screen where time is collected. Note however, that any default time that you specify for the Answer screen will apply to all versions of the Answer screen (Client contact such as Partial answer and Query to client, and Notes).
If you set this code table to be Mandatory, then users of RefTracker screens will be forced to enter a time value whenever they use a RefTracker request answering screen. If it is set to Optional, staff can enter time just when it is appropriate.
If you provide a default value for a RefTracker screen in this Time type code table, the value will be automatically inserted in the field – providing a reasonable value that will mean staff only need to enter a Time used amount if a better estimate is needed. However if Time is important to you, and you have set this code table to Mandatory, you will truly want to force staff to enter a time value in each RefTracker request answering screen, so leave the default time field for that Action blank in this code table.
Default values can be enter using the usual m, h.d, and hh:mm formats and will be automatically reformatted to the hh:mm format when you move to another field so if you enter 105 it will reformat to 01:45 to clearly show the time used.
If you disable this code table the “Time used” field will disappear from the Answer, Third party and New, and Copied question screens; and the Record time screen will disappear from the Actions menu list.
If you want to record time, but not allow certain staff to see the time that has been recorded, you can do that by Denying those staff access to the View cost (others function) in the Functions tab of that user’s signon.
Time can also be entered using the System>Batch process menu>Data import/export>Time and cost journal entry import. This process imports Time used and Cost incurred in relation to specific RefTracker questions, provided by online database vendors in COUNT compliant reports.
Time used in RefTracker can be billed using:
- the one off invoice template provided by the RefTracker Qprint function or any similar custom written Qprint template.
- the System>Batch process menu>Data import/export>Data export “Staff time journals since last run” routine, or your organisation’s customised version of this routine, that takes the cost information recorded in RefTracker and creates an XML formatted file that is suitable for transfer to your time recording or billing system.
Exercise:
Think about the time that is regularly used for answering requests in your organisation and create entries for each of them – for the standard RefTracker request answering screens like the Answer screen, leave the field blank if you have made this code table mandatory and want to force staff to always enter a value in this field. However, if you are happy to have a default amount inserted that only needs to be changed if the actual time used is (substantially) different, set the default value in this code table to the average amount of time that a staff member would spend for each use of that screen.
Disable this code table if recording time is not of interest to your organisation.