Question input code tables
Question input code tables are used in Request forms, i.e. in gathering information about new questions.
Mandatory question input code tables
There are a small group of question input code tables that MUST be set up before you can use your system. They are all found in the Question input group of code tables. They are:
- Request groups
- Request types
- Priority
- Received via
- Response method
These code tables must all be set up before you use your system because information from each of these code tables is included in the information recorded for each question entered using RefTracker. Other code tables might also be required according to your Request forms designs, but these ones will always be required because they are mandatory for use in Request forms, or are automatically added to your request forms design by the system.
Despite these code tables needing to be set before you start using your system, the values you choose for them can be changed at any time, so don’t be afraid to take your best guess as to the appropriate values for these tables now, with the objective of refining them after a trial period.
Understanding Request types
Request types are used to indicate the type of work involved in a question and/or subject of a question. This information is used for statistics about the types of questions being handled by your service, so that questions can be allocated to the most appropriately skilled staff, and for searching.
You can have as many or as few Request types in your system as are required to obtain appropriate statistics for your library, and appropriate question allocation. So you should create Request types for everything that you want to count, not just all the different types of reference questions that you handle, but perhaps also, local history questions, room bookings, training course bookings, etc. The distribution values in the Request type code table will give you some hints about what should be included, but the best indication is to look at the statistics that you are currently creating, and ensure all of the question types you are currently reporting on, are included in RefTracker.
Request types must be associated with a Request group which allows you to collect these Request types into broader groups for reporting. More about Request groups in the next section.
Some Request forms allow the Request type to be selected. Request types can also be changed in most of the after question entry screens or by using the Change screen.
Request types are used in both DeskStats, and for questions entered into RefTracker as requests for service, or as Internal tasks. The Request type code table allows you to select whether each entry will be used for DeskStats only, service requests only, or both, or whether it will be used for Internal tasks.
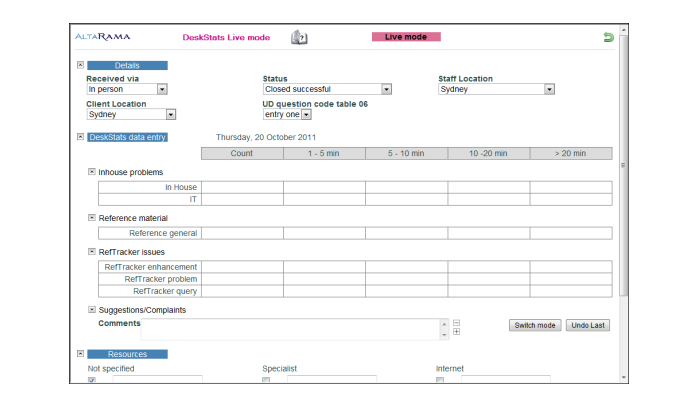
In the image above you can see how the DeskStats screen uses Request types (organised by Request group) to allow statistics to easily indicate the type of question responded to.
Hints: If you have some Request types that are only ever handled on an “on the spot” basis which means that you will only ever have to enter stats for them in DeskStats, it’s a good idea to create a separate Request group for these Request types. Similarly, if you have some Request types that are only ever handled as questions in full which means that you will never have to enter stats for them in DeskStats, it’s a good idea to create a separate Request group for them so that you can configure that Request group out of DeskStats.
For questions entered in full, the Request type is usually defined by the Request form used to enter the question, e.g. A New book request form would create a question with Request type New book. For this reason it is often the case that a library will create a Request form for every Request type for which questions will be entered in full. In this scenario Request types for which there is no corresponding Request form will generally be those Request types that are only used in DeskStats.
It is common for systems to have a request type of *New request* that is used to indicate that the question has not yet had a request type applied. This request type is usually used in conjunction with the “classify on receipt parameter in the Request form Edit options, as that parameter ensures that staff apply a request type once the question has arrived.
Internal tasks can only be created using the Create Internal task function, and the Internal task Request types only show for them. Once a question has been created, a Service request cannot be changed to be an Internal task, nor can an Internal task be changed to be a Service request.
Understanding Request groups
The Request group code table allows various Request types to be grouped to indicate the broad type of work that they represent. Request types are used for reporting on the types/subjects of requests coming into the library, and for allocation by these types/subjects. Requests groups facilitate a second level of Request type reporting – for several related request types at a time.
An example of Request grouping is: there may be several types of reference questions coming into your library; ready reference, standard, extended, etc. Or there might be several reference subjects coming in; science; arts; engineering; medicine, etc. Whether you group by subject or type or both, they can be grouped as “reference” type questions so that the type of staff member required to answer them is clear, and so that statistics and searches can be easily made over all reference request types. Similarly you could group local history and community information questions as “community” questions, and ILL requests and photocopy requests as “document delivery” requests, so that the staff required to answer these specific types of questions are clear, and you have reporting at this broader level.
We recommend that you always have a separate Request group for “Internal tasks”. It will only show up for Internal tasks that use the Internal task Request types that you have associated with with this group.
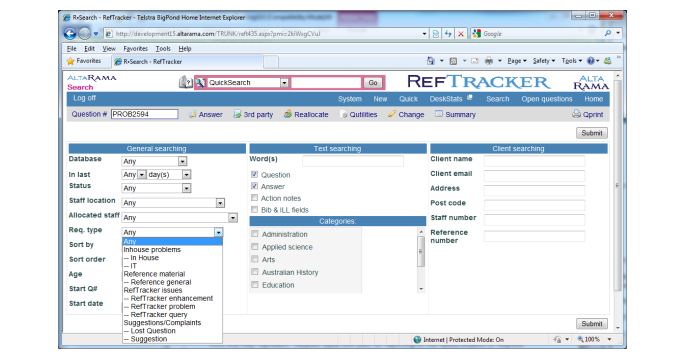
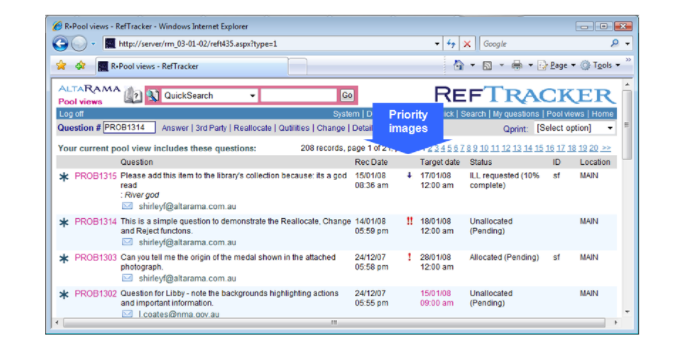
The above image shows how searching can be done by either an individual Request type, or a Request group, that can cover several different Request types.
The Request groups code table not only allows Request groups to be defined, but it allows an image to be associated with each group for easy recognition.
The Request group images are displayed in search results such as the Open questions screens, and are intended to provide a quick guide as to the type of information covered by this Question/Answer, and the type of staff member required to answer the question.
Exercise:
Display the Request types (user code table) by clicking on the link at the bottom of the Request Group or Type code table pages. Note that for each Request type defined in this screen, a Request group has been associated.
Click on the Request group images link at the bottom of the Request Types (user) Group codes table page.
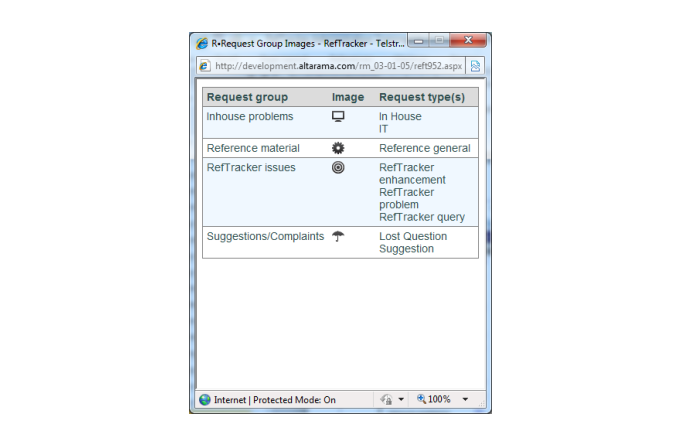
Request group images re Request code tables

This sub window shows the all of the available Request group images and how they are currently allocated. You can choose any of these images to indicate a Request group.
The  image is usually used for Internal tasks.
Exercise:
When you have considered which images might be suitable for your needs, click on the x in the top left hand corner to remove this sub window. Then click on the Request groups/types link at the bottom of the Request Group codes table page, so we can investigate that.
Request groups/types re Request code tables
This sub window provides a summary of Request groups in use together with their images and related Request types. It shows the two tier relationship between Request groups and types.
Exercise:
This screen shows how the Request types and Request groups currently in use, relate to each other. This is a great way to think about how the Request groups and Request types needed for your service should look, so, for those doing initial system setup, now is the time to try creating a table of Request groups and Request types required for your service, in the same format as shown in this sub window.
Request group code table
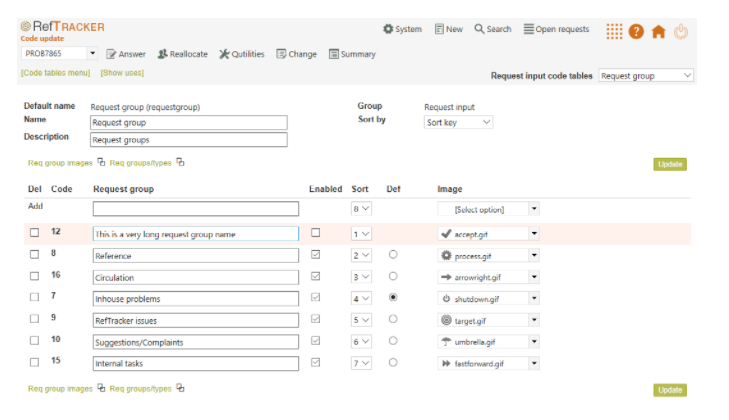
The Request group code table allows request groups, and their associated quick recognition images, to be defined.
Request Group: enter the text by which this Request group will be known (max 50 characters).
Def: The value selected in this column is the Default Request group. RefTracker uses code table default values if it cannot determine a value for that code table in any other way. The Request group value will be set for every questions as it is created, according to the Request type recorded for that question.
The table of Search results (in screens like Open questions, Simple search and Advanced search) includes a Request group symbol for each question as the left most column. The heading for that column is determined by the symbol for the default Request group defined for your system in this Request group code table.
Image: select the identifying image to be used for questions of Request types associated with this Request group. The image is used in search results, and in the summary of each question. A summary of all available images showing which ones have already been used can be seen using the Request group images link at the bottom of this screen.
You can add your own Request group images for selection here by going to System>Utilities>Administration utilities>File upload/download and selecting the image/reqgrp/local directory. Your custom images should be 16×16 pixels, and you will need to provide a complete set of request group images to meet your needs as the Request group code table will only show the images in the include/images/reqgrp/local directory, for selection,
Note that you cannot delete a Request group that is in use – sometimes you need to use the Request type code table to remove all associated request types, before a Request group can be deleted, and sometimes you may need to Edit the Request types associated with Request forms to be able to delete the associated Request types. A simple approach is to simply disable the Request group that you no longer want to use.
Exercise:
Use this screen to enter the required Request Groups. A hand written two tier list of Request types and Request Groups is helpful for those doing initial system setup. Amend the existing Request group names and associated images, add new ones and delete unwanted ones, to meet your needs, and then click on Update.
Hint: Often when setting up a new system, it’s easier to edit existing entries in a code table, rather than try and delete all the old entries before adding new ones!
If you need to add a new Request group, enter its name in the Add line at the top of the screen, select the most appropriate image, and then click on Update.
Don’t forget to indicate your default group and set a sort order.
Request type code table
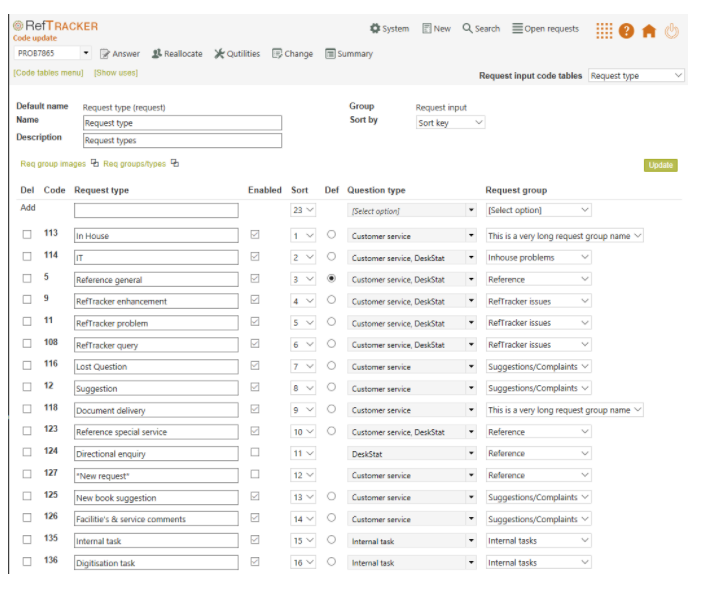
The Request type code table defines all of the Request types that you will use in your system, and how they relate to your defined Request groups.
Request type: enter the text by which this Request type will be known (max 100 characters).
It is common for systems to have a request type of *New request* that is used to indicate that the question has not yet had a request type applied. This request type is usually used in conjunction with the “classify on receipt parameter in the Request form Edit options, as that parameter ensures that staff apply a request type once the question has arrived.
Question type: some Request types are only applicable to specific functions – DeskStats, Full questions, both DeskStats and Full questions, or Internal tasks. This is where you choose the function/s that are applicable to that Request type. The Request type will only display as an option for the function/s that you choose here, so Internal task Request types will only show for Internal tasks, DeskStats will only show for DeskStats, etc.
If a Request type has been used for Full questions, it cannot be changed to use with Internal tasks, and if a Request type has been used for Internal tasks it cannot be changed to use with full questions or DeskStats, but new Request types can be set for any of these options, as appropriate to that new Request type.
Once a request has been created its question type cannot be changed. Question type is set by the form used to create the request.
Request group: select the Request group to which this Request type belongs from this drop down list. If you need a group that is not appearing in this list, go to the Request groups code tables that controls this list, and add the required entry before adding the new request type.
Note that you cannot delete a Request type that is in use – sometimes you need to either delete a Request form that uses the Request type, or change the Request type used in that form, to a Request type that you want to retain, before a Request type can be deleted.
Exercise:
Continuing on with your hand written list of Request types and Request groups in hand, use this screen to enter the required Request types. Amend the existing Request type names and associated Request groups, add new ones and delete those not required to meet your needs, and then click on Update.
If you need to add a new Request type, enter its name in the Add line at the top of the screen, select the appropriate Request group for it, and then click on Update.
Don’t forget to indicate your default type and set a sort order.
The Request type code table defines all of the request types that you will use in your system, and how they relate to your defined Request groups.
Priority code table
The Priority code table determines the values that will appear in the drop down box for the Priority field in Request forms, and how those values will be represented by images in the staff interface. They also determine whether the priority associated with imported emails will also be reflected in this way. You can create as short or long a list as you require, but experience shows that the distribution list of 4 entries works well. You can use whatever descriptions you desire, but remember that the values you use will be the values upon which you can obtain information about, and statistics on, the level of priority associated with a question.
The images you define to be used in this table will be used as graphic indicators of priority wherever the question Received date is displayed, and wherever the Priority description is displayed. On initial arrival of a question form the client interface the Priority symbol represents the priority indicated by the client, but the staff member initially reviewing the question can use the Change screen to change the Priority to indicate the Service level that needs to be provided.
The Priority code table also reflects the client selected Priority in any Allocation or Notification email send about arrival of the question. If the question was entered by the client or staff member Priority will reflect their opinion of the priority. If the question was created from an imported email Priority will reflect the priority with which the sender sent the email (as you have mapped it to your Priority values. RefTracker supports the standard email priority types of High, Normal, and Low.
To relate these email priority levels to your RefTracker question Priority settings, each RefTracker priority level has incoming and outgoing email priority levels associated with it.
So, for example, according to how your System administrator has set up this functionality, if a client submits a question through the client interface with Priority set to High, any Allocation or Notification email sent to advise staff of its arrival will also appear in your email client with your email program’s high priority indicator.
Importantly this also works for questions created as a result of an imported email. For imported emails RefTracker will record the priority with which that imported email was sent and display that priority in the Open questions screen and any Allocation or Notification email that is sent about arrival of the question. This means that staff who primarily work with imported emails coming into RefTracker will see new questions submitted by email with the same high (and low) priority indicators as they would see if the question had arrived directly into their in box.
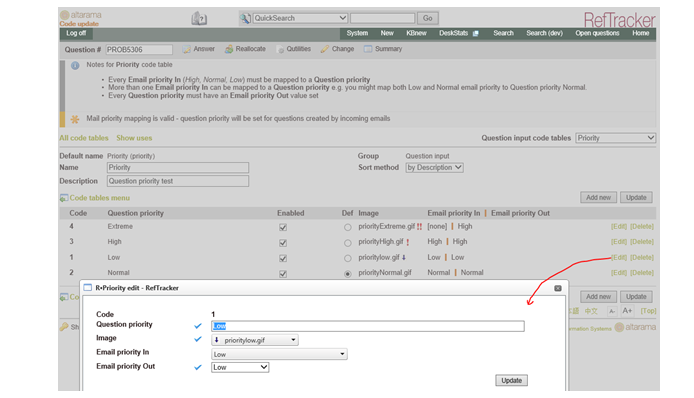
Here is an example showing the default settings for this code table that will result in questions created from incoming emails with high or low priority being indicated by the usual RefTracker priority symbols of ![]() and , and in the allocation/notification email sent to staff with these priorities no matter how the question arrives (email importing, client entered or staff entered).
and , and in the allocation/notification email sent to staff with these priorities no matter how the question arrives (email importing, client entered or staff entered).
Use the Add new button to add a new entry and the Update button to save changes in this screen such as when you disable an entry or change the sort order.
To Edit an entry or Delete one use the appropriate hyperlink to the right of the entry.
For each of your Priority code table entries you must set are:
Question priority: enter a descriptive name for each priority (max 50 characters).
Image: Associate an image which will show in Open questions to the right of the Received date. Select the name of an image appropriate to describe this priority level. A standard set of images are delivered with RefTracker but you can supply your own images of up to 16 pixels wide by 20 pixels high in size by going to System>Utilities>Administration utilities>File upload/download and loading them in the include/images/priority/local directory. If you do this you will need to provide a complete set of four priority images to meet your needs as the Priority code table will only show the images in the include/images/priority/local directory, for selection, and the images will not be picked up until the overnight system restart. The image associated with the Normal priority is usually transparent so that images only display where the question priority is other than Normal.
Email priority in: Select an incoming email priority if one is appropriate to this level. Each of the three Incoming email priorities (Low, Normal and High) must be assigned to one entry in your Priority code table, for imported email priorities to be automatically translated to your RefTracker Priorities. Validation of this code table will indicate if you have not yet assigned all three incoming email priorities.
The impact of this assignment (example shown in the screen print above) is that the Priority set for any question created from an email arriving with Low Priority, will be that it is set to have RefTracker Low priority and high priority emails will be indicated as High priority in RefTracker.
You can assign more than one incoming email priority to a RefTracker question priority. Add all three Email priorities to your “Normal” Priority code table entry if you do not want to use this concept, by ticking all boxes in this multi-select drop down list for the normal priority entry.

To select [none] for Email priority in do not tick any of the boxes in this drop down list

Email priority out: Select an outgoing email priority for each of your Priority code table entries. The object is to match every RefTracker priority to the most appropriate Email priority so that sent emails can indicate an appropriate priority.
At present, the only emails that are sent with Priority set, are the Allocation and Notification emails that can be sent on arrival of a new question. Set all Priorities to Normal if you do not want to use this concept.
The impact of this assignment (example shown in the screen print above) is that any Allocation or Notification email sent on arrival of a Question with Low priority (whether it came in via email importing, or via completion of a client interface form, or via a staff member entering it on behalf of the client) will be sent with Priority set to Low, and High priority questions in RefTracker will have these emails sent with high priority.
Exercise:
Think about the priorities that you would like to present to your clientele and staff, and amend the Priority table to reflect them. When setting up a new system System administrators should review their Priority code table and adjust the distribution Email priority in and Email priority out settings to suit their needs.
For those using email importing, make sure the High, Normal and Low “Email in” priorities are associated with a RefTracker Question priority level and image that makes sense to your users.
If the Priority field is included in an email importing Request form, any default value provide by that field will override the priority that would have been set because of the priority of the imported email.
Even if you do not use email importing you need to make sure that an appropriate “Email out” priority setting has been set for every one of the entries in your Priority code table.
Ask you Altarama support person for assistance if you are having difficulty matching how you want to use this new functionality to your Priority code table
Received via code table

A Received via value is recorded with every question that is entered in RefTracker (both full questions and DeskStats). It provides statistics about how questions arrive in your library (as opposed to Received location that records where they arrived). Received via is a mandatory code table which means that you cannot disable collection of this information, but, you can remove the need to enter Received via information into Request forms and DeskStats by disabling all but one of the entries in this code table.
RefTracker has an understanding of the functionality associated with each of the entries in this code table, so it is important that you do not change the meaning of each entry. We allow you to change the description associated with each entry so that you can use different terms for the same thing e.g. “Mail” to “Post”, but the text you use for the distributed values must describe a similar mode of arrival. We also allow you to add new entries to this code table (for example you may want to count how many questions are arriving from a particular service that you offer, so you can add an entry for that service), and you can delete any entries that you add, but you cannot delete any of the system provided values as RefTracker utilises the system provided values for dealing with the different incoming question methods that it knows about (these entries must be disabled if you do not want to use them.)
Received via values that have associated attributes, use those attributes to provide hyperlinks back to information provided fro accessing that service. Once again RefTracker knows how to handle this information so it cannot be changed. Contact Altarama if you have a source of questions that needs a link provided for it.
When a question comes in through a RefTracker client interface form, the system will automatically set the received via value to 5 “Web form”. If you are using a RefTracker form to pick up information from another service you should include the Received via URL parameter in the URL that you use to bring up the form so that the Received via value is set correctly (or build it into the Request form). For example, if you have a form that is being used to record requests taken by phone, you could include the Received via field into the form and set its default value to “Phone”, or alternatively you could bring up the form using a URL string like
http://currentrelease.altarama.com/reft100.aspx?key=simple&qnrdid=1
The qnrdid parameter is the URL parameter for Received via, and 1 is the code table value for Phone.
Exercise:
Disable all the entries in the Received via code table that you do not want appearing as options in the Received via drop down list that will display in the DeskStats and Request forms screens in your RefTracker system. Then add any new ones that you need (for example you may offer a suggestion box where some questions arrive, and so will want to add “Suggestion box” to the values in this list.
Even though the Web page value is used by the system, it will usually be disabled – disabling a value does not stop the system from using it – it just stops if from showing in the Received via drop down list that your staff will use.
Response method code table
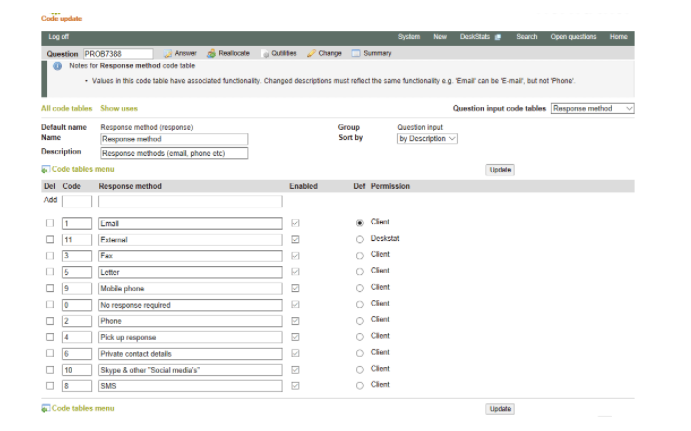
A Response method value is recorded with every question that is entered in RefTracker. It provides statistics and instructions to RefTracker about the client’s preferred method of receiving a response.
RefTracker provides different functionality in the answering process according to the value recorded from this code table, so it is very important that you do not change the meaning of each entry. We allow you to change the description associated with each entry so that you can use different terms e.g. from “Mail” to “Post”, but the text you use must describe a similar mode of answer delivery.
For this same reason you cannot delete any entries from this code table, but you should take the opportunity of disabling entries for Response methods that are not use in your library (by unticking the box in the “Enabled” column). You can also change the names of these response methods to things that mean the same thing e.g. “Other” might become “Response delivered outside RefTracker”.
When a Request form is submitted the system validates that enough contact information to be able to contact the client by the Response method selected, has been provided. The rules are:
Response method Required fields
Email – Client email address
Phone – Client name, and Client phone
Mail/letter – Client name and Address1
Fax – Client facsimile number
Skype – Skypename
SMS – Client mobile phone number
Pickup response – Client name (you might like to add a code table showing your pickup locations)
Private contact details – Client name (will usually contain the name of the library staff member who knows who the private client is)
No response required – No contact details required but will result in the Close without client contact screen presuming a closing status of ” Closed – no response required
External – This method is automatically applied when an answer email is imported (as the answer has been provided externally to RefTracker). However it has primarily been provided for situations where the details of a request are entered into RefTracker but none of the RefTracker emailing functions will be used to communicate with the client. It is also applicable whenever you have a type of request for which you do not want any emails sent by RefTracker, even though an answer will be delivered (outside of RefTracker) and so the closing status needs to be “Closed successfully”.
The External response method will not appear as a Response method option for clients when they select a Response method in a form – it is only seen by staff members.
You can disable the “External” Response method if you will never use it.
If “External” Response method is set or selected in the New screen, the system will not require any client contact details to be provided, and it will not provide any client contact confirmation options. However you can provide whatever contact details are requested by the form and they will show in the contact summary provided in the Open questions screens. Despite note being necessary, providing an email address for External questions is advantageous for easily identifying the end user and connecting this request to others this user may have asked.
When a question with “External” Response method is answered through the “Answer” screen, a client contact box is not displayed and the closing status defaults to “Closed successfully”.
When a question with “External” Response method is answered through the “Close without client contact” screen, the text “Response provided externally” is added to the top of the Answer field and the closing status defaults to “Closed successfully”, to make closing these sorts of questions highly efficient.
Exercise:
Disable all the entries in the Response method code table that you do not want appearing as options in the Response method selection drop down list that can display in the Request forms you design for your RefTracker system.