Editing Code tables
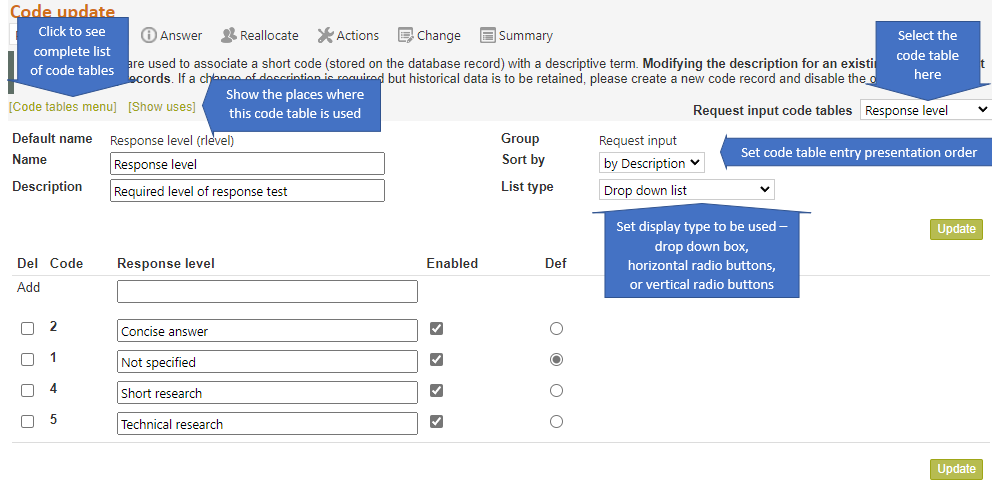
To edit a code table click on its name in the appropriate Code table screen, or if you are already in a code table update screen, you can move from that code table to another in the same group by selecting the table name from the Select code table drop down at the top right of the screen. Use the All code tables link in the top left of the screen to see all other code tables or go to System>Code tables menu.
Code tables can have different columns, but the process for editing each code table is the same.
To change an existing entry simply change the text in the main entry description box. Changing a code table in this way will change all previous uses of this code table description to reflect the new one, so only change an existing entry if you want the change to act retrospectively! If you do not want the change to act retrospectively, disable the existing entry and add a new entry to replace it.
To change the default setting simply click the button in the Default column (labelled “Def”) for the row that you now want to be used as the default – it is the value that will show automatically whenever this drop down box is used, and so the value that will be saved whenever the table is used for data entry, and no other specific selection for its value has been made, hence the default entry is often “Not specified” Note however, when designing Request forms, there are other ways to ensure that values are not saved for code tables used in the form that do not have specific values saved for them, which means adding a “Not specified” entry to code tables used in Request forms is usually not necessary or appropriate.
To delete an entry check the box in the delete (del) column for the line that you want to delete, then click on Update. Because statistics are recorded against code table entries, it is often impossible to delete an existing code table entry. If this happens to you, simply disable the entry instead of deleting it. It will no longer appear in drop down lists created by this code table, and may be able to be deleted at some later time when all statistical records related to the entry have been removed.
To retain an entry but remove it from lists created by this code table (disable it) uncheck the box in the Enable column for the line that you want to remove, then click on Update.
To add a new entry fill in all of the information requested in the Add line at the top of the list of entries, then click on Update.
To change the order of presentation of entries in the drop down box created by this code table select a sort method – alphabetically by Description, numerically by code number (which will result in a list in the order in which the entries were created), or according to a sort key defined by you. When this is selected and Update clicked, an additional sort column appears showing the presentation sequence number for each entry. To change the order of presentation of an entry change its sort number to the number that you want it to appear in the list, for example, if you change its sort number to 1, it will appear at the top of the list.
List type sets the way this code table will be display wherever it is used in RefTracker – so, radio buttons here means radio buttons everywhere this code table is used, or, Drop down list selected here, means Drop down list presentation wherever this code table is used.
Horizontal radio buttons will wrap if the window is not wide enough to display them all on one line.
The radio buttons work similarly to the Drop down list in that, if a default is specified, the list will be presented with that entry selected, and if [select option] is set as the default, then none of the radio buttons will be presented selected. If the field is mandatory this means that one of the radio buttons MUST be clicked to satisfy the mandatory requirement.

You can make multiple changes before clicking on Update to have the changes saved, and you can use either Update button on this screen.
Don’t forget the standard browser shortcuts when editing code tables:
The End key takes you to the end of a very long code table editing page where you can find an Update button. The Home key takes you to the top of a long code table where you will find the Add line and an Update button.
Tab allows you to quickly move between data entry fields on a screen.
Links to related screens are provide at the bottom of the screen, if there are any.
Special characters like > and & can be used in code tables – in fact any UNICODE character can be used, but they take 3 characters to store and the maximum number of characters for a code table entry is 50.
Things that can be done to emphasise code table entries (such as names in the Resources code table) are limited to:
– Capitalisation
– Use of special characters including any UNICODE character such as those shown below ( in fact any UNICODE character can be used, but they take 3 characters to store and the maximum number of characters for a code table entry is 50)
– Use of simple HTML such as <b> and <i> (you can use any HTML, but it will generally take too many characters to fit in the 50 character limit)

At the top left of every code table screen the following helpful links are provided:
All code tables -provides a quick link to the page that shows all code tables and their enable status.
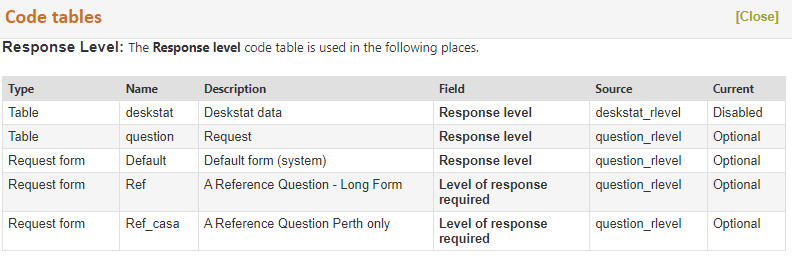
Show uses – shows (in a separate window) a list of all the places where this code table is used (if it is used). It provides an excellent reference as to all the places that will be effected if this code table is changed as it shows the Request forms that use the code table.