Customising the email templates and Qprint templates
Templates are used in RefTracker to determine the layout of emails sent by RefTracker, and its QPrint printouts.
Templates are located in the reftracker/templates sub directories with email templates having names in the format refm<name> (and refmu<name> for library defined customised email templates) and print templates having names in the format refp<name>.
The email templates used by RefTracker, and their subject lines, are defined in the Email templates code table. By referencing this code table you can find out the filename for the specific template that you want to amend.
The print templates are defined in the Print templates code table. Similarly this table allows you to find out the file name of the specific template that you want to amend.
Your system is delivered with email templates and print templates that are flexible enough to work no matter how you have set up your Parameters, Code tables, and Data Dictionary. This is achieved by including every variable that could be required for use in a template, in that template, and providing a mechanism that allows the template elements associated with that variable to be excluded from the resulting output if the variable has no value for the question being applied to that template.
Because of the extensive use of variables in these templates, you will find that they work for you without any customisation. However some customers want different wording for their email and print templates, and some may want entirely different formats in order to match corporate identities. Of course you can also add as many additional print templates as you like, and RefTracker provides some functions for using alternate email template formats (for example the ability to choose the email template that will be used for Confirmation emails within each Request form design).
Therefore, this section is about how to edit these templates. (for an easy way to add a temporary message, such as regarding your Christmas closure, see this help page.
The easiest way to create a new template is to copy an existing one, give it a new name and definition, and then edit it to meet your new requirements!
You can find a list of all email templates at System>Code tables menu>Other>Email templates. This code table allows new email templates to be added and associated with the Email function they will perform. It also allows you to modify the Email subject line for each template.

If you need to edit ALL email templates that will go outside your organisation, in order to match your corporate identity, you will need to edit all email templates in the Client/Requester and Third party recipient groups:
However, most commonly you will just want to edit the Confirmation receipt (refm110) and Question response (refm500) templates, as they are the main ones used for client correspondence. If you want to customise all the commonly used templates, you may want to edit refm110, 500, 501, 504, 508 and possibly 230 and 260, and even some of the templates in the Third party group (refm455, 510. 511 and 512) as they all go to recipients outside your organisation.
Email templates may change in future releases in order to support additional functionality, and, if that happens, you will need to recustomise your template/s so keeping the number of templates that are customised, to a minimum is advisable. Please use the header, footer, and signoff files, and the email.local.css file, to provide corporate identities, without doing individual template customisations. (see the appropriate headings below for more information about how to use these features).
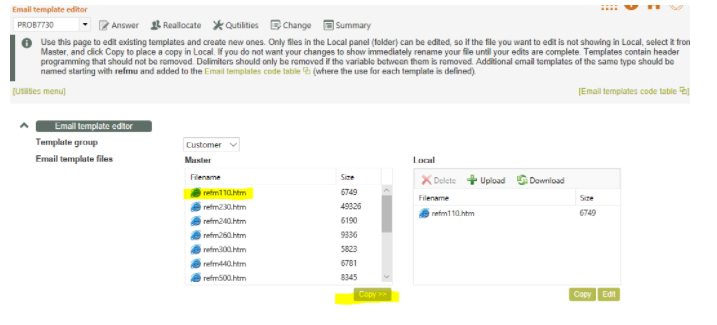
At System>Utilities>Administration utilities>Template editor (email) and (print) a function is provided that allows you to modify these templates from within RefTracker, or to download them, edit them using your own HTML editor and upload them if you prefer.
Please note that if you copy/edit templates, you must copy them from the appropriate /master directory to the appropriate /local directory then make your changes to the copy in the /local directory to ensure that your template is not overwritten by software updates. The inbuilt Template editor functions will ensure that this process is followed. Don’t forget to select the right template recipient group as the first step.
Also note that whenever your RefTracker system is updated it is essential that you reapply your template customisations to any amended version of the template that is provided in that new release, if you want to be able to use any new fields provided by the release, or any changes made to the template in that release. However customised templates will generally continue to work after an upgrade, but without any new features and fields – the release notes will identify whether your customised templates need to be re-customised immediately or can be upgraded when you next want to add a new feature or field.
If you are unsure as to whether your customised email template was created for the latest master, compare the release information provided on the second line of every template.

Format of Email templates – using css with email templates
Email templates are made in HTML so the templates must be edited using an HTML editor. Editing them in source mode is highly recommended. The easiest way to do that is using the inbuilt Email template editor function accessible at System> Utilities>Administration utilities>Template editor (email), but you can download the templates and then use Notepad or your own HTML editor.
The layouts of the templates provided by Altarama are just examples – you can use whatever layout you desire, that can be provided through HTML formatting. You can even include logo’s, but it is better that logo’s are constructed using HTML text formatting if possible – images should ideally be avoided in emails as they can make the email more difficult for the end user by appearing to have attachments that might contain viruses, or needing to be right clicked to view!).
The templates are HTML 4.01 compliant and so display attributes are controlled by classes defined in a .css file.
For email templates, the css is automatically inserted into the email from the email.reftracker.css file (or email.custom.css file if you are using a custom colour set) in the include/css directory, at the same time the variable substitutions are made (i.e. as each email is built) so that the email can be viewed in its formatted layout even if the end user is offline. The email.reftracker.css and email.custom.css files are automatically kept up to date as new releases are delivered.
If you wish to use customised css for your email templates you should place your customised css into the email.local.css file which is referred to by the templates, or just place it directly in the template. Having your custom css in email.local.css will protect it from being overwritten by future software upgrades. You can find email.local.css at System>Utilities>Administration utilities>File upload/download in the include/css directory. Download it, amend it, and upload it to the same location, if you need to change it. To refer to the standard css you can also download email.reftracker.css (or email.custom.css if you are using custom colours) from the same place.
Colours are defined by the Colour scheme editor at System>Utilities>Administration utilities>Colour scheme editor – go to the “Email” tab. If you only want to change the colours (and not fonts) then the colours will be changed by the global colour change tab (and/or the email tab) when you create a customer colour set – there is no need to create custom css.
In addition to the css that you see regularly used in the master email templates, a style called rtemlaccent has been provided to allow application of the red colour used in your RefTracker system to any email template text. This is handy for inserting important notices like Public Holiday closure notices. Just add the style to the appropriate stye tag in your template to make the text red, for example:
<span >The target response date is: </span><span class=”rtemlvaluetext rtemlaccent”>{question_target_date}</span>
This will present the Target date in red.
{emailheader} and {emailfooter} allow standard header and footer templates to be added to your templates so that a header or footer change only needs to be made in one place, and will be reflected in all templates that specify use of those variables. Similarly the email template signoff can be amended by amending just one file rather than every template. See below for more details about using these variables.
Note that every time you select a new colour set at System>Utilities>Administrations utilities>Colour scheme editor, the css definition in your email templates will be automatically changed to refer to the newly selected colour set which will mean that the date (last updated) for your email templates files may reflect the last time the Current CSS was set in System>Utilities>Administrations utilities>Colour scheme editor rather than the last time you manually made a change.
Format of Print templates
Print templates are in HTML format. HTML templates must be edited using an HTML editor, and editing them in source mode is highly recommended. The easiest way to do that is using the inbuilt Email template editor function accessible at System> Utilities>Administration utilities>Template editor (print).
The layouts of the templates provided by Altarama are just examples – you can use whatever layout you desire, and as the output is local, there is no reason why images should not be included in these templates where appropriate. Load your image/s into your RefTracker /images/local directory and refer to them in your template like this for example
<img src=”/include/images/local/imageName.jpg” alt=”Image description” />
Or, even better for older system compatibility, <img src=” <YourRefTracker domain>/include/images/local/imagename.jpg” alt=”Image description” />
The templates are HTML 4.01 compliant and so display attributes are controlled by classes defined in a .css file.
For print templates, the css classes used are picked up from the main.reftracker.css file (or main.custom.css file if you are using the custom colour set) in the /css directory. The main.reftracker.css and main.custom.css files are automatically kept up to date as new releases are delivered.
If you wish to use customised css for your print templates you should add just your overriding customised css changes into a separate main.local.css file, or just place it directly in the template. Having your custom css in this local file will protect it from being overwritten by future software upgrades.
If you only want to change the colours (and not fonts) then the colours will be changed by the global colour changer when you create a customer colour set – there is no need to create custom css. You can even individually change the colours used, using the Qprint parameters in the Other tab of the Colour scheme editor under Systems>Utilities>Administration utilities – go to the “Other” tab and find the definitions under “Misc”.
How the templates work
The current value of a RefTracker variable for the relevant question is inserted into an email or QPrint by inserting
{<variablename>}
into the template, where <variablename> is the name of the variable that you want to insert as defined in the “Name” column of the tables in the System>Data dictionary screen. Variables used in each Request form can be found in the Request form details screen, by using Display mode.
In addition to the variables for attributes of questions, there are a number of other variablenames that can be used. They are defined in the Variables help page in the Customising RefTracker section of the inbuilt RefTracker help – they can be very useful, so be sure to look at this help page.
For example that help page describes how a label for each question variable can be automatically created by inserting label_ before the variable name
{label_<variablename>}
into the template. By adding “label_” to the front of the variablename, the text in the “Label” column of the Data Dictionary will be substituted, ensuring that if you have renamed the data dictionary element, the label that you have defined will be automatically used as the label in the email or print that you are defining.
The construct $rvb$ followed by $rve$ is used to prevent anything from being included in the email or Qprint, if the RefTracker variable used between these constructs currently has no value. This construct is known as delimiters ($rvb$ denotes “RefTracker variable begin” and $rve$ denotes “RefTracker variable end”). The delimiter characters can be changed in appsettings file if necessary, but this should rarely be necessary (see the appsettings.xml section of the Support manual if you need to do this).
In HTML templates these delimiters need to be used as comments and so appear as

e.g.

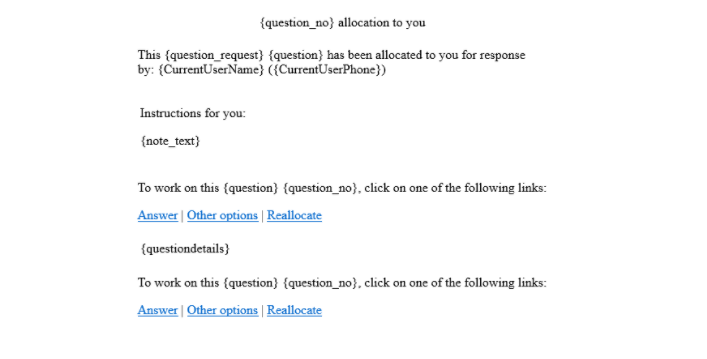
A RefTracker email template typically looks like this (Qprint templates use the same principles):
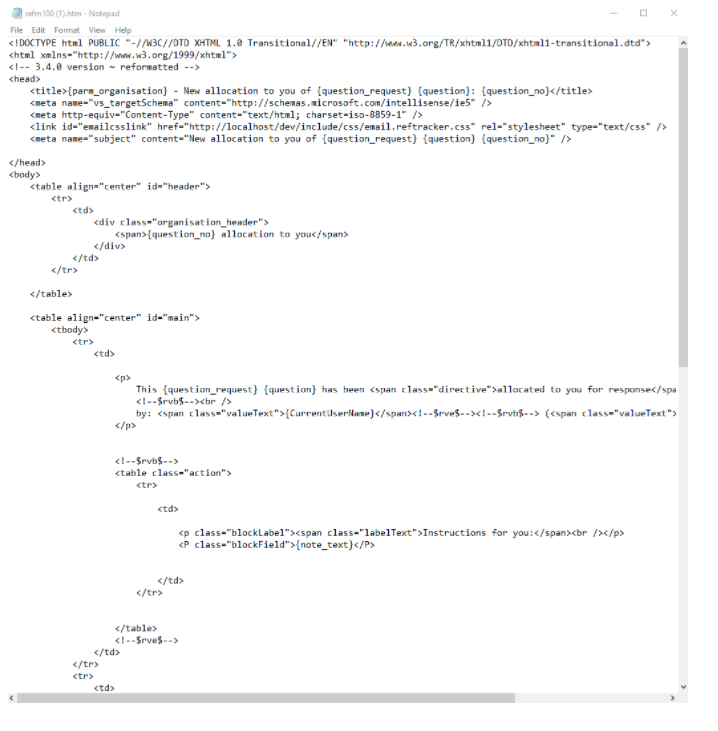
However when viewed in HTML source mode it looks like this:
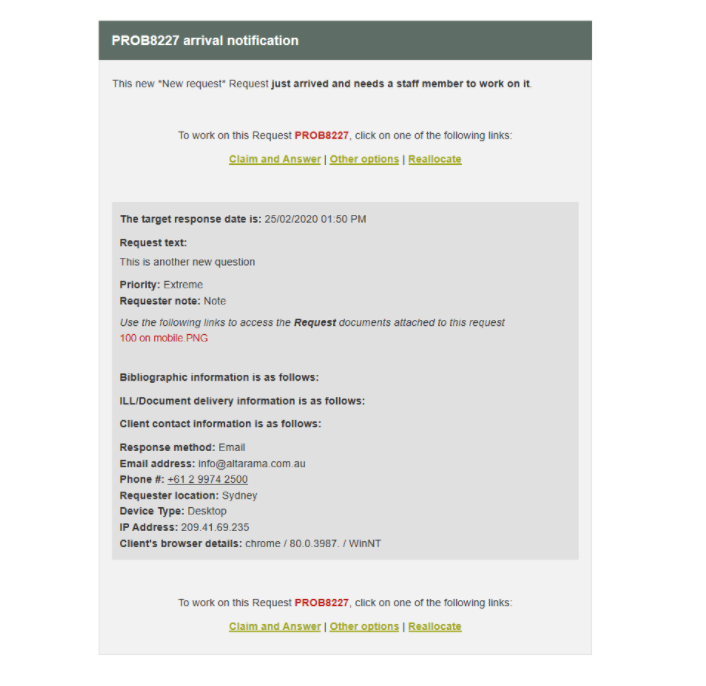
And when the template is used it produces an email that looks like (because the $rvb$ and $rve$ tags remove all of the things that are not relevant to that particular request):