Customising the staff interface
A number of aspects of the staff interface can be easily changed via parameters. The following section discusses all the places where such customisation can be made.
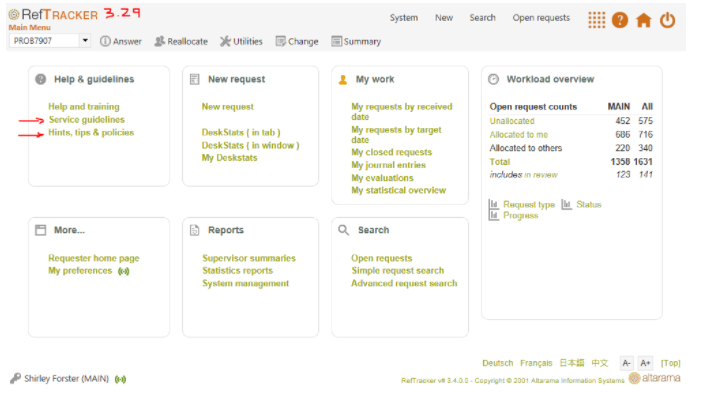
Staff interface header and Home page customisation
The diagram below shows the parameter numbers that can be used to customise the standard staff header.
Firstly a general comment about the terms that you use for referring to your end users and the requests they make of you – RefTracker manages your questions, requests, projects, offers, or whatever else you want to call them. And similarly you might call your end users clients, requesters, patrons, customers, etc. Whatever you call these things, your terminology can be reflected in RefTracker. Just contact your RefTracker support representative and let them know what you want to call your requests and requesters and we will make the change by changing the Request (system name Question with label Request) and/or Requester (system name Client with lable Requester) table names (in Code tables>System>Database tables). The effect of this change is to change what is inserted wherever the {question} or {client} variables are used throughout RefTracker – for example “Open {question} analysis” can become “Open question analysis”, “Open request analysis”, “Open project analysis”, “Open offer analysis”, etc. according to the change you make here.
Parameter 3.29 determines the image that will display in the top left of the staff interface header bar. Any changes you make to this will also appear in the client interface, however there are additional client interface header customisation features available that allow a different header in the client interface when this is appropriate. Many customers will want to replace the RefTracker logo shown in that location with a corporate logo, or leave out a logo altogether.
You can also add a custom staff header above this standard staff header using the headerstaff.htm file (see below for more details). This is a common way to add a corporate logo, as it does not appear in the client interface, but it does take space on every screen that might better be used for answering requests – your choice!
The New function can be removed for all users by unticking “Staff availability” for ALL of the Request forms of all types, using the Request forms design Edit options mode. To just remove Internal tasks, Just turn off all of the Internal task forms. To remove Direct to KB, turn off all of the Direct to KB forms or set parameter 0.15 to None to turn off the entire KB functionality for both staff and clients.
Additionally specific functions like DeskStats, My Journal entries, Open questions, and most other links on this page, can be removed for individual users by removing access to that function using System>Users-Full and the Functions tab for the specific user. Additionally, these Functions can also be removed for all users in your system by disabling the entry for them by going to Code tables menu>System then choosing the Application function code table. Ask your RefTracker support representative for assistance with exactly which function/s to disable in the application function code table, if you want to do this.
Service guidelines: This link only appears if parameter 4.7 is set to Yes. The text that displays when this link is clicked is intended to describe your library’s reference policies. To provide content customised to your needs you can:
- edit the default document 408.htm using System>Utilities>Administration utilities>Text editor
- upload you own .htm document using System>Utilities>Administration utilities>Text editor and then put the name of that document in parameter 4.6
- or enter the full URL (i.e. starting with http://) of web page that you may already have that describes your organisation’s policies for using the different lines, columns an fields in DeskStats, into parameter 4.6.
Staff hints & tips: This link only appears if parameter 4.9 is set to Yes. The text that displays when this link is clicked is intended to cover frequently asked questions that your staff ask about how to use RefTracker in your environment, and is controlled by the contents of the file named in parameter 4.8. To provide content customised to your needs you can:
- edit the default document 409.htm using System>Utilities>Administration utilities>Text editor
- upload you own .htm document using System>Utilities>Administration utilities>Text editor and then put the name of that document in parameter 4.8
- or enter the full URL (i.e. starting with http://) of web page that you may already have that describes your organisation’s policies for using the different lines, columns an fields in DeskStats, into parameter 4.8.
Workload overview : In this box the links to the Request type, Status, and Progress graphs can be added or removed using Functions of the same name, under Search &reporting>Search in the user signon.
The workload comparison graph can be added or removed using Functions of the “Summary charts” permission, under Search &reporting>Statistics in the user signon.
Removing system-wide functionality that you do not use
Sometimes there are functions provided by RefTracker that your organisation will never use.
To remove a function from the menu structure so that no-one in your organisation will see it, or be able to use it, go to System>Code tables>System and then click on the Application functions code table. In the Application functions code table, search for the name of the function that you want to remove and then untick that function in the Enable column, and Click Update. You can reinstate the function just as easily by returning to this code table and ticking the function in the Enable column.
To remove a function for one particular user only, go to the user’s signon (System>Users full and then click on their name), and then the Functions tab, and search for the name of the function that you don’t want them to access, and change it to Denied (and the Update).
Specifying your own staff header or footer layout
In addition to the parameter changes mentioned above, the layout of the footer used by the RefTracker staff interface can be changed, and a custom header can be added above the standard header. The standard header/footer, together with the customisations described above will suit most customers, but should you want to make further changes, the following files can be amended to suit your needs using System>Utilities>Administration utilities>Text file editor:
- headerStaff.htm (prescribes a custom header to be added above the standard header)
- footerStaff.htm
Information about how to edit these files is provided at Header, Footer and colour customisation for the client interface as it is the same as editing the client interface header and footer, however we suggest that if you want to edit these files, you should obtain advice from your RefTracker support representative. For example, it is important that the header takes up as little space as possible, as any extra space it takes up means less screen space for staff to be doing the work they have to do.
It is important that the header takes up as little space as possible, as any extra space it takes up means less screen space for staff to be doing the work they have to do.
DeskStats page customisation
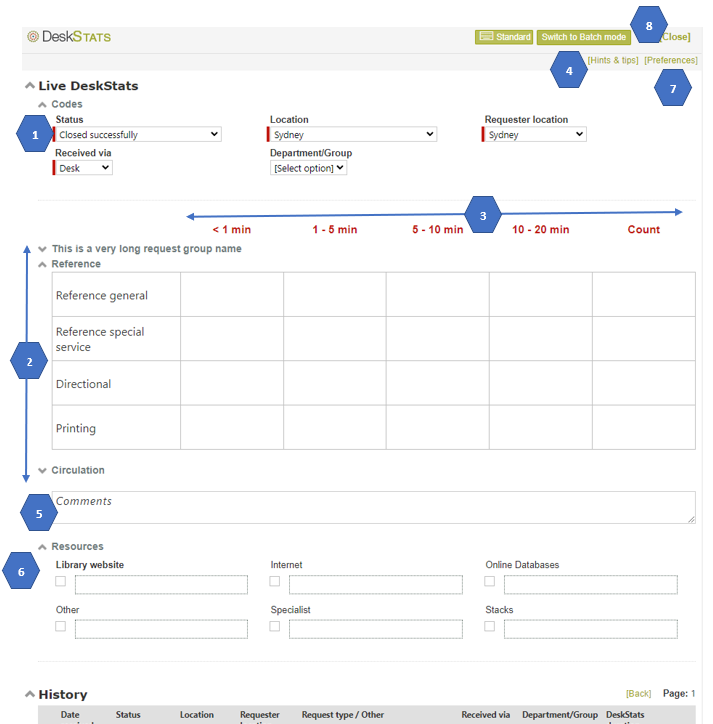
The order of display of the parts of the DeskStats screen is controlled by each user using the [Preferences] link in the top right of the screen. After clicking preferences a popup displays that provides a Layout tab. In that ab you can drag and drop the section names to specify the order in which they will appear.
The logo in the top left of the DeskStats screen can be changed using parameter 3.30.
- Codes: The Staff and Client Location, Status and Received via code tables appearing in this section will always appear if they have more than one value in them (and will not appear if there is only one entry in them), however their values are sensibly defaulted so that staff don’t normally need to change them (Staff location and Received via are defaulted according to the signed on user’s My preferences/Signon settings). Because they have been defaulted they will appear with their names highlighted with a coloured bar, to remind staff to check the defaulted entries every time they use this screen.
Other code tables appearing in this Details section are controlled by the DeskStats Data table in the Data dictionary (found under System>Data dictionary menu). Any code table defined as Mandatory or Optional or Required in the DeskStats table of the Data dictionary, that is not a system code table, will also be displayed in this section. To enable a code table so that it appears in this section, go to System>Code tables menu, and for the relevant code table, click on the [Review] link and enable the code table for the DeskStats table, in that screen.
In the above example Country has been defined as Optional and so has no default value showing, and no highlight bar. No value will be recorded for any code table showing [ select option ] when a statistic is recorded.
If it had been defined as Mandatory, its default value would be showing and the field would be highlighted to remind staff to check it value each time they record a statistic.
If it had been defined as Required, [Select option] would be showing and the field would be highlighted. A value MUST always be entered for Required fields before a statistic can be recorded. If a value is not entered a pop up will display and the field surround will be highlighted to indicate that a value MUST be entered.
To remove a code table from this section set it to Disabled in the Enabled column of the DeskStats Data table.
You can also determine the order in which the code tables appear in the Details section of the DeskStats screen by using the Seq (Sequence) column of the DeskStats data table.
Regarding Staff Location, and Client Location in this Details area, many organisations have more than one staff location defined but they want to lock certain users (such as shared signons used at service point) into only recording stats for their own location. This can be done by setting the “Ability to change operating location” to Denied for these signons using the Functions tab of their Signon.
2. Data entry grid rows: The data entry grid rows are provided by the entries in the Request type code table that have been enabled for Any or DeskStats.The heading are provided by the Request groups associated with that group of Request types. The Preferences section of this screen can be used to determine which of the available Request groupings will appear for each individual user allowing each user to tailor this screen so that it is efficient for the particular types of requests that they use most often.
3. Data entry grid columns: The data entry grid columns are controlled by the DeskStats Duration code table. Using that code table you can have 1-5 columns and each column is related to a time equivalence. A “Count” column for example would have 0 minutes associated with it and a 10-20 minutes column might have 15 minutes associated with it.
The Save, Undo and Switch mode buttons will automatically reposition themselves to remain close as you reduce the number of columns.
4. DeskStats hints & tips: The page that displayed when Hints & Tips is clicked is easily amended to include whatever information you need to provide your staff about how to use DeskStats in your environment. For example, you may want to include information about the particular service scenarios you provide and specify which line in DeskStats should be used to record them e.g.
“Booklets – use this line to record the number of booklets that you provide, when a service results in provision of our softcover corporate materials. Do not record a separate statistic for the service provided if you are recording the number of booklets delivered as a result of the service.”
To customise the page that displays when this link is clicked you can:
- edit the default document 540.htm using System>Utilities>Administration utilities>Text editor
- upload your own .htm document using System>Utilities>Administration utilities>Text editor and then put the name of that document in parameter 4.20
- or, in parameter 4.20, enter the full URL (i.e. starting with http://) of web page that you may already have that describes your organisation’s policies for using the different lines, columns an fields in DeskStats.
- To remove this link all together set Parameter 4.21 to No.
5. Comments: The Comments field can be renamed, and set to Optional, Mandatory, Required (for this field Mandatory and Required produce the same outcome which is that “(Required)” appears after the Label in this field, and the user must enter something in this field before each DeskStat is entered) or Disabled (which removes it from this screen) by amending the entry for it in the System>Data dictionary>DeskStats data table.You can also change the name of this field (the label appearing in it) by changing it in the System>Data dictionary>DeskStats data table
6. Resources: This section can be removed, or the values Resources appearing in it changed by going to the Resources code table. In that code table you can specify whether each entry should appear in the Resources section for just DeskStats, DeskStats and full questions, or just for full questions. If there are no entries in that code table set to show in DeskStats or Any and resources will not appear in DeskStats. Don’t forget to set the to set the availability of the Resources code table correctly – we recommend it is set to Optional as the change confirmation page will then allow you to separately set whether it is to be Mandatory, Optional or Disabled for DeskStats.
7. Preferences: The appearance of individual Request groups in the DeskStats data entry grid, the order in which the main parts of this screen display, and the default value for Locations and received via, can be set for each individual staff member, by each staff member, by clicking on the [Preferences] link in the top right of the DeskStats screen, and making your selections (or by going to System>Users. and the DeskStats preferences tab of he user signon).
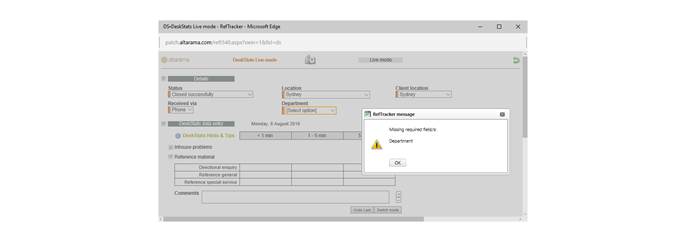
8. Live and Batch mode: DeskStats opens in the mode that the user last used. The DeskStats control in each user’s signon Functions tab individually controls access to the Live mode and Batch mode. If you do not want a user to switch between modes, Deny the mode they don’t need, in their Functions tab, and the Switch mode button will disappear. Deny both modes to remove access to DeskStats entirely, for that user.
Batch mode – staff selection: The ability to enter statistics on behalf of another staff member (i.e. appearance of the Staff field at the top of the DeskStats data entry section of the screen in Batch mode) is controlled by “Can select staff member in Batch mode” in the DeskStats section of each user’s signon Functions tab. The default permission to use this feature is Supervisor. Grant this function to any lower level user who needs to be able to enter statistics on behalf of other users.
Question accessibility vs privacy/security
When questions are entered into RefTracker in full (such as by using Quick or New or when a client enters the question themselves) the text of the Question and Answer can be viewed by all staff with signons to the system. This is a design decision that ensures that any staff member can immediately deal with any client.
However it means that there is no concept of private or secure questions in RefTracker – the system presumes that staff abide by professional ethics and keep all of the work that they do confidential. Should you require the concept of private/confidential questions please let Altarama know as this may be something that could be developed in the future.
In the meantime, parameter 2.20 Log question views can be set to Yes to have the system record history entries every time a question/answer record is viewed by a staff member to allow the history of a record to be examined for who has had access to that information.
Access to question/answer records in the system can also be limited by using the Functions tab in a user signon to remove access to functions they don’t need. For example a staff member could be limited to only seeing the My questions list under Open questions. They could even have their ability to Search removed if necessary.
Importantly, the Functions tab of each user’s signon also includes “Ability to change operating location”, which, when Denied for a specific staff member ensures that they can only search for questions that belong to their own location, effectively limiting them to only seeing things in that part of the database. When combined with limiting their Open questions list to their own location, and setting Parameter 2.21 set to Yes to automatically change the Staff location of a question whenever the question is reallocated, this can provide a “ethical wall” for users in that location.
New, Change and Copy screens
Request forms: The Request forms available for use in these screens are controlled by the staff availability settings in the System>Request forms>Edit options screen.
Request form layout: The fields presented in these screens are controlled by the layout defined in the Request form. How the system processes the question on saving is also controlled by the Request form layout. The fields in the Receipt information and Closing information/Allocation divisions of the staff version of Request forms will only appear if there is more than one value enabled in the corresponding code/location table (such as the Received via code table and the staff or client entries in the Locations table), and if they have not been included in the layout of the form that is displaying (so including them as a hidden field will simplify question entry for staff, if you never use those fields in that form.
Other fields:
Where “Other fields” appears, it shows all other fields in the Data dictionary that are not specifically allowed for on the Request form, so that this additional data can be recorded. If there are fields appearing in this section that you do not use, you can remove them by disabling them in the Data dictionary.
Time used: This field can be removed, or set to Optional or Mandatory according to the availability of the Journal entry (time) code table. The label for this field is provided by the label column for the “journal_hours” field in the Journal table of the Data dictionary. The default value appearing in this box (if any) is controlled by the Time type code table entry for that screen.
Allocation fields customisation:
If you NEVER user the System administrator or Automatic allocation modes, you can remove one or both of them from the “Allocate this question” options that appear in the New, Change and Copy screens. Just go to System>Code tables menu>General codes and then select the Allocation mode code table. Then untick the method that you never use. It will disappear from the drop down box shown below, simplifying the decision that your staff can make about who to allocate the question to, when they enter a question on behalf of the client.

Closing field customisation:
KB inclusion question: This field can be removed, or defaulted to Include or Exclude, using the KB default Options setting in the design of the Request form in use.
Expertise: This field can be renamed, removed for all forms, or set to Optional or Mandatory according to the setting of the Expertise Code table. It can be removed on a form by form basis using the Expertise Options setting in the design of the Request form in use.
Closing comment: This field can be renamed, removed for all forms, or set to Optional or Mandatory according to the setting of the Closing comment field in the Data dictionary Question table. It can be removed on a form by form basis using the Closing comments setting in the Edit options design of the Request form in use.
Closing comment: This text area field can be renamed, removed for all forms, or set to Optional or Mandatory according to the setting of the Closing comment field in the Data dictionary Question table. It can be removed on a form by form basis using the Closing comments setting in the Edit options mode of the Request form in use. Common uses for this field are to provide descriptions of “Other” options in Expertise or Category, or it can be renamed for purposes like “Billing description”.
Closing note: This text box field can be renamed, removed for all forms, or set to Optional or Mandatory according to the setting of the Closing note field in the Data dictionary Question table. It can be removed on a form by form basis using the Closing note setting in the Edit options mode of the Request form in use. Common uses for this field are to provide descriptions of “Other” options in Expertise or Category, or it can be renamed for purposes like “Billing description”.
Number of items: This text box field can be renamed, removed for all forms, or set to Optional or Mandatory according to the setting of the Number of items field in the Data dictionary Question table. It can be removed on a form by form basis using the Number of items setting in the Edit options mode of the Request form in use. Common uses for this field are to document the number of attachments sent or the number of physical items provided.
Costs: This set of lines allow costs and payments to be entered in the closing division as a question is closed. This can also be done using the Record costs/payments screen, but inserting it in the closing division serves as a reminder that costs and payments need to be recorded before closing.
Category: This field can be renamed, removed for all forms, or set to Optional or Mandatory according to the setting of the Category Code table. It can be removed on a form by form basis using the Expertise Options setting in the design of the Request form in use.
Resources: This field can be renamed, removed for all forms, or set to Optional or Mandatory according to the setting of the Resources code table under System>Code tables menu. It can be removed on a form by form basis using the Resources setting in the Edit options design of the Request form in use.
Reallocate screen customisation
Location does not show under Reclassification if Parameter 2.21 Change staff location on reallocated is set to yes (as the Staff location will automatically change is appropriate).
The Specialties column does not display if the Specialty code table has been disabled in your system (in order to simplify your system by removing this concept from your system).
Summary screen Details tab customisation
The Details tab of the Summary screen displays all the known facts about the question. It shows the details using the labels defined by the Request form used for that question so the data will always be presented in a way that makes sense for that particular question. It will only show the data that has been collected for that question so if data is not showing here, it was not collected.
Some data is collected automatically by the system (IP address, browser details, device, and URL of the referring page fields). If you never need that data collected, disabling the field in the Data dictionary Client table will prevent that data from being collected for any question for your system, and so prevent it form being displayed in this screen.
If you never use the KB concept, or the FAQ concept, they can be removed using parameters 0.15 and 16.
Answer page customisation
7.1 and Journal entry (time) code table

The Question summary at the top of this and many of the question answering screens contains a summary of the question that is used here and in the Open questions screens. The details of the question shown here are controlled by the Question Active.htm text template. Use System>Utilities>Administration utilities>Text file editor in HTML mode to edit this template.
This summary also includes the question’s current status and the Allocated staff member name, if there is one.
Request type: In the Edit options page Main options tab of each Request form design, the “Classify on receipt” parameter can be set to Yes. When this is set to Yes, and an appropriate Request type has not yet been selected for this question, Request type will display as [ select option ], and staff will need to select an appropriate request type before Submitting this page (also applicable to the Third party screens).
Requester contact details: Use System>Utilities>Administration utilities>Text file editor in HTML mode to edit the ContactSummary.htm file to determine what client contact details appear in this screen on initial display. Edit ContactDetails.htm to determine what displays after [. . .] is clicked. Editing these text templates needs HTML expertise so please do not hesitate to ask your RefTracker support representative to make the changes for you.
This entire line will disappear, including he Requester contact details label, if all Requester contact methods have been disabled in the Application functions code table
Manage Answer and workflow attachments: The “Manage answer attachments” and “Manage workflow attachments” links that allow use of attachments can be removed by setting parameters 7.30, 7.31, and 7.32 to No.
Select workflow type: you can remove any value from this drop down list by Denying it for this user in the Functions tab of their signon under System>Users – Full.
Time used: This field can be removed, or set to Optional or Mandatory according to the availability of the Journal entry (time) code table. The label for this field is provided by the label column for the “journal_hours” field in the Journal table of the Data dictionary. The default value appearing in this box (if any) is controlled by the Journal entry (time) code table.
The clock can be automatically turned on using My preferences, or the user’s signon. See the “Auto start timer” parameter in the Answering preferences tab.
Leave open/Close: The default setting for Leave open/Closed is set using My preferences, or the user’s signon. See the “Answer default action” parameter in the Answering preferences tab.
Client/Requester contact confirmation: The Response method set for this request determines what appears in this box -contact details for email, phone, etc. as appropriate.
If the Response method is email, and as the default, you do not want an email to be sent to the the client as a result of this answer being closed, you can have this box default to “Answer email is not required” by unticking the Response email template for that Request form. To do that go to System>Request form summary>Requester server and then the relevant Request form. Then choose Edit options in the top right corner, and then the Processing options tab. You’ll then be able to untick the Response email in the group under the “Client/Requester communication” heading.
Resources: This section can be removed by setting parameter 7.21 to No.
CLOSING FIELD CUSTOMISATION:
KB inclusion question: This field can be removed, or defaulted to Include or Exclude, using the KB default Options setting in the design of the Request form in use.
Expertise: This field can be renamed, removed for all forms, or set to Optional or Mandatory according to the setting of the Expertise Code table. It can be removed on a form by form basis using the Expertise Options setting in the design of the Request form in use. Common uses for this field are to record the difficulty of a question (as opposed to the amount of time spent on it – you might set it to reflect a READ scale for example), the major skill used in answering the question, or it might be renamed for a purpose like “Marked for” attention of management, consideration of web site change, etc.
Category: This field can be renamed, removed for all forms, or set to Optional or Mandatory according to the setting of the Category Code table. It can be removed on a form by form basis using the Expertise Options setting in the design of the Request form in use. Common uses for this field are to record subjects associated with a question, or as a an option to the Resources concept that allows resources to only be recorded as the question is closed.
Closing comment: This text area field can be renamed, removed for all forms, or set to Optional or Mandatory according to the setting of the Closing comment field in the Data dictionary Question table. It can be removed on a form by form basis using the Closing comments setting in the Edit options mode of the Request form in use. Common uses for this field are to provide descriptions of “Other” options in Expertise or Category, or it can be renamed for purposes like “Billing description”.
Closing note: This text box field can be renamed, removed for all forms, or set to Optional or Mandatory according to the setting of the Closing note field in the Data dictionary Question table. It can be removed on a form by form basis using the Closing note setting in the Edit options mode of the Request form in use. Common uses for this field are to provide descriptions of “Other” options in Expertise or Category, or it can be renamed for purposes like “Billing description”.
Number of items: This text box field can be renamed, removed for all forms, or set to Optional or Mandatory according to the setting of the Number of items field in the Data dictionary Question table. It can be removed on a form by form basis using the Number of items setting in the Edit options mode of the Request form in use. Common uses for this field are to document the number of attachments sent or the number of physical items provided.
Costs: This set of lines allow costs and payments to be entered in the closing division as a question is closed. This can also be done using the Record costs/payments screen, but inserting it in the closing division serves as a reminder that costs and payments need to be recorded before closing.
Third party page customisation
Category: This field can be renamed, removed, or set to Optional or Mandatory according to the setting of the Category Code table.
Expertise: This field can be renamed, removed, or set to Optional or Mandatory according to the setting of the Expertise Code table. Note that if changing Expertise from Mandatory to Optional you may have to also change the Enable setting for Expertise in the Questions table of the data dictionary.
Time used: This field can be removed, or set to Optional or Mandatory according to the availability of the Journal entry (time) code table. The label for this field is provided by the label column for the “journal_hours” field in the Journal table of the Data dictionary. The default value appearing in this box (if any) is controlled by the Journal entry (time) code table entry for the Third party page.
KB inclusion question: This field can be removed, or defaulted to Include or Exclude, using the KB default Options setting in the design of the Request form in use.
Category: This field can be renamed, removed for all forms, or set to Optional or Mandatory according to the setting of the Category Code table. It can be removed on a form by form basis using the Expertise Options setting in the design of the Request form in use.
Expertise: This field can be renamed, removed for all forms, or set to Optional or Mandatory according to the setting of the Expertise Code table. It can be removed on a form by form basis using the Expertise Options setting in the design of the Request form in use.
And in regard to the ILL workflow:
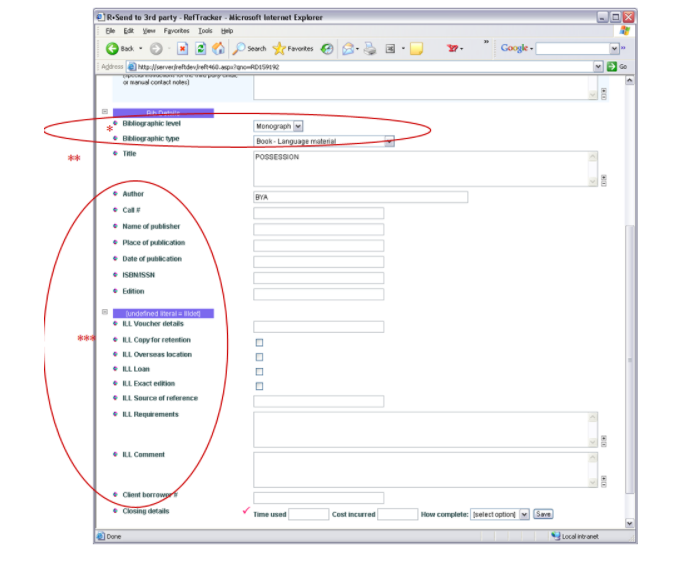
* Bib level and Bib type can be disabled via the Code tables (because they are drop down box).
** Title is mandatory and cannot be removed.
*** Each of the other Bib and ILL fields shown on this screen can be individually removed by disabling the appropriate field/s in the Bib and/or ILL table of the data dictionary. When customising this section, don’t forget that the bib fields are also available from use in Request forms. This means that only bib fields that are not used in Request forms can be disabled (removed from the ILL workflow screen). ILL fields are not used elsewhere so you can remove any ILL field.
Other Actions screens customisation
Record time: Can be removed by disabling the Time type code table (note that it will also remove the Time used field from the Answer, Third party and New/Quick screens). (note that the Record time Function in the Application functions code table will not disable unless the Time type code table is disabled first, so disabling the Time type code table is definitely the easiest way to do this).
Record costs: Can be removed by disabling the Cost type code table (note that the Record costs and payments Function in the Application functions code table will not disable unless the Cost type code table is disabled, so disabling the Cost types code table is definitely the easiest way to do this).
The Cost centre column can be set to Disabled, Optional or Mandatory, as appropriate, in Data dictionary>System>Journal (Disabled removes that column from the screen, and Mandatory means that a Cost centre MUST be entered).
If the Payment code table is enabled, payment functionality appears in the Record costs screen, and that screen gets renamed to “Records costs and payments”.
Search screen customisation – Simple and Advanced
Question text summary: Provides a summary of the Question and (Answer text for closed questions). There are three templates controlling what is included in this display:
QuestionActive.htm text template (usually provides Subject, Question text, any question attachments, Item summary, Latest client and staff notes since last open/reopen).
The notes that will appear in this summary are controlled by Parameters 80.35 Requester notes and 80.36 Staff notes by adding the relevant action codes from the System>Code tables>System>Action code table, | (pipe) separated.
QuestionConcluded.htm text template (usually provides Subject, Question text, any Question attachments, Item summary, Answer text, any Answer attachments, any Categories, and a closing status summary)
QuestionKB.htm text template (usually provides Subject, Question text, any Question attachments, Item summary, Answer text, any Answer attachments, any Categories, and a closing status summary which includes information about the who added the question to the KB, when it was added, and when it should be reviewed.)
Use System>Utilities>Administration utilities>Text file editor in HTML mode to edit this template to include anything else that you want to include about your questions (such as request type or matter number). A good way to add additional data about your questions to the Open questions screens is to add that information into the QuestionActive and QuestionConcluded templates. Client’s cannot see these summaries.
Display of text before [more] symbol: Parameter 3.5 determines how many lines (Hard returns) of question, answer or Item summary text are displayed before the [more] symbol appears. Make parameter 3.5 larger or smaller according to how much text you need to see to be able to distinguish between questions.
Parameter 3.9 determines how many lines (Hard returns) of Note text are displayed in the Question text summary before the [more] symbol appears. The default is 2 but you can vary it, such as reducing it to 1 if you want these notes to take up less space in the Open questions screen
Item summary (appears in italics after the Question text): The Item summary is defined in the Request form used by that question. See System>Request form summary and then the form for that request – then go to Edit options mode and the the Other options tab. You can define the Item summary to include any data about this specific request, and you can use HTML formatting to make is stand out. In this way, Item summary can be used to add in any other important attributes of the question to the Search results screens, including the Open questions screen. Clients can see the ItemSummary.
Key attributes: Key attributes works in the same way as ItemSummary, and appears directly after Item summary in the Question Summary. It only appears for staff so, as opposed to the ItemSummary, you can use it to summarise things that staff need to be able to see at a glance, but that clients should not see.
Client contact details: Use System>Utilities>Administration utilities>Text file editor to edit the ContactSummary.htm file to determine what client contact details appear in this screen on initial display. Edit ContactDetails.htm to determine what displays after [. . .] is clicked.
Request group column heading: The table of search results includes a Request group symbol for each question as the left most column. The heading for that column is determined by the symbol for the default Request group defined for your system in your Request group code table.
Search attachments: In the Text searching column, the “Attachments” tick box allows users to indicate that they want to search attachments to questions and answers, as well as the other places indicated by the ticked boxes in that section. This option to search attachments will only show if it has been set up for your server. Hosted customers should contact Altarama if they want this feature enabled. In-house customers need to contact their IT department to have it set up – instructions for how to set up this feature are provided in the Support Manual.
Export options: This function allows a record for each Request retrieved by this search to be exported to excel. The record will contain the enabled Request fields, Answer fields, Request and Answer attachment links, and Bibliographic table fields. Fields regarded as Requester contact details (like email address and phone number) are only provided to System administrators by default (to comply with privacy regulations). It does not include calculated fields like “Minutes to close”. There is a user signon Function (in the Search group) that System administrators can use to change the permission level of users that can export this data, and separately, those that have the Requester contact details included in these exports.
Additional information regarding the Advanced search screen
The Advanced search presents a set of fields that are required for all systems and then adds the 15 most used fields in your system. When your system is new, it will take a while for enough data to be present for the system to sensibly calculate the best fields to present, so be patient!
However, if there are fields showing in the Advanced search screen that you do not use at all, disabling those fields in the Data dictionary will remove them from this screen.
Open questions screens additional customisation
Question text summary: Provides a summary of the question controlled by the QuestionActive.htm text template (usually provides Subject, Question text, Item summary, Latest client note since last open/reopen). Use System>Utilities>Administration utilities>Text file editor in HTML mode to edit this template to include anything else that you want to include about your questions (such as request type or matter number).
Question text [more] symbol: Parameter 3.5 determines how many lines (hard returns) of question, answer or Item summary text are displayed before the [more] symbol appears. Make parameter 3.5 larger or smaller according to how much text you need to see to be able to distinguish between questions.
Item summary (appears in italics after the Question text): The Item summary is defined in the Request form used by that question. See System>Request form summary and then the form for that request – then go to Edit options mode and the the Other options tab. You can define the Item summary to include any data about this specific request, and you can use HTML formatting to make is stand out. In this way, Item summary can be used to add in any other important attributes of the question to the Search results screens, including the Open questions screen.
Display of client contact information: Parameter 3.1 determines whether the client’s primary contact information is displayed in work database search results like the Open questions screens, and optionally for closed question such as in My closed questions.
Format of client contact details: Use System>Utilities>Administration utilities>Text file editor in HTML mode to edit the ContactSummary.htm file to determine what client contact details appear in this screen on initial display. Edit ContactDetails.htm to determine what displays after [. . .] is clicked. Editing these files needs HTML expertise so please do not hesitate to ask your RefTracker support representative to make the changes for you.
These Open questions screens open showing the search results defined by the Pool view set of parameters in each staff member’s My preferences, so use the Pool view parameters in each user’s signon to have them focus on the work that is important to their area.
Target date highlighting and “Needs attention”: The “Needs attention” parameters in the Processing options tab of each Request form’s Edit options mode determine when certain coloured highlighting appears in the open question screen:
- “Needs attention” can appear in the ID column to indicate that it is urgent that a staff member picks up this question and starts working on it.
- The Target date can appear in a bold highlight colour when it is becoming close to its Target date as a reminder to get it finished on time.
- The allocated staff member’s ID in the ID column can appear in the highlight colour when the question is approaching its Target date to indicate that the question is in urgent need of attention by that staff member.
Click here for details of how to set up the “Needs attention” functionality.
Locations screen
The labels in this screen can be amended by changing the label column in Data Dictionary System tables, Location table.
Request forms screen
The labels in this screen can be amended by changing the label column in Data Dictionary System tables, Request form table.
Staff signon maintenance screens
The labels in this screen can be amended by changing the label column in Data Dictionary System tables, Staff table.
The DeskStats preferences tab will disappear if your RefTracker does not entitle you to use of DeskStats, or if the DeskStats functions have been configured out for this user.
The Specialties tab will disappear if this concept has been configured out of your system by Disabling the Specialty code table.