Data dictionary table viewing and editing
To see details of any of these tables, or to edit them, simply click on the table’s System name. The data dictionary editing screen will be displayed. This is the Data dictionary display for the Client table of the Data dictionary.
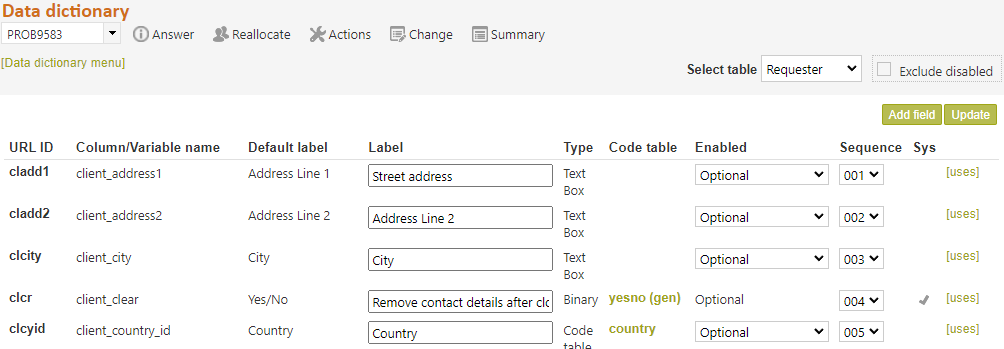
The Data dictionary details screen shows the fields (including code tables) that make up each table and, where appropriate, allows the field name to be set by your request answering service. When a field name is changed it will be referred to by the new name throughout RefTracker, for example a field used in Request forms will not only appear under its new name in the Request forms design screens, but the text for its default label will also be set to the new name.
Note that Code table names are changed in the Code table screens, not in that Data dictionary. Because the Data dictionary is the primary definition of fields in RefTracker, Code tables appear in the data dictionary with a hyperlink to their associated Code table maintenance screen. If you need to change the name, or contents of the drop down box provided by a code table, simply click on the hyperlinked Code table name in the Data dictionary screen and you will be presented with the Code table maintenance screen, and you can make the changes there. Because Code tables have data associated with them, they need the extra Code table maintenance function to manage that additional information. That is why changes are made at the Code table level rather than at the Data dictionary level, and it is also why a simple link between these functions has been provided.
The Data dictionary also allows fields to be Disabled (and hence no longer displayed in RefTracker) if your library does not want to collect that data. Similarly fields can be set to Mandatory in the data dictionary, which means that when they are used in RefTracker screens or Request forms, data MUST be entered for them (but Mandatory does not mean that they have to be used in every Request form). For example, in the Client table, you can disable the fields used to automatically collect browser, device, IP, and referring URL information, if this is not important to your library, and the data will no longer be collected and the fields will no longer appear in the Details tab of the Summary screen or in staff emails. Another example is that you can Disable, say, the Reason field in the DeskStats data table and that will remove the Reason table from the DeskStats screen so it is no longer displayed as a field for which data has to be collected in DeskStats. (Note that additional functions for disabling fields/functions in RefTracker are provided in the 7.x Question answering customisation parameters and the 8.x DeskStats customisation parameters.)
If you need a new Data dictionary field you can achieve that by re-enabling a disabled field, or by using the “Add field” button to add a new Data dictionary field. See below for more details about using the “Add field” button. Code tables can be added using this screen but to re-enable an existing code table, use the Code tables menu screen.
The “Exclude disabled” option in the top right of the Data dictionary screen allows all enabled Data dictionary fields to be viewed without the distraction of any disabled fields.
This option is unticked by default so that you can see all fields, including any that might have been disabled. We recommend that if you use this function to make it easier to find a field, it should be returned to unticked after use. When this option is unticked, you can choose a specific disabled field/code table, to be re-enabled, preventing unnecessary new fields from having to be created
The Data dictionary also allows the order of presentation of the elements of that table to be set. The Sequence will determine the order in which fields are displayed in the Details tab of the Summary screen, allowing you to have the fields most important to your library at the top, should you want to do this.
For each of the fields that can be used in RefTracker the following information is provided:
URL ID: The name by which this field can be used in a URL. Click here for information about how to use these parameters to pre-fill a request form with information known by the web page it is being displayed from.
Column/variable Name: The name by which this field can be included in RefTracker email and print templates, and the column header under which it will be found in the database. For more information about using these names in templates see the later section of this manual called “Customising the templates used in RefTracker”.
Default label: The name of this field in the RefTracker database.
Label: The name by which this field will be known throughout the RefTracker application pages for this instance of RefTracker. It is also the label that will appear for the columns of the raw data provided by the RefTracker Statistical reporting function. You can change this name when it is displayed in a data entry box. (The name is changed in System>Code tables, for fields of type code list.)
The name of the Client and Questions tables are available as the variables
{client} and
{question}
and you may see these variables used in field labels e.g. {client} name appearing in the label field would be replaced on use by “Customer name” or “Patron name” according to how your Client table is named.
Field type: The type of field in which this data is stored in the database.
Text box is a single line text entry box allowing up to 2000 characters.
Text area is a multi-line text entry box allowing up to 2 million characters.
Code list is a drop down box whose values are supplied by the code table referred to on this line, with each entry up to 100 characters long.
Date is a field that stores a date or a date and time.
Money is a field that stores amounts to which an International currency code applies – for example US dollars – up to 8 numerals and a decimal indicator only.
Numeric is a field that stores numeric data (can include digits past a decimal point) – up to 8 numerals and a decimal indicator only.
Code table: The code table used by this field, if there is one. Code table names and values are managed by System>Code tables and you can get to the appropriate code table to change its name, and to change values in it, by simply clicking on the code table name in this page.
Enabled: The option displayed here controls how this field is used. Mandatory means that wherever this field appears a value MUST be provided for it, Optional means that the provision of a value is optional. Disabled means that this field is not being used in RefTracker. You can change this attribute when it is displayed in a data entry box.
Seq: The order in which the fields in this table will be displayed in RefTracker e.g. in the Details tab of the Summary screen and in the Raw data record created by RefTracker Statistical reporting. To change the order change this sequence number to the number at which you want the entry to appear. For example if you change the sequence number to 1 that entry will appear at the very top of the list.
Sys: A tick appears here if this field is required by the RefTracker system, in which case it cannot be Disabled.
Uses: Click this link to see a table of all the places where this field is used. Viewing this link is really helpful if you are considering disabling a field, or re-using it for another purpose.
Using the “Add field” button
The “Add field” button allows new fields to be created in the Request, Requester, and Bib Data dictionary tables, as new fields are required (including more code tables). It means you can add an unlimited number of User Defined fields rather than being limited by the number already configured into your RefTracker system.
You cannot add new fields to the ILL Data dictionary table as this table is related to specific RefTracker functionality. And in the DeskStats table, fields from the Request table and the Requester table can also be activated for use in the DeskStats table (so that consistent statistics can be obtained across these two functions.
When a new field (whatever type you require, including code tables) is required, go to the Data dictionary to create it. Choose the table that you need the new field to be in – Request where the field is an attribute of the request, Requester where the field is an attribute of the person making the request, Bib where the field is an attribute of the item being requested.
In the Data dictionary screen for that table (or Code table menu screen if its a code table), look to see if there are any existing disabled fields that would suit your need. If not, click the new “Add field” button and complete the requested details for your new field – select the type of field you want, give it a Label (name for that field), and click Submit.
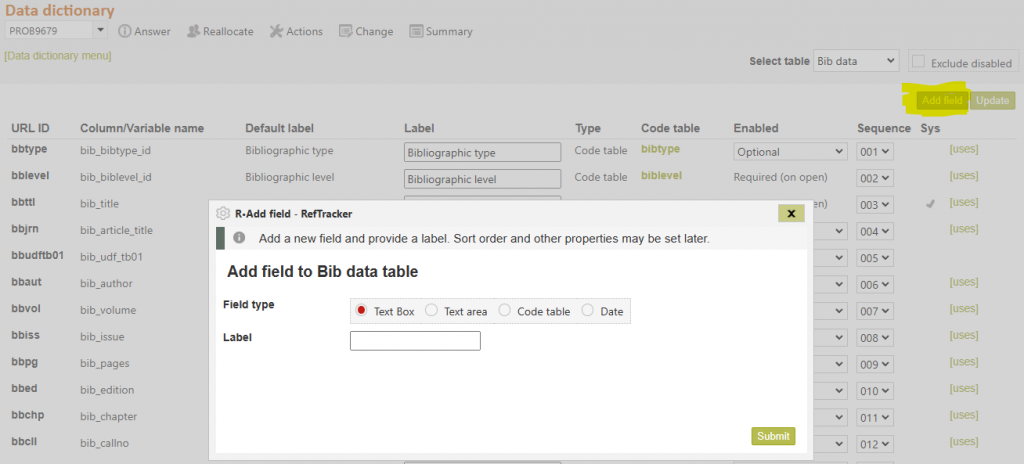
The Data dictionary table screen will redisplay showing that your field has been created (at the bottom of the page – you can change its sort order to change its position in the screen).
The new field will be created as an Optional field as that is the recommended enabled status for all user defined fields in the Data dictionary (because other statuses can be applied when you use the field in Request forms). However you can change attributes of the field after it is created (such as disabling it), by changing it in the Data dictionary screen and using the Update button to save the change.
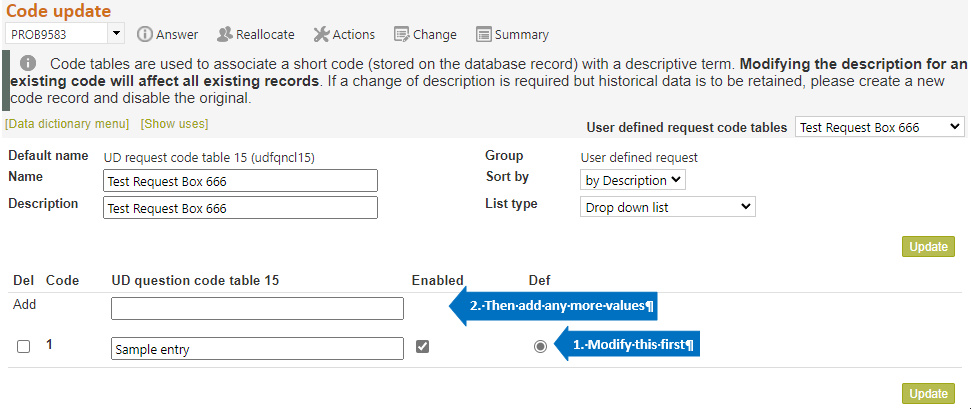
If you choose to create a new Code table field, the code table will ONLY be enabled for requests (the Request table). Should you need it enabled for DeskStats you should use the [Review] function for that code table, in the System>Code tables menu screen, after it has been created.
When you click Submit, the code table will be created and you will be presented with the screen that allows you to manage the entries in that Code table. A sample entry will have been created , which you should modify to suit your first entry, before adding any further entries.
NOTE that, when you add a new field to the Data dictionary, you may also been to add that field to the email and print templates you want to use it with (usually only if you have added a lot of customer fields), and your Active system administrator may need to add it to the Advanced search screen, if you are going to want to be able to search by that particular field.