4 – Text parameters
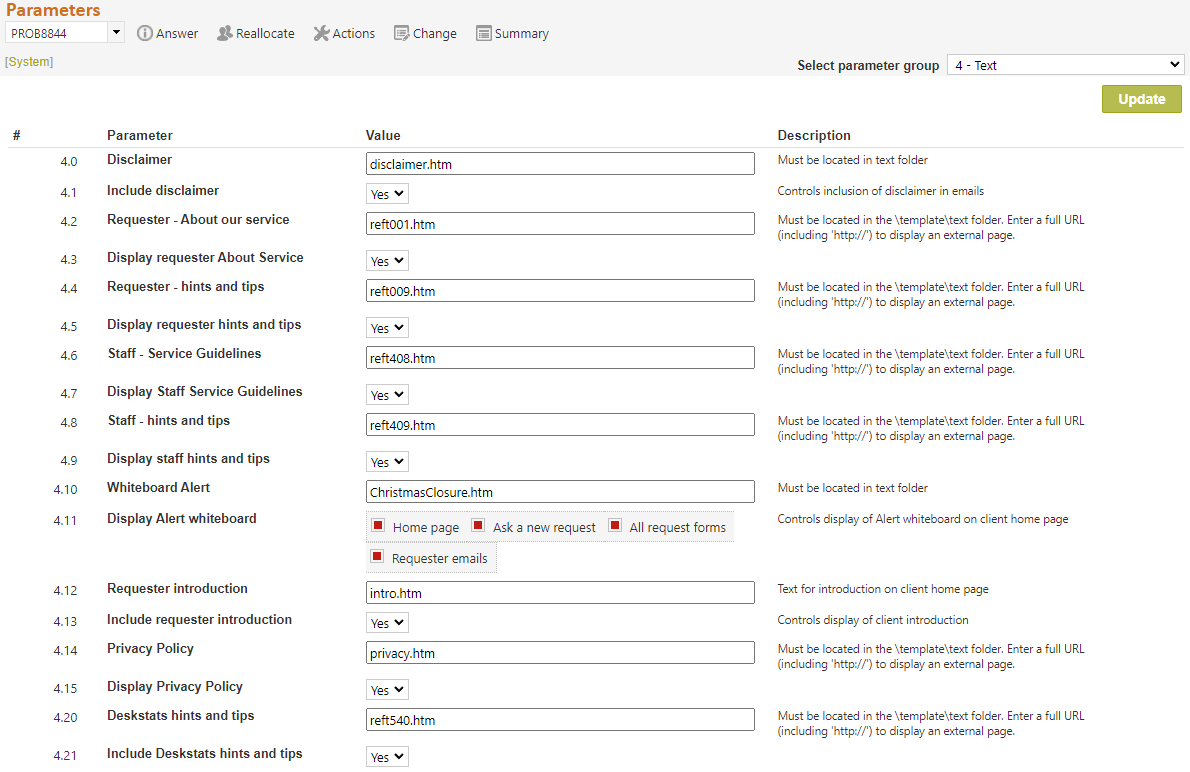
Text parameters allow for several text files to be defined by your library, or the use of them to be turned off if required.
All text files are distributed with example text, but you may wish to turn off display of these files until you have been able to customise them for your specific requirements.
To edit any file indicated by a parameter on this page, use the System>Utilities>Administration utilities>Text file editor function that can edit any of the files provided in the reftracker/template/text directory.
However, where indicated, you can specify your own web page to be displayed at these points. For example, you may have a set of web pages that record your Reference policies at say http://www.abc.com/policies You can link those policy pages directly into the Staff – Service guidelines link in the RefTracker home page by entering http://www.abc.com/policies into parameter 4.6.
Don’t forget that you can use the Web page editor function at System>Utilities>Administration utilities>Web page editor, to create a policies page/s should you wish to do that!
4.0 & 1 Disclaimer: Disclaimer text is included at the bottom of every email to a client.
4.2 & 3 Client – About our service: The client home page contains an About our Service link. This is where you can describe the operating policies of your service. To provide content customised to your needs you can:
– edit the default document 001.htm using System>Utilities>Administration utilities>Text editor
– upload yoru own .htm document using System>Utilities>Administration utilities>Text editor and then put the name of that document in parameter 4.2
– or enter the full URL (i.e. starting with http://) of a web page that you may already have that describes your aims for your request answering service.
4.4 & 5 Client – Hints for using this service: The client home page contains a “Hints for using this service” link. This is where you can provide information to supplement the standard help for the client interface that is provided by RefTracker. To provide content customised to your needs you can:
– edit the default document 009.htm using System>Utilities>Administration utilities>Text editor
– upload your own .htm document using System>Utilities>Administration utilities>Text editor and then put the name of that document in parameter 4.4
– or enter the full URL (i.e. starting with http://) of a web page that you may already have that describes your organisation’s policies for using the different fields in Request forms.
4.6 & 7 Staff – Service guidelines: The staff home page contains a Service guidelines link. This is where you can include your reference operating policies manual for the convenience of your staff. To provide content customised to your needs you can:
– edit the default document 408.htm using System>Utilities>Administration utilities>Text editor
– upload your own .htm document using System>Utilities>Administration utilities>Text editor and then put the name of that document in parameter 4.6
– or enter the full URL (i.e. starting with http://) of a web page that you may already have that describes the polices that your staff should subscribe to when operating your request answering service.
4.8 & 9 Staff – Hints, tips and policies: The staff home page contains a “Hints, tips and policies” link. This is where you can provide information to supplement the standard help for the staff interface that is provided by RefTracker. To provide content customised to your needs you can:
– edit the default document 409.htm using System>Utilities>Administration utilities>Text editor
– upload your own .htm document using System>Utilities>Administration utilities>Text editor and then put the name of that document in parameter 4.8
– or enter the full URL (i.e. starting with http://) of a web page that you may already have that provides information that supplements the RefTracker help, in relation to how your organisation uses RefTracker.
4.10 & 11 Whiteboard Alert: These parameters provide an easy way to spread a message (such as our service will be closed on Monday for Veteran’s day”) to your request answering service users, by displaying the message in up to 4 different places. Specify your message in the file selected at parameter 4.10 and select where it should be displayed in parameter 4.11.
To turn the display of these notices off, just deselect the places where you want it turned off in parameter 4.11.
This whiteboard functionality allows notices that relate to your whole service to be easily implemented in a way that ensures your clients will see them. If you need to make an announcement regarding just one of your services, that is best implemented using a notice built into that specific request form and any email templates specifically used by that form.
How to use the whiteboard functionality:
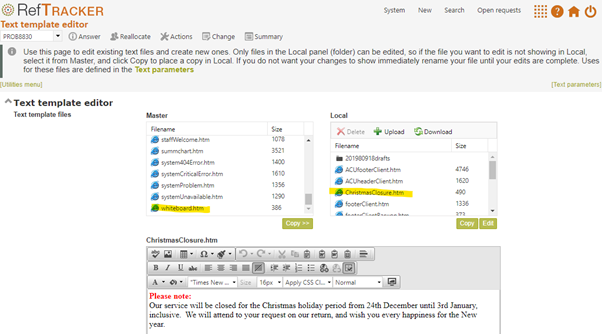
At Parameter 4.10 specify a file that contains the message you want your users to see (called the whiteboard file). You can create a number of whiteboard master files (e.g. one for Christmas, one for single day Public holiday closures, and one for emergency closures) and switch between them using parameter 4.10. Create the file/s you need, with names that indicate their purpose, by going to System>Utilities>Administration utilities>Template editor (text). Copy the master whiteboard.htm file and use right click to rename it to something suitable e.g. ChristmasClosure.htm, and edit the text to suit your needs. The Template editor (text) screen provides easy to use formatting functions, and the HTML editing option provides the full features of HTML to emphasise your message, should you want further flexibility.
When creating these files remember that the text is going to be inserted in places that already contain important text. The message should be relatively short so that the important information below it does not disappear off the screen!
Enter the name of the file you want displayed at parameter 4.10.

Then, at parameter 4.11 choose where you want this message to be displayed.
If you select the “Home” option, it will display in the Client interface “Home” page like this:

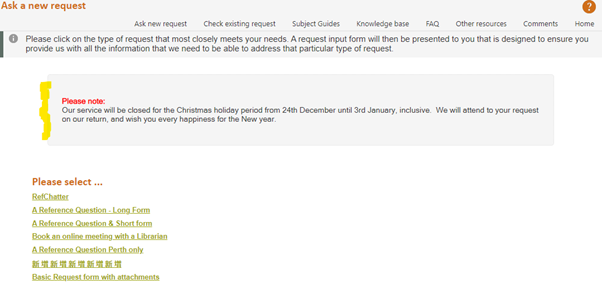
If you select the “Ask a new request” option, it will display at the top of the Client interface “Ask a new request” page like this:
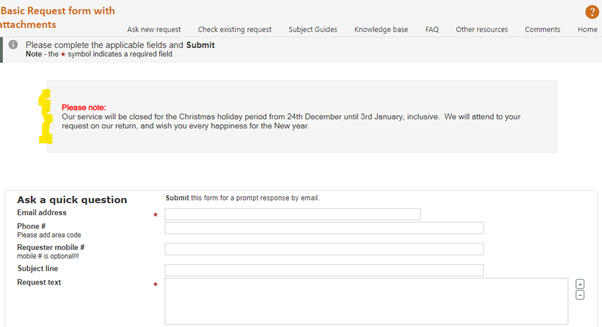
If you select the “All request forms” option, it will display at the top of each of your request forms, wherever they display, like this:
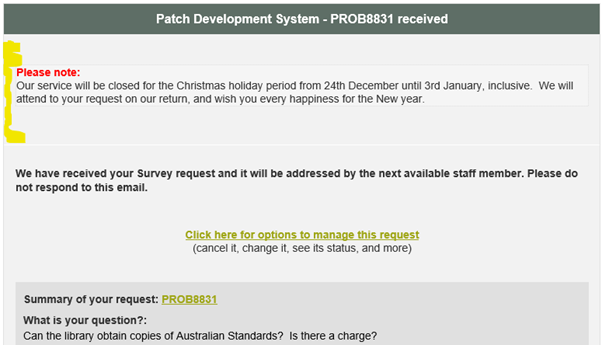
If you select the “Requester emails” option, it will display in each email that is set up to include this text. By default, that is just the refm110 confirmation email, but you can add it to any other client correspondence templates that you want to add it to:
Please note that if you have custom client interface email templates, and you want this message to appear in those emails, you will need to amend those custom email templates to include the following code (usually inserted just below the header bar). This code will only insert the text in your whiteboard file, in email templates where the code is inserted and ONLY when the “Requester emails” option is selected at parameter 4.11.
The variable for inserting your whiteboard file text into any client interface template is: {misc_whiteboard}
4.12 & 13 Client introduction: The text appearing immediately below the Welcome heading (which itself is set using parameter 1.2) in the client home page can be changed using this text file. You might use this feature to prominently display some service policies – however you should be careful about the length of home page that you create when changing this file as ideally the home page should not be more than one screen full.
4.14 & 15 Privacy policy: Every client interface page contains a Privacy policy link in the standard footer. If you use a custom footer you will need to include your own link to a Privacy policy if you need one based on your local PII (Personally Identifiable Information) Privacy laws. The standard document that appears when you click this link accurately describes the privacy policy applied to all RefTracker systems hosted by Altarama – which is that the client’s contact details will not be used for any other purpose than responding to their request and improving the service provided (such as surveys about the level of service received).
To remove this Privacy policy link from the standard footer at the bottom of every client interface page change Parameter 4.15 to No.
To modify the standard Privacy policy that appears when you click this link edit the default document privacy.htm using System>Utilities>Administration utilities>Text editor
To upload your own .htm document use System>Utilities>Administration utilities>Text editor and then put the name of that document in parameter 4.14. No matter what named file you provide it will display in the RefTracker client interface with a URL of ref014.htm.
To have the system go to one of your already existing web pages when Privacy Policy is clicked, enter the full URL of that web page (i.e. starting with http://) into Parameter 4.14.
4.20 & 21 DeskStats Hints & tips: The DeskStats screen contains a “DeskStats hints& tips” link. This is where you can provide information about your local policies for using the different rows and columns and fields in DeskStats.
4.20 defines the document or web page that will be brought up when a user clicks on “DeskStats hints & tips” in the DeskStats screen. To provide content customised to your needs you can: – edit the default document 540.htm using System>Utilities>Administration utilities>Text editor- upload you own .htm document using System>Utilities>Administration utilities>Text editor and then put the name of that document in parameter 4.14- or in this 4.14 parameter, enter the full URL (i.e. starting with http://) of a web page that you may already have that describes your organisation’s policies for using the different lines, columns and fields in DeskStats. If you do this, your web page will display when “DeskStats hints and tips” is clicked.
4.21 allows you to remove the “DeskStats hints & tips” link from all of your DeskStats user’s screens, or reinstate it.
Exercise:
Consider the effect of these parameters on your library’s requirements. Make any desirable changes, and if you make any, click on Update. Then proceed to the next parameter group 5) Server.