Request forms – Edit layout screen
This is the Request forms Edit layout screen mode that allows the layout of Request forms to be defined.
This page allows the text and fields that are included in a form to be defined – that is it allows you to create a series of questions to ask the client, that create a suitable reference interview for this type of request.
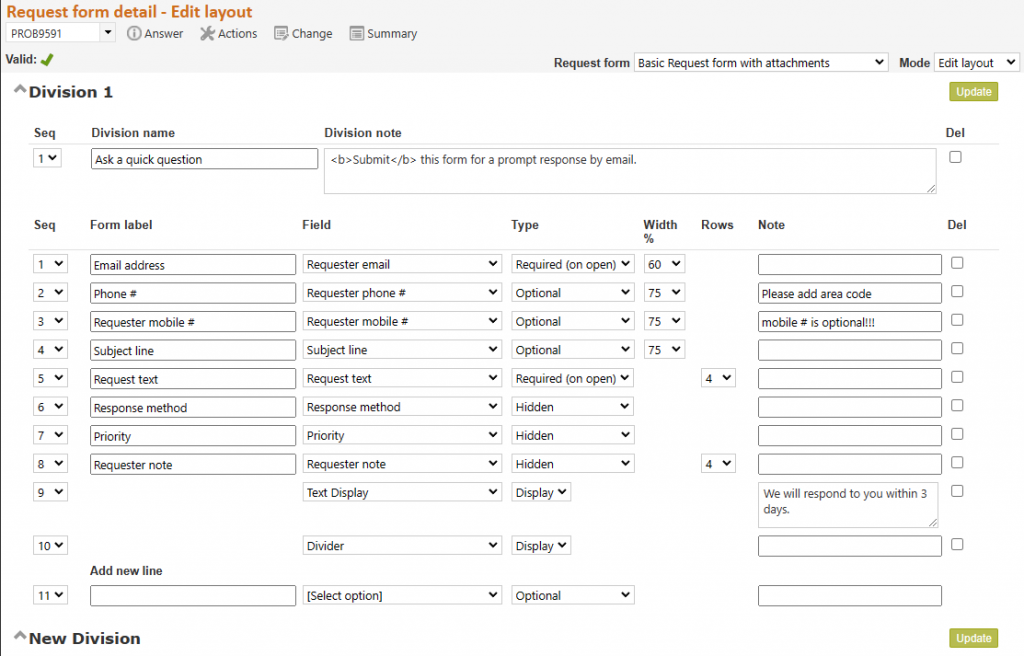
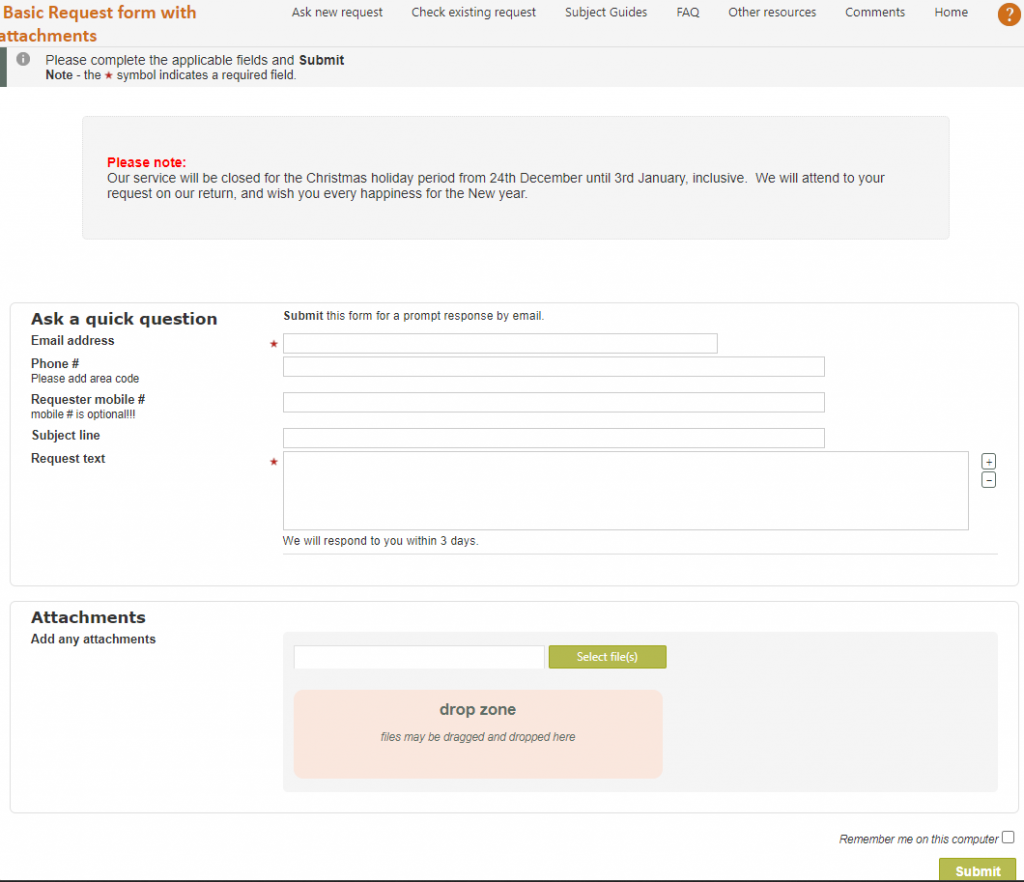
When you choose Edit layout mode you are shown the definitions of each of the lines that make up the form you have designed – one definition line for each line that appears in the form. For example, this is how the above layout looks when viewed by a client:
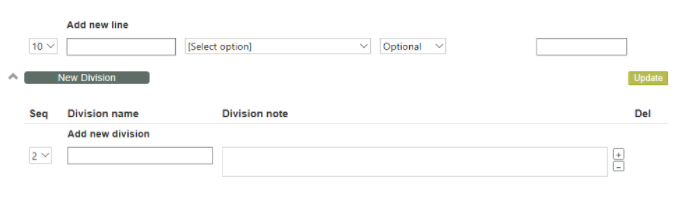
Headings and their associated text are defined as “Divisions”, highlighted by a Division header with a background colour. To amend the text appearing in a heading, simply amend the text in the Division name and note definitions in the line below the division header bar. To create a new section of the form with its own heading use the Add new division line below the last header bar on the page. A “Division” creates an area in your form that is logically grouped together by a background, allowing like things to be visually grouped together, such as all client contact information to be grouped together in one part of the form.
Lines and their associated fields and text are defined as a one line definition per field to be included, under the Division or heading where they will appear, and in the sequence order that they will appear. To create a new line in the form use the Add new line (see the next section for how to define a line).
Note that the fields that show in the Field drop down list are the fields that are currently enabled in the Data dictionary (which includes Code tables even though they are defined using the separate Code table function). If you need a field not listed, check for a suitable field in the Data dictionary that can be enabled for the use you have in mind, enable it (using code tables if it’s a code table) then come back to this Request form update screen and the field will be showing and able to be used.
The data type of a field that you have inserted is not specifically stated in this screen, however it can be easily distinguished as follows:
- Text boxes (single lines for entry of text) are displayed in this Edit layout screen with the option to change the width of the screen that they use when displayed in a Request form.
- Text areas (multi-line boxes for entry of text) are displayed in this Edit layout screen with the option to change the number of rows used by the field (its depth) when it displays in a Request form (it will always use the full width of a screen as this type of field is intended for entering larger amounts of text.
- Code tables do not allow either the width or number of rows to be defined as their size is determined by the size of the entries in the code table, and the “List type” selection in that Code table (that determines whether the code table will be presented as a drop down list, horizontal list of radio buttons, or a vertical list of radio buttons.
Hidden fields are lines of information recorded in a form, but not shown to the client in the form. A value (default) must always be recorded for a hidden field using the Edit defaults screen (see upcoming section), and that value will be automatically passed through to RefTracker with every question created using this form. A validation warning will appear until a default value has been entered using the Edit defaults screen.
Hidden fields are often used to set a known location, or a response method. Anything where information is already known about the request because the client selected to use this particular request from. For example, the above example includes a hidden field (Response method has been defaulted to email by setting it as a hidden field with default value “email”).
Minimum fields in a form A validation warning will appear until a form includes lines defining at least:
- a Question (the Question field), even if it is an implied question like “I would like to book a tour with the following details” that you save as a default value for a hidden field (the Question field). Note that the Question field is the main field by which questions entered using this form will be identified, and it is generally the only field that clients can enter HTML formatted text (such as information cut and pasted from a web site), so use this field for the key thing that is being requested.
Wherever a Question field is provided, a [Manage question attachments] hyperlink will also be provided, when the form is used in the staff interface. This allows staff to add and delete attachments to any questions. In the client interface you need to include the “Attach files” field in the form if you want clients to be able to include attachments. - a Contact method (the Response method field). If a response is not required for this type of request, you might want to set response method to hidden and default it to “No response required” (which presumes that a response does not have t be sent to the client), or “External” (which presumes that all correspondence in relation to the request will be conducted outside of RefTracker.
- and at least one of the contact information fields that matches the contact method (in this example the Client email field has been used to match the Contact method of email defined in the defaults – see upcoming section). “No response required”, “External”, and “Private contact details” do not require contact information.
Note that when the form you are designing is used (in the client interface, staff interface New or Quick screen, or in the Change screen), validation is applied to each use of the form that looks at the data that was entered using the form and ensures that it will result in a valid question, for example, if response by email is selected in the form, the form usage validation will ensure that an email address has been supplied as part of the data entered with that question. It will also ensure that the email address information provided is in a valid format for an email, and, if the form is being completed through the client interface, the confirmation screen that appears after submission will provide a popup that asks the client to double check that the email address they have entered is correct. - if any bibliographic fields are included, then the Title field must be included.
Re-ordering headings and lines To change the order of display of lines or headings simply amend the sequence numbers. Giving a new line or heading the same number as an existing field or heading will result in the new field being inserted directly before the existing field with the same sequence number.
Use of HTML – to enhance text used in Request forms, HTML can be used:
- <b>bold</b> to bold text
- <i>italics</i> for italicise
- <br /> to force a new line
- <font colour=#FF0000>red</font> to colour the text
- <a href=https://www.altarama.com.au target=”_blank”>click here</a> to hyperlink the text click here to the URL https://www.altarama.com.au and have that site open in a separate window.
Update buttons are provided at every Division heading level. You can use any of the provided Update buttons – they all work identically.
Request forms – the field line in Edit layout mode
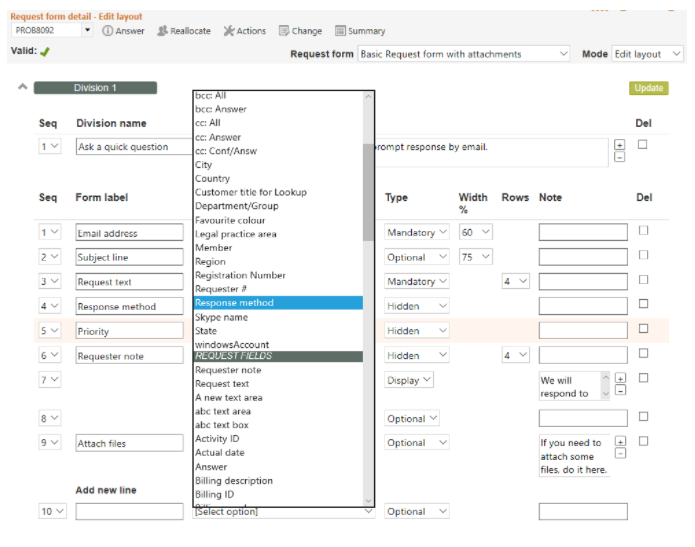
When adding a new line you must start by choosing the field you want to insert from the drop down list in the Field column.
The name of a field is indicative of its intended use, however there is a table provided at the end of the Administration section of the help system that describes the use of each field. Use it to guide you in what field to use.
Once you have selected a field, each line allows for the following information to be defined about that field:
Sequence – this number determines the order in which this field will appear within this division/heading.
Label – this is the text that will appear on the form, as the label, or description for this field. When you select a field for the line, the default label for that field (its name in the Data dictionary) is automatically inserted, however the label should describe the information to be entered in this field, as the label will identify this information wherever request form information is used. So if you need to use a more appropriate label, simply overwrite the default label. (Max 50 characters)
It is possible to create a blank label by using the HTML non breaking space character – enter into the label field to create a blank label.
Field – this is the RefTracker Data dictionary field that you want to use for this line. There are more than 300 such data fields, some with purposes defined by RefTracker and others that are User defined, as described in the “Data fields in Request forms and Details tab” help page. Some are code tables (drop down boxes managed through the Code tables function) and others are data fields (single line boxes and multi-line areas managed through the Data dictionary). Only the code tables and fields that you have enabled are listed here, so if there is not one to suit your purposes, go to the Data dictionary (or code tables) and label on to suit your needs, and enable it.
It is important that you use the available fields consistently so that your statistics will be consistent, but the definition can be stretched to meet specific needs where appropriate – for example there is no reason why the Client note field could not be used to receive responses to a survey question – a client note of a type! But there are also User defined fields that you can apply to specialised needs. When you are designing a new request form, always consider what field should be used for each piece of data you are capturing first. If the data is not captured in any other form, start by deciding whether you need a code table (drop down box), or whether you simply need a text entry box. If a Code table is required, go to Code tables and choose an appropriate code table to use from the Question input or User defined lists. Ensure the table is Enabled and then give it an appropriate name. If a text entry box is required, go to the Data Dictionary and choose an appropriate field from the Question, Client or Bib tables (including the User defined ones). Ensure the field is Enabled and give it an appropriate name.
The Field drop down list is divided into Client fields, Questions fields, Bibliographic fields and formatting fields, to aid in this choice. The fields showing under each of these sections are the fields enabled in the Client table, Question table, and Bibliographic table of the Data dictionary, respectively. When you create a new field, you need to think about whether the field represents information about the client (in which case it should be created in the Client table of the Data dictionary, or the User defined Client code tables), or the question (in which case it should be created in the Question table of the Data dictionary, or the User defined Question code tables). Displays of information saved in the new field that you create will be grouped with other like information according to whether you add it to the Client or Question tables – for example, information stored in a new Client field will be displayed in the client information section in the Details tab of the Summary screen and with other client information in emails to staff about the question – so make sure you choose the right sort of field.
There is no substitute for reading the Admin help page Appendix 1- RefTracker fields for Request forms in order to understand the full purpose and flexibility of each of these fields. This table also defines the maximum number of characters that are supported by each field.
A manually maintained mapping of how you will use these fields in your library, as opposed to their system definition, is a great aid to good Request form design! Adding a field to the Default Request form with a note describing its use, as you enable it for use in other Request forms is a great way to document your use of fields. Using descriptive names as you define new fields in the Code tables and the Data Dictionary, is also key to good use of these fields. The [review] and [uses] links to the right of fields in the Code tables menu and Data Dictionary tables, are also invaluable in being able to see where forms are currently being used!
Type –
- Optional means this field will appear in the form, but is not mandatory for completion. (Not available if a field has been defined as mandatory in the Data dictionary/Code tables)
- Required (on open) means this field will appear in the form, with a tick or red asterisk next to it indicating that a value must be entered in this field. Form validation will check that a value has been entered each time the form is used. This field will be indicated by the icon you choose at parameter 3.24.
- Required (for close) means this field will appear in the client form as an optional field, but in the staff New form as a Required (for close) field with an orange asterisk indicator. If not completed, it will result in the request being created as an incomplete request. The incomplete status, means that this field needs to be completed before the request can be closed. Required (for close) is often used where that information may not be available until part way through the processing of the request, such as a catalogue number for an item that is yet to be digitised. This field will be indicated by the icon you choose at parameter 3.25.
- Display means this field will appear in the form, but will not be able to be changed by the form user. The value set for it in the Edit defaults screen will be shown and saved with this form each time it is used.
- Hidden means this field will NOT appear in the form, but the value set for it in the Edit defaults screen will be saved with this form each time the Request form is used.
If you do not want a value for a field to be passed with each use of your form, be sure to delete the field – hiding fields and setting “Not specified” values for them, simply results in staff being given useless information!
Note that although the Question field is mandatory, you can define it as a Hidden field. For example you could set the Question field to Hidden and give it a value of “Please obtain the following item on ILL for me”. This is often used where the request is “implied” such as a suggestion for an item to be purchased.. - Disabled means that this field has been disabled at the Data dictionary or Code table level, since it was included in this form. As it is disabled it will no longer appear in the form and no data will be collected for it.
Width % – when a field will appear as a Text box (single line), a Width % field appears here. The value you select controls the % of screen width that the data entry box for this field will take up (no matter what the size of the Screen RefTracker is displaying in – unless the mobile phone layout has been invoked where all fields are shown full width). In this way you can control the look of these fields and the implied length of response required.
Rows – when a field will appear as a Text area (multi-line box) in the form, the rows value can be adjusted to determine how deep the box will be. As this type of box is intended to allow larger amounts of data to be entered it will always display in the Request form using the maximum screen width available. As the Question and Answer fields can support large fonts, lists, tables and images, you may want to consider making them larger that the default 4 rows!
When values do not appear in either the Width % or Rows columns, the field is a Code table and the width of the field is determined by the length of the entries you put in that code table if that code table displays as a drop down list or vertical list of radio buttons. If the Code table specifies that it should be displayed as a horizontal list of radio buttons, the list will wrap if it is wider than the current window.
Therefore, you can often tell what sort of field you have inserted by whether the Edit layout screen allows you to amend the width % (single line text box), number of rows (multiline text area), or none (code table). However, for full confirmation of the type of field you have inserted see the Request form design, Display mode screen that shows the field type, or view in in Preview mode to see the effect it has created.
Note – this is a smaller font text that appears under the label for this field. This is generally used for specific instructions about entering data in this particular field. Maximum length is 2 million characters.
Del – check this box, then click on Update, to delete this field (entire line) from the form. Don’t be afraid to delete fields, they can be easily re-instated. Do not set fields to Hidden when you should really be deleting them!
Request forms – Edit layout – Adding new fields and headings
Hint: Don’t forget the standard browser shortcuts when working in the Request form screens:
- End takes you to the end of a very long Request form page when you can find the Submit button.
- Tab allows you to quickly move between data entry fields on a screen.
- Home takes you to the top of a very long Request form where you can find the Mode button.
Exercise:
For the purposes of this manual we are going to add a new field, and a new Division/heading and then preview the results.
The screen print above shows the entries in the Request forms details screen, Edit layout mode screen, that we used to add an example new field and heading.
Firstly we chose the field we wanted to use – in this case “Places already looked”. In this case we chose a field that was already enabled, but if you had needed to use a new field that had not been used before, you would have had to go to Code tables or the Data dictionary and name and enable an appropriate code table or field so that it would show up in this list and be available for selection.
We then decided we would prefer to have this field labelled “Research already done” in this form, and so changed the Label. We decided that we wanted the field to be Optional for completion, and that the suggested box size for this field would be better at 4 rows deep. We then added some note text to provide instructions for filling out this field.
Adding a new division/heading name and note, are just as easy.
We then clicked on any Update button. The screen then redisplays to show the newly added field and header. It also then allow more new fields to be added to the original division, and the new one.
For the request form that you created using your name, add a field and heading similarly to the above, then click on any Update button. Review the new lines that have been added, and how the screen now allows for further fields and another header to be added.
Then change the Mode to “Preview” and review the results of your change (see the next section).
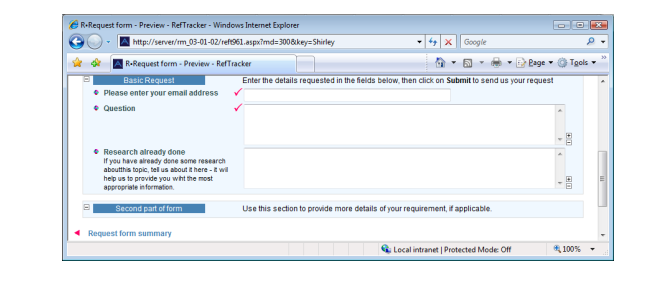
Request forms – Details screen – Previewing changes
Exercise:
Preview mode shows the form as staff will see it. To see what clients will see use the client hyperlink at the top of the Preview screen.
Notice that the “Research already done” line has been added together with the instructional note that we defined for it. There is no tick next to this new field as we have made it optional for completion. RefTracker knows that the “Places already looked field” is a text entry field (that’s how it knew to provide a multi-line box for data entry – you will recall when you chose this field it automatically inserted column and width dimensions into the field definition indicating it would provide a text area). This is part of the definition of this field as opposed to the other fields that you could have chosen to insert.
If you have added a new Division, not that it provides a new heading in a separate “background” to highlight the different parts of the form that you are designing.
So adjusting an existing Request form can be as easy as that! You can add as many or as few lines/fields to a form as are required to achieve the reference interview you want to portray, and you can use whatever combination of the RefTracker field types, in whatever order you need to use them, to achieve that purpose. You simply need to keep adding or amending lines in the same way as we have just done, using the Edit layout screen.
But what about those default values that we mentioned earlier, and the processing options that also need to be defined (or at least checked)? Well let’s now look at the Edit defaults mode for this screen – so change mode to Edit defaults and go the next section.