Request forms – Edit options screen
The first and most important thing to say about the Edit options screen is that all of the parameters in this screen are defaulted to the most common settings. If you want questions entered using your Request form to come into the system and appear in the unallocated questions pool, with Request type “Reference”, a confirmation email being sent to the client, and the target response date being set 2 days (including weekends) from arrival, and all the enabled closing fields to be presented when closing questions of this type, you don’t have to make any changes to anything on any of the tabs in this screen!
However there are many more things that can be configured into how your form will operate, so, if for this type of request you need the questions to process in some other way, or to include some other features, the Edit options screen should be reviewed! Although this screen is very easy to use, if you are concerned about how to achieve the particular processing result that you want for your particular Request form, please call your RefTracker support representative for assistance.
You will quickly come to know which parameters on this screen are the ones that you normally change to replicate the processes in your library, and to make it even easier, we have grouped them into tabs. You can make as many changes as you need on as many tabs as you need before having to click update, however for most Request forms you will only need to look at the first two tabs. The third tab, as per its label, only contains optional settings.
If you normally use settings that are different to the defaults, and want to minimise the work required to create new forms, then set up a form that has the settings correctly set for your organisation, and copy that form whenever you need to create a new form.
The description below explains each of the settings on each of the three tabs, and considers any differences between setting up Client servers, Internal task and Direct to KB forms.
Organisations that are licensed for the optional Dynamic Lookups module will have a fourth tab showing – Lookups – how to use the Lookups tab is explained in the separate Dynamic Lookups Module Setup and Usage Manual.
MAIN ACCESS OPTIONS TAB:
This tab allows you to set the main options for your Request form. You should always review all of the settings on this page, however the lower ones will change only when the form has specific usage or closing requirements.
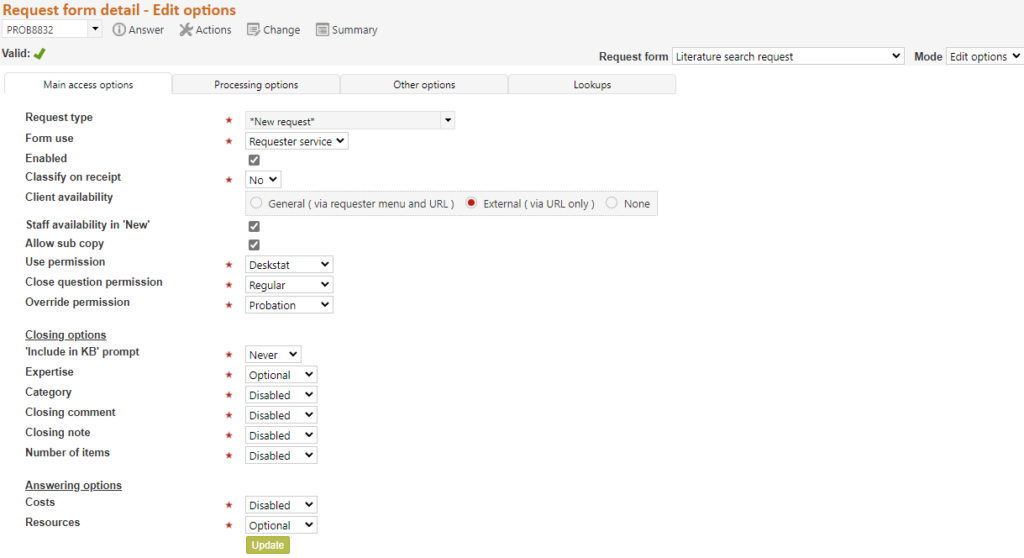
Request type – This is the Request type that will be assigned to questions submitted using this form. You will usually design a Request form for every Request type that you want submitted by clients as Request forms do not allow for client users to be able to change Request types (though staff can always change them once the question has arrived). If there is no suitable Request type, a new one can be created using System>Code tables>Request type.
If the Request type field is included in your Request form design, the value selected by the user of the form will override the value selected here.
Some forms are designed to accept questions of a range of Request types – for example your email importing form will import questions of unknown Request types, and you may well have one “Generic” form specifically designed to collect requests of a wide range of types. When this is the case we recommend that you set the Request type to a value that clearly indicates that classification is required (such as “New question” or “**Unclassified**”) and set the “Classify on receipt” option to “Yes”.
Form use -The options here are Requester service, Direct to KB, and Internal task. They determine what type of statistic is generated for questions entered using this form and the statistics report and Search screen provide parameters that allow questions to be found and reported on according to whether a customer service was provided or not. Some types (e.g Internal tasks) cannot be converted to other types so it is always best to start by copying a form of the type that you want to use.
– “Requester Service ”, presents the parameters in this tab that are applicable to Requester service requests. “Requester service” showing here means that the requests that use this form will be of type “Requester service” and so produce a full request with a service statistic. This is the default and most common use of this parameter as it is used for all forms used to answer requests.
– “Direct to KB” means that the Edit options parameters that are applicable to forms used to just add requests to the KB will display in this tab. “Direct to KB” selected here means that the requests created using this form will be of type “Direct to KB”, and so can be identified for statistics about new requests added to the KB, and can be excluded from service statistics and task statistics.
– “Internal task” showing here presents the Edit options parameters that are applicable to forms used for internal tasks (that should not be included in service statistics). “Internal task” selected here means that the requests created using this form will be of type “Internal task” to clearly identify them for statistics as internal tasks. It is used for forms used to manage tasks as opposed to those used to answer requests, so that separate statistics can be generated for internal work as opposed to work done for the benefit of the end users your organisation supports.
When you need to create a new request form, copy an already existing request form of the right type by going to System>Request form summary, and using the Service type drop down in the top right of that screen to select the right Service type. You’ll then be shown a list of all of the currently available forms of that type. Copy the one that most closely meets your needs.
Enabled – As with all other uses of the term Enabled in RefTracker, unticking this parameter Disables the form, which takes it out of use in all RefTracker screens, but retains it for use when used in historical work. Importantly it means that disabled forms will not display as an option in the New, Change, or Copy screens, or the client interface.
When designing a new form, untick the Enabled box and it won’t be able to be used until you are ready! Tick it again when you are ready to make the form available for use. Note that it does need to be Enabled to be tested!!!
A form’s Enabled status also shows in the Request form summary screen as shown in the screen print above.
Note that when a form has been disabled, it no longer shows in the list of available forms in the Request forms editing screen, so the only way to re-enable the form is to click the [Options] link in the Request forms summary screen, and tick “Enabled” in the screen that then shows.
Disabling a form means that it no longer appears as an option in places like the Change screen, making that screen easier to use, but it is still available in the system to provide labels for the fields in requests that use that form. If a form is deleted, the labels are no longer available and the system has to use the labels provided by the Data dictionary, for the fields in those questions.
Classify on receipt – Change this to “Yes” if you want the staff member first handling the response to this request to select an appropriate Request type for this question. When “Classify on receipt” is set to “Yes”, the Request type (specified in the field above) will be associated with the request on submission but will act as a generic classification only. Changing this option to “Yes” sets a process in place that ensures that the staff member who first works on this question, MUST change this default Request type to a more accurate Request type, the first time they use the Answer, Third party, Close without client contact or Change screens for that question. In Answer, Third party, Close without client contact and Change, the Request type will show as “[select option]”, and include a highlight bar to its left, in order to indicate it needs to be changed.
The Reallocate screen can be used without reclassifying the Request type, but if a new Request type is applied using the Reallocate screen, this will satisfy the requirement that the Request type must be changed.
This option assists organisations that want to use a generic form to bring in questions of many types, to obtain better statistics about the types of questions that they are responding to. For example, you may well want to set this parameter to “Yes” for your form/s used to import emails, or forms used by the RefTracker to RefTracker process, or even forms completed by clients in your web pages. The “Yes” setting should not be used in forms that will be closed in the New screen, so make sure that you have not ticked the “Close now” option for “Allow processing type” in the Request form Edit options Processing options tab..
When implementing “Classify on receipt” we recommend that you create a Request type that can be used specifically for the unclassified questions e.g. “*New request*” or “*Unclassified*”. Using a Request type like these in the “Request type” field immediately above “Classify on receipt” will make it clear that a request has not yet been classified (both to staff answering the question, and in the statistics), as well as neatly complying with the need to change the Request type.
Do not include the Request type field in forms that are set to “Classify on receipt” as it is inappropriate and will result in the Answering staff member not being able to select the default request type.
Note that forms where “Classify on receipt” has been set to “Yes”, do not display the Request type in the Receipt information section of the New screen as the intention of this workflow is to have the staff member answering the request set the Request type, not the staff member entering the request. If you need the staff member who enters the question to be able to set the Request type for a form set to “Classify on receipt” when using Close now mode in the New screen, we recommend that you include the Request type field in the Request form design – changing the Request type in the New screen in Non-follow up mode will satisfy the requirement to Reclassify.
When “Classify on receipt” is on for a form being used in Close now mode, Request type displays as the default request type for that form. Staff need to remember to change the Request type value when that is applicable (it is likely to be something like “*New request*” that clearly indicates that it needs to be changed) .
Beware that the standard confirmation email to clients shows the Request type in the subject line, so if a confirmation email is going out (which it rarely does for email importing), its subject line will read something like “Receipt of your *New request* question” if you do not change the Subject line for that template in the Email templates code table.
Client availability – Tick General when you want this form to be used by clients through the RefTracker client interface Ask new question function (which is accessible from all RefTracker client emails, even if you don’t use it in your web pages).
– Tick External where you want this form to be used anywhere else but in the RefTracker client interface Ask new question function. When External is chosen the form is only available from places where you specifically insert its URL (which will be in the forms http://<YourRefTrackerDomain>/reft100.aspx?key=<KeyForThisForm>Use this option for testing forms – if you are the only one who knows the URL for the form, you will be the only one who can access it if you set its client availability to External.
If either General or External are selected this for will be available for use in the Change and Copy screens. To remove it from the Change and Copy screens, disable the form.
– Select None if this form is not to be used at all by clients (=Disabled for client use).
Don’t forget that as soon as you set availability other than “None”, and the form passes validation, the form will be made available for live usage in your system – so sometimes you will need to leave setting the availability until the moment you actually want to make this form available for use for the first time.
Staff availability in ‘New’ – Make it available in New so that staff can enter requests on behalf of the client.
Unticking “Available in New” removes the form from under New, but leaves it available for use in the Change and Copy screens. To remove it from the Change and Copy screens, disable the form.
Don’t forget that as soon as you tick set availability for staff, and the form passes validation, the form will be made available for live usage in your system – so sometimes you will need to leave setting the availability until the moment you actually want to make this form available for use for the first time.
Allow sub Requests/Tasks – Tick here to allow this form to be used in Create linked request (if its a Customer service type request form), or Create sub task (if its an internal task type request form). Allowing it here means it will appear in the menu list under under “Create linked request” (or for internal tasks “Create sub task”). A common reason why you might want to untick/disallow a form here would be that the form is only used for gathering statistics – for example, you would not want a form that is used to collect training statistics to show in the “Create linked request” submenu as it is not appropriate for use there. And you would not want an Internal task form to appear in the “Create sub task” menu list if it is only used to gather statistics about other activities that your staff perform, as it is not appropriate for use as a sub task to an Internal task.
Note that this parameter does NOT control the forms available for use as Internal tasks (only sub tasks to those internal tasks). The forms available as Internal tasks are those defined as available at System>Request forms summary>Internal task.
A form does not have to be allowed for client or staff availability to be allowed for sub copy use (you might take advantage of this if you have a process that is only ever performed as a sub task, such as an approval).
KB permission – Sets the lowest permission level of staff member that will offered the KB review screen after choosing to “Include” a request in the KB. Need the “Include in KB prompt” to be set to “Include” or “Exclude”, to be of importance.
Use permission – Sets the lowest permission level of staff member that will be shown this form. The default setting of DeskStat means that all levels of staff users can see, and therefore use this form. Don’t forget to raise this level if you don’t want ServicePoint users like those at service desks to be able to enter questions using this form.
Close permission – Sets the permission level of staff that will be able to close questions using this form in the screens that you make it available for staff usage in the Availability settings above. You only need to change this if you want a different level of user to be able to close the question than the default value of Regular. For example you may want to allow general users to close this question – especially if it’s the sort of question that does not need a response like the details of a service that was provided to the customer on the spot, or input to a survey. If a staff member can use the form, but not close it, and you have made the form available for use in the New screen, that staff member will be presented with a field where they can add notes for their Supervisor, and the question will be placed into Review by supervisor status, and an email sent to the Supervisor for view of the Answer, when they click on Submit.
Override permission – Sets the lowest permission level of staff members that will be able override the client communication and allocation settings specified in this Options screen – for example – you may want General and DeskStats users to be able to enter the details of a question using this form, but you may not want them to be able to prevent the confirmation email from going out, or to allocate the question to anyone other than the normal person for this type of question – in this case you would set this parameter to Probation (because General and DeskStats are lower level users that Probation they will then not be able to override the confirmation email or allocations setting). The System default is that Probation users and above can override the confirmation email and allocation settings that you design into your form, so you will need to raise this setting if you want to tighten up who can override your design.
CLOSING OPTIONS:
“Include in KB” prompt – determines whether the prompt to add this question to the KB will be provided in the closing section for questions entered using this Request form. Further, if this option is to be displayed, it then allows its default setting to be set.
Set to “Never” to remove the question about KB inclusion from the closing division. You would choose Never here, if you do not want staff to be involved in the process of what goes into the knowledge base, for this type of request. Admins can still create KB (and FAQ) entries from these questions by using KB review under Actions, should they want to. This is the most common setting.
Set to “Include” to have the question about KB inclusion in the closing division and default it to “Include”. This will mean staff will have to actively exclude any question they do not think should go in the KB. Staff with permission level higher than that specified at “KB permission” above will be presented with the KB review screen after choosing “Include” and then “Submit”, so they can immediately edit the request and answer and place it in the KB. Staff of lower levels will not see the KB review screen – the request will go into KB review status so staff with permission can place it in the KB, or create a new KB entry for it using KBnew.
Set to “Exclude” to have the question about KB inclusion in the closing division and default it to “Exclude”. This is the default setting. It means staff can choose to “recommend” that a question be included in the KB (by changing the “Include in KB” field for that question to “Include”), even if they don’t have permission to add questions to the KB. In this case the Request will be placed into KB review status and staff with permission can then use KB review to edit it and place it in the KB, or create a new KB entry for it using KBnew.
Expertise – if you have the Expertise code table set to Optional or Mandatory, this parameter determines, whether the Expertise drop down should be included in the Closing division for questions that use this Request form, and whether it should be Optional or Mandatory for that form. Set to “Disable” to remove it form the Closing division for questions using this form (you can remove it from all forms by setting the Expertise code table to Disabled, and if the code table has been set to Disabled the option to set the status of the Expertise code table in this Main access options tab will not be provided). Set to “Optional” to include (only available if the Expertise code table is set to Optional). Set to “Mandatory” to ensure that a value is always provided.
The Expertise code table controls the values that appear in this drop down, and the name of the Expertise code table determines its label.
Expertise is usually used to record the difficulty of a question, but it can also be used for other purposes – for example, a common use is “Marked for” Management attention, updating the web site, interesting question report, etc. One value in this drop down list can be selected.
Category – if you have the Category code table set to Optional or Mandatory, this parameter determines whether the Category drop down should be included in the Closing division for questions that use this Request form, and whether it should be Optional or Mandatory for that form. Set to this to “Disable” to remove it from the Closing division for questions that use this form (you can remove it from all forms by setting the Category code table to Disabled – if the code table has been set to Disabled the option to set the status of the Category code table in this Main access options tab will not be provided). Set to “Optional” to include (only available if the Category code table is set to Optional). Set to “Mandatory” to ensure that a value is always provided.
The Category code table controls the values that appear in this multi-select list, and the name of the Category code table determines its label.
Category is usually used to record standard search terms for a question, but it can also be used for other purposes – for example, some customers use it to record Resources, as they only want to record Resources as questions are closed. Any number of values in this multi-select list can be selected. It can be renamed (using the Data dictionary) to reflect its purpose, for example it might be called “Subject”.
Closing comment – if you have the Closing comment field in the Data Dictionary Question table set to Optional or Mandatory, this parameter determines whether the Closing comment field should be included in the Closing division for questions that use this Request form, and whether it should be Optional or Mandatory for that form. Set to “Disable” to remove it from the closing division for questions using this form. Set to “Optional” to include. Set to “Mandatory” to ensure that a value is entered in this field
The name of the Closing comment code table determines the label that will be used for this field in the closing division.
Closing comment is usually used to record explanations, but it can just as easily be used for numeric applications like “Number of documents” provided. It can be used to record up to 2 million alphanumeric characters. It can be renamed (using the Data dictionary>Question tables>Question) to reflect its purpose, for example it might be called “Billing description” or “Number of items”. This field is QuickText enabled for easy insertion of standard comments such as “Researched similar cases”.
Closing note – if you have the Closing note field set to Optional or Mandatory, this parameter determines whether the Closing note text box field should be included in the Closing division for questions that use this Request form, and whether it should be Optional or Mandatory for that form. Set to this to “Disable” to remove it from the Closing division for questions that use this form (you can remove it from all forms by setting the Closing note field to Disabled in the Data dictionary – if the field has been set to Disabled the option to set the status of the Closing note field in this Main access options tab will not be provided). Set to “Optional” to include. Set to “Mandatory” to ensure that a value is always provided.
This is a text box for which your browser’s autofill will operate. It will usually be used for collection of data that is similar every time, such as file numbers or details of payments received, as the autofill will suggest your commonly used text (as opposed to the Closing comment Text area where QuickText allows a range of standard text to be quickly inserted, or even auto-inserted – for example billing descriptions).
Number of items – if you have the Number of items field set to Optional or Mandatory, this parameter determines whether the Number of items numeric field will display in the closing section of this Request form, and whether it should be optional or mandatory. Set to this to “Disable” to remove it from the Closing division for questions that use this form (you can remove it from all forms by setting the Number of items field to Disabled in the Data dictionary – if the field has been set to Disabled the option to set the status of the Closing note field in the Main access options tab will not be provided). Set to “Optional” to include. Set to “Mandatory” to ensure that a value is always provided.
Only numerics will be accepted in this field. It is usually used for collection of the number of items delivered as a result of this request and so is only applicable where items are being delivered – attachments, documents, files, samples, etc.
This is a text box for which your browser’s autofill will operate. It will usually be used for collection of data that is similar every time, such as file numbers or details of payments received, as the autofill will suggest your commonly used text (as opposed to the Closing comment Text area where QuickText allows a range of standard text to be quickly inserted, or even auto-inserted – for example billing descriptions).
ANSWERING OPTIONS:
Costs – Use this parameter if you want staff to be reminded to enter costs and payments each time they use the New, Answer and Third party screens. Costs (and payments) can always be entered in a separate window (using Actions>Record costs (and payments), but this payment will insert the cats/payment table right in those screens.
Disabled means that the table that allows costs and payments to be recorded will not be inserted in the Saving and Closing division of these screens.
Select Optional or Manadatory as appropriate to have the Costs/payments table appear in the Saving and Closing divisions of the New and Answer and Third party screens. If you only use costs then only the costs functions will be provided, but if you use both costs and payments you will be able to enter both.

Use this Costs and Payments section in exactly the same way you would use the Record costs and payments screen. Notice that the current total of costs, payments and Balance owing are displayed to indicate the closing costs and payments that might be required. Note that these totals do not include any time that you are billing for in this last closing step and do not include any last minute costs, so there are three cost and payment lines provided for entry of these last minute costs and payment actions.
Resources – if you have the Resources code table set to Optional or Mandatory, and there is one or more resources with Question type Any or Question in that code table, this parameter determines, whether the Resources display should be included in the Closing division for questions that use this Request form, and whether it should be Optional or Mandatory for that form. Set to “Disable” to remove it from this form (it is common for Resources to be disabled for forms set to close on arrival, as disabling Resources makes the form much easier to use). Set to “Optional” to include (only available if the Resources code table is set to Optional). Set to “Mandatory” to ensure that at least one Resources entry is recorded EVERY time the Resources section displays for that form (in this case you will need a “None applicable” entry in the code table).
The Resources code table controls the values that appear in this horizontally displayed multi-select list, and the name of the Resources code table determines its label.
Resources is usually used to record the Resources that proved useful in providing this step of the response, but it can also be used for other purposes – for example, number of documents provided. Any number of items in this table can be selected, and optionally, a comment of up to 2000 alphanumeric characters can also be records (such as the search criteria used in that Resource).
PROCESSING OPTIONS TAB:
Processing options – staff follow up required: This tab allows you to set the options for how your Request form will be processed on arrival. You should always review all of the settings on this page.

Allow processing type – This parameter simplifies the settings in this page by making this initial decision as to whether questions received using this form will need staff follow–up or will be closed as they are created.
Choosing “Follow up” means the question will be worked on by RefTracker staff and so parameters allowing you to determine how the question will be allocated on arrival will display.
Choosing “Close now” means that you want the question to be closed and/or redirected on arrival, and so appropriate parameters for that option will display.
Both options can be chosen, and if that is selected, the New screen will provide radio buttons that allow the users to swap between these two modes of operation.
Default processing type – If both options are chosen in “Allow processing type” above” this options allows the mode that will show on initial display of the new screen, to be determined.
The Answer field must be provided in the layout of every form set to default to Close now, that allows Client use – a validation message will ensure that this is done.
Allow reopen by client – This parameter actually applies to reopen by client and reopen emails imported from third parties:
For more information about reopening questions click here.
There are two parameters to consider here: the type of reopen, and who to Allocate to.
The default parameters are “As a request” and “Available staff” as shown here, because this produces the most efficient way of handling these requests and the best statistics, because questions will only be reopened by imported emails if a staff member has first checked that the email is a valid request for reopen (not an out of office notice, or email delivery delay notice, or other spurious email!).

Regarding the reopen type options of Never, Automatic and As a request:
– Never is the right option if you do not want requests that use this Request form to be able to be reopened by clients. For some request types, some organisations want their clients to submit a new request if they need more information. For example, this option is often used for “Suggestions and Complaints” so that there is no opportunity for the client to argue with your response.
If you choose this option, the option that allows clients to reopen their question in “Check on existing question” is removed, and the option to ask for further information about a request is removed from the Response email.
If you also have the “Allow client evaluation” box ticked in the “Other options tab”, an email that arrives from the client will be treated as an evaluation, but an email that arrives from a third party will be treated as an “email that could not be automatically applied”, which will result in an email going to the parameter 8.3 email address so a staff member can work out what to do with this email. Mostly these emails from third parties will be notices from email servers about non-deliveries, and will be able to be ignored.
– Automatic is the right option if you want questions to be automatically reopened as soon as an email that would reopen the question arrives. The question appears at the top of the Open questions screen and is placed in a “Reopened by . . . “ status. If you click the “Reopen by . . .” status link, you will be taken to the Correspondence tab of the Summary screen so you can see the content of the email that was imported and make a decision about what has to happen to this question next (such as re-close using “Close without client contact”, or provide a further Answer).
– As a request (default and recommended) is the right option if you want staff to check reopen requests before the reopen proceeds. This “As a request” option is a more efficient and statistically more correct option because it means that questions are not actually reopened until a staff member has reviewed the request and confirmed the question really should be reopened. Instead, the question appears at the top of the Open questions screen and is placed in a “Reopen requested by. . . “ status. A “Manage reopen request” function is provided under Answer, Actions, and the question number menu list , and can be used to Reopen, Deny the reopen request, Record as a new question, or Record as an evaluation. Alternatively, staff can just go ahead and work on the question using any of the question answering functions, which automatically reopens questions in “Reopen requested by . . .” statuses. If you click the “Reopen requested by . . .” status link, you will be taken to the History tab of the Summary screen from where you can use any of the Answering functions, or if the question does not need to be reopened, use “Manage reopen request” under Answer or Actions.
Regarding the Allocate to option:
. Customers who operate shifts will want to set this to Unallocated pool so that whoever is rostered on when a reopen request comes in, can handle the reopened question. An email will only be sent advising arrival of this reopen if Allocation mode for the question is Unallocated and a email address has been provided at “Notify email addresses” in the Followup options section of this tab. Even if an email is not sent, rostered staff will notice it as the question will appear at the top of the Open questions screen because its Target date will have been recalculated based on the reopen date and time.
. Customers who operate a service where most staff are available most days will want to use Allocated staff so that the staff member who provided the answer will be automatically notified by email of the reopen. The Target date will be reset, and the question will appear at the top of the Unallocated questions list, so other staff can easily see it needs attention if the allocated staff member does not act on it promptly or is unavailable.
If the Allocated staff member is disabled or locked, the system will use the Available staff member option to find a more appropriate staff member to allocate the question to, if it is allocating Automatic, and if it is Allocating As a request, the staff member will be given the option as to whom it should be allocated, and the Disabled/Locked user will not be an option.
Note that if you choose this Allocated staff member setting, the question will remain allocated to the Allocated staff member, even if they are unavailable (on the presumption that they are the best person to answer the question, even if it has to wait until they are available again!). If you want the question to go to the allocated staff member, but not if they are unavailable, choose the Available staff option.
. Choose the Available staff (default and recommended) option here if the question should be reallocated to an available staff member to ensure it is addressed quickly, if the Allocated staff member is Unavailable. This is likely to be the mostly commonly selected option. An email advising arrival of the reopened request will go to the staff member RefTracker determines based on the following escalation regime:
– Current allocated staff member, but if they are Unavailable
– Current allocated staff reviewer if any have worked on the question and are Available
– Available Supervisor at the same location with the least number of questions allocated to them, and if none
– Available System administrator from the same location, and if none
– the Active system administrator
We cannot stop clients from replying to the Response email, and when that occurs and the Reopen option here has been set to disallow reopening by the client, the way it is handled depends on whether Evaluation is enabled for this form (see the Other options tab for this parameter).
– if Evaluation IS in use, the client will receive an email saying that their email WAS received as a comment, but that the question cannot be re-opened with some other communication options as provided by links in that email. A note about the email goes into the question’s History, and it is treated as an evaluation comment with the text going into the Evaluation comment field (for analysis), and the appropriate person being advised as per the Evaluation parameter (in the Other options tab). Use this option if you want to make sure that all comments from clients are addressed.
– if Evaluation is NOT in use, the client will receive an email explaining that their email was NOT received, the question cannot be re-opened and that they should use some other communication options as provided by links in that email. A note about the rejected email goes into the question’s History, but the question is not re-opened and no-one is advised that this has occurred. Here’s an example of the email sent to the client advising that the question cannot be reopened. Use this option if you are happy to ignore comments from clients who do not follow instructions.

If the client clicks on the “Ask a followup question” link in any of these Follow up option emails, they will be presented with the same Request form they used for their original enquiry, with their contact details already filled in, and a reference to the original question already in the Question field.
Further, when a question is reopened the Open date is reset and the question appears at the top of the Questions by received date list. If the Target date is being set by Objective response date (as per parameter 2.12), the Target date will be reset as if it is a new question. If Target date is being set according to Last useful date, the Target date will not be automatically reset as new Last useful date information has not being provided, but if the staff member working on the question knows of a new Last useful date, they can always (and should take the time to) change it using the Change screen so the system and statistics will reflect that changed need.
External answer action – This parameter determines what happens when an External answer email is imported. For full details of how to use the Answer email importing function see How questions for follow up arrive in your system, and for details of how to set up this function see “Answer email importing” in the Email importing help page.
“External answer action” in the Processing options tab provides three options:
Close – Whenever an answer email is imported in relation to this request form, automatically close the question. Use this when review is not required.
Review always – Whenever an answer email is imported in relation to this request form, automatically close the question and set the status of the question to “External answer review”, so that staff have to review this question to complete the closing process. Usually this will be used to ensure that time is added for the time taken outside of RefTracker to provide this external response, even if adding time is optional in your system. It can also be used where it is important to check that form fields such as the client’s Department, or a Matter number, have all been completed.
Ticking the Send reminder email box will send an email to the staff member who closed the question to reminder them to review this “External answer review” question.
Review when incomplete – Whenever an answer email is imported in relation to this request form, automatically close the question and set the status of the question to “External answer review” ONLY if there are mandatory form or closing fields with no values saved for them yet. Usually this will be used when your organisation needs closing information such as a billing description (Closing comment) added. .
Send reminder email can also be ticked if you want staff who send answer emails for importing, to be reminded that they need to review these questions if they are in “External answer review” status. This email is optional as staff are already reminded via the “External answer review” status being hyperlinked and italicised in the RefTracker Open questions screens.
Follow up options
If Followup processing type is chosen, this group of parameters will show to allow you to determine how these requests will be allocated on arrival.
Objective resp date value and Objective resp unit – Use these parameters to set the Objective Response Date for questions being entered using this form. When a question arrives in the system, its Objective response date will be set by adding the time that you specify here to the date and time of arrival, if the question arrives within the opening hours of the receiving library, otherwise the time will be added to the date and time that the library is next open.
The minimum setting for Objective response is the value set for Parameter 2.12 Minute intervals.
Allocation mode – Choose how the question will be allocated – to the Unallocated pool, to an individual, etc. – the appropriate fields to complete your Allocation mode choice appear according to the choice you make here. Your choice of allocation mode determines how questions entered by clients using this form will be allocated and the default allocation mode offered to staff using this form to enter questions via New, but staff can override this setting according to the Override parameter in the Main tab. You should refer back to the Staff manual if you need a refresher on the implications of each of the possible allocation settings. More details of the Allocation options are provided in the Staff manual.
Staff member – Choose the staff member the questions created using this form are to be allocated to if your selected Allocation mode was individual.
Allocation type – Choose what types of staff should be taken into account if the selected Allocation method was Automatic. Default is System (taking everyone into account). Please check this setting even if Automatic is not going to be the default allocation method for questions coming in on this form, as a staff member might choose this option at any time.
Allocation method – Choose what levels of staff should be taken into account if the selected Allocation method was Automatic. Default is Egalitarian (taking everyone into account). Please check this setting even if Automatic is not going to be the default allocation method for questions coming in on this form, as a staff member might choose this option at any time.
Send allocation email – Choose whether an email advising a new question has arrived using this form, should be sent to the staff member who is allocated this question, and if so, what email template should be used – the default template is refm100.htm. Note that if you design a new template it has to be included in the System>Code tables>Other>Email templates code table, before it can be selected here! code table, before it can be selected here!
Send notification email – Choose to have a notification email sent to a specified email address when questions that are entered using this form arrive unallocated or a request to reopen is received for an unallocated question (as specified in the Allocation section of this tab). As this notification email is to advise staff of the arrival of a question, this notification email is NOT sent when questions are created by a staff member using this Request form in the New screen (as that staff member should have already have dealt with any consequences, such as allocating the question to another staff member if followup is required).
This is a useful tool for systems with low volumes of questions coming in, and, in any scenario where a shared email address is used to alert all staff of work arriving.
If the client cancels the question and a notification email has been sent, and the question has not been allocated since its arrival, a cancellation email will be sent to the notification email address/es, so that staff relying on these notification emails to pick up new questions, rather than viewing the Open questions screen, can immediately see that they no longer need to attend to this question.
If you choose to send this email you can choose what email template will be used – the default template is refm101.htm. Note that if you design a new template it has to be included in the System>Code tables>Other>Email templates code table, before it can be selected here! Notification emails are not sent when a question is entered and closed at the same time using the New screen in Close now mode.
Notify email address(es) – Related to the Notification email parameter above and so only active if Notification email option is ticked – this is where you choose the email address/es to which the notification email (refm101 template) or the reopen requested notification email (rem265 template) will be sent for unallocated questions. This field is 2000 characters in length so there is plenty of space to add in multiple email addresses, separated by a semicolon, if you want more than one person copied – or you could just send the notification email to a shared email address.
Bcc outgoing client emails – In some organisations, a copy of all outgoing client correspondence is needed, usually for Records Management System (RMS) purposes. This parameter allows either the logged on staff member (so their email client reflects copies of all emails they have sent), and/or some other email address/es such as one monitored by your Records Management system, to be automatically blind copied on all client correspondence.
-Tick the “Logged on staff member” option if you want the logged on staff member to automatically receive a bcc: of all outgoing client correspondence.
-Enter an email address (or more than one separated by a semicolon) in the right hand box if you need a different address automatically bcc’d.
-Do BOTH if you need both the logged on staff member AND another email address/es bcc’d on all client correspondence for this type of request.
-Do neither if you do not want the client correspondence for this type of question automatically bcc’d to anyone. This is the default operation of this parameter
The client emails that will be bcc’d are Answer, Query to client, Inform client, Partial answer, and Copyright Declaration.
These automatic bcc’s will always be in addition to any other bcc’s specified in the form. They do not show up in the client contact confirmation box in RefTracker as they are not contact details of the client, but the History screen shows that these bcc’s were sent.
Close now options
If Close now processing type is chosen, this group of parameters will show to allow you to determine what happens as the question is closed on arrival.
Automatic redirect – Choose whether this question should be automatically redirected as it is closed on arrival – if selected, additional parameters will appear to allow you to define which email template will be used to communicate the redirect, and to which address(es) the email should be sent.
Redirect email addresses – When the option to have a question redirected on arrival is chosen, this line appears allowing the email address(es) to which the redirect email should be sent, to be defined. If more that one email address is specified, the recipients of the email will be able to see who else received the email as the one email is sent to all addresses specified here.
Redirection email template – When the option to have a question redirected on arrival is chosen by ticking the Automatic redirect box, this line appears allowing the template to be used for the Redirection email to be selected. The default template is refm512.htm but other templates can be made available for selection by adding them into System>Code tables>Other>Email templates.
Client communication options
Confirmation email – Choose whether a Confirmation email should be sent to the client on arrival of the question (whether entered by staff or client, though staff can override the choice). This option is ticked by default so that a Confirmation email will go out unless you specifically untick it. The template that will be used is selected in the template drop down list that appears to the right of the tick box. The default template (refm110.htm) is generic enough to be appropriate in most situations but you can design a template specifically for use with this Request form if you need to. Note that if you design a new template it has to be included in the System>Code tables>Other>Email templates code table, before it can be selected here! For example when a request is being automatically passed on to another area for handling, that can be explained to the client in a custom designed confirmation email. In some environments (often in special libraries) clients do not need a confirmation email. Note that if you define both a confirmation email to go to the client, and a response email to go to the client, and the question is closed at the same time as it is entered using the New screen, only the response email will be sent.
If this form is being used for importing emails, we suggest that you turn the confirmation email off. Spam email cannot be prevented from entering your system, and you do not want to be encouraging spammers by sending them “replies”.
Response email – Choose whether a Response email should be sent to the client for questions entered using this form. This option is ticked by default so that a Response email will go out unless you specifically untick it. Then select the template to be used from the template drop down that appears to the right of the tick box. Note that if you design a new template it has to be included in the System>Code tables>Other>Email templates code table, before it can be selected here! The default template is refm500.htm.
If the template is for an internal task the template used here is the refm600.htm template in order to provide access to the Primary question that this internal task response has been created for, so the response can be reused in the Primary, or so that other appropriate actions on the Primary can be taken.
Inform Client email – Choose whether an Inform client email should be able to be sent to the client for questions entered using this form. This option is ticked by default so that an option to send an Inform client email will be offered unless you specifically untick it. Then select the template to be used from the template drop down that appears to the right of the tick box. Note that if you design a new template it has to be included in the System>Code tables>Other>Email templates code table, before it can be selected here! The default template is refm504.htm. You do not usually need to change this option. NOTE that disabling this option will also prevent Partial answer emails from being sent.
Query to Client email – Choose whether a Query to client email should be able to be sent to the client for questions entered using this form. This option is ticked by default so that an option to send a Query to client email will be offered unless you specifically untick it. Then select the template to be used from the template drop down that appears to the right of the tick box. Note that if you design a new template it has to be included in the System>Code tables>Other>Email templates code table, before it can be selected here! The default template is refm501.htm. You do not usually need to change this option.
Update email (online) – Choose whether a Update confirmation email should be sent to the client when they use the client interface function “I want to amend this request (or ask a question about it)”, for a question entered using this form. This confirmation email will give the client a record of the update that they made to their request. This option is ticked by default so that an Update confirmation email will be sent when a client updates their question using the client interface, unless you specifically untick it. Then select the template to be used from the template drop down that appears to the right of the tick box. Note that if you design a new template it has to be included in the System>Code tables>Other>Email templates code table, before it can be selected here! The default template is refm230.htm. You do not usually need to change this option.
Note that a Update email is never sent to clients updating their question by using an email reply. This is because they already have evidence of their Update in the form of a copy of the email that they sent.
Reopen email (online) – Choose whether a Reopen confirmation email should be sent to the client when they use the client interface function “I would like more information about the answer I received”, in relation to a question entered using this form. This confirmation email will give the client a record of the reopen request that they made in relation to this request. This option is ticked by default so that an Update confirmation email will be sent when a client updates their question using the client interface, unless you specifically untick it. Then select the template to be used from the template drop down that appears to the right of the tick box. Note that if you design a new template it has to be included in the System>Code tables>Other>Email templates code table, before it can be selected here! The default template is refm260.htm. You do not usually need to change this option.
This option is irrelevant if you have chosen to change the “Allow reopen by client” option, near the top of this tab, to “No”, as that will stop questions entered using this form from being reopened.
Reopen email (imported) – Choose whether a Reopen confirmation email should be sent to the client when they send an email reply that reopens a question entered using this form. This confirmation email will acknowledge their reopen request. This option is unticked by default because clients sending emails already have a record of their reopen request in that they have a copy of the email that they sent. Then select the template to be used from the template drop down that appears to the right of the tick box. Note that if you design a new template it has to be included in the System>Code tables>Other>Email templates code table, before it can be selected here! The default template is refm260.htm. You will want to tick this option if you specifically need clients who reply by email, to receive acknowledgment that their question has been reopened.
This option is irrelevant, and does not display, if you have chosen to change the “Allow reopen by client” option, near the top of this tab, to “No”, as that will stop questions entered using this form from being reopened.
Other communication options
Needs attention options – Click here for details of how the Needs attention functions are used by staff.
The “Needs attention” functionality determines when the “Needs attention” allocation highlight, the “Target date near” highlight, and the “Target date overdue” highlight appear in the Open questions screen. It can also send reminder emails when questions meet these criteria. Utilising this “Needs attention” functionality will help your staff achieve your service objectives. There are three parameters that you can use to set how this will operate for questions entered using this Request form.

Needs attention – Allocation provides tools to highlight when a question remains unallocated for more than a specified time. It helps ensure questions are picked up by staff within service guidelines. The default value for this parameter is 30 minutes. These emails are turned off by default.
Needs attention – Response provides tools to highlight when a question is in danger of not meeting its Target response date. The default value for this parameter is one weekday. If notifications are selected they will go to the Allocated staff member’s email address. These emails are turned off by default.
Needs attention – Overdue provides tools to highlight when a question has passed its Target response date, and to escalate it. The default value for this parameter is one weekday. By default an email goes to the Supervisor/s for the question’s Staff location and escalates to the Active System administrator if there are none available. When you do not tick a box for a staff level in this parameter that staff level will not be copied on the notice and will not be included in the escalation mechanism.
To change the setting for these notifications click the [Edit] link for the relevant notice and amend the options in the popup box. Don’t forget that you also need to click Update in the Edit options screen after using this popup selection window, in order to save the change!

The staff level tick boxes in this pop up window allow you to determine what levels of user are sent the evaluation notification email, so for example:
If you tick Allocated staff member, the Allocated staff member will be notified.
If you tick Work reviewer, the Allocated staff member’s Work reviewer (as specified in the Contact details tab of their User signon) will be notified.
If you tick Supervisor, all Supervisors at the Allocated staff member’s location will be notified.
If you tick System Administrator all system administrators at the Allocated staff member’s location will be notified, but if there are none the Active system administrator will be notified.
Further, you can specify a specific email address/es to which these emails should be sent.
Or you can specify any combination of the above choices.
If you do not tick anything or enter a specific email address, no-one will be notified by email when a comment arrives.
Even if you don’t think you need this functionality, please read further! Customers with strict service delivery commitments will want to implement the reminder email functionality provided here, but ALL customers will want to take advantage of the ability to set the point at which colour changes in the Open question screens occur for each different type of request that you handle.
So, in most instances you will want to check the settings for this function for each request form. Here are some general guidelines:
Choose values with care! For example, it makes no sense for “Needs attention – Response” to be set at 1 day if the response time for questions arriving via this Request form is only 4 hours.
You might also want to review your opening hours for each of your staff Locations (Under System>Locations) to ensure that they accurately reflect the time that you are open, and so the times between which you want the Needs attention (Allocation) process to be operating.
Beware that when you first implement the “Needs attention” emails, you will receive Needs attention emails in relation to all of your backlog of open questions that match the Needs attention criteria! We recommend that you get the highlight dates right first, and only turn the emails on (tick Send notifications) when your workload is at a manageable level. Where the option of who the email should go to is provided, have email just go to the System administrator until the initial set of reminder emails have been sent out.
If you choose to send emails, the Needs attention background process needs to be enabled (by default it is enabled and runs every 5 minutes).
The colours used by the “Needs attention” Target date highlights are set using the “Target date near” and “Target date missed” colours in the CSS editor.
Details about setting Needs attention – Allocation
Needs attention – Allocation provides tools to encourage staff to pick up questions and start work on them within a defined period. This parameter will be important for customers who have service level agreements specifying a time by which work should have started on a question.
To ensure that staff do not get “Needs attention – Allocation” emails without first having had an opportunity to do the work, the function only operates during the opening hours of the question’s Staff location. Further the Needs attention processes will not run until the notification period or 60 minutes (whichever is the less) has expired since the location opened, and, so staff can go home at night with a clear mind, the Needs attention processes do not run for the last 30 minutes, or notification period (whichever is the less) of each Location’s open hours.
Untick the first box if you do not want to use this functionality. Most customers will want to use at least the Open questions “Needs attention” indicator which required the “Unallocated for” parameter to be set.
The Unallocated for value in this parameter is the time that a question must remain unallocated after arrival, before it should be indicated in the Staff ID column of the Open questions screen as “Needs attention”. This Open questions screen indicator will appear your selected amount of time after arrival of the question, or after it is reopened (and remains unallocated).
Make sure that the time you enter here is LESS than the value you have set for the Objective response date value and unit (near the top of this tab).
Tick the appropriate Notify box/es if you also want an email to be sent when this question reaches its “Needs attention – Allocation” date and time as set by the “Unallocated for” parameter.
The email will be sent out by the Needs attention batch process next time it runs (usually every 5 minutes). This means that the email will be sent out a maximum of 5 minutes after the time you specify in this parameter (within 20 minutes if you set 15 minutes here and the batch process is set to run every 5 minutes).
The email will go to the Notify email address/es for this function for this Request form if any have been set. Tick the staff levels that you want notified or enter an email address, or addresses semicolon separated. Remember that the requests that this function applies to are unallocated so there is no Allocated staff member or Work reviewer that can be notified.
If you select Supervisor, it will go to the Supervisor for the Staff location recorded for that question with the least number of allocated questions, or if there are none, to the System Administrator for that location with the least number of allocated questions, and if none, to the Active system administrator, even if they are unavailable.
Similarly, if you select Administrator, it will go to the the System Administrator for that location with the least number of allocated questions, and if none, to the Active system administrator, even if they are unavailable.
If you do not use a notification email address for your questions going into the Unallocated question pool, this process can be used to act as an escalation process.
A SECOND NOTICE “Needs attention – Allocation” email will be sent if the question remains unallocated for another two times the amount of time you specify in this parameter. This means that if your “Unattended for” time is 30 minutes, the first email will go out 30 minutes after arrival of the question. The Second email will go out 90 minutes after arrival of the question, if the question remains unallocated. The longer delay for the second notice is because an ignored first notice probably means that all staff are coping with an exceptionally busy period.
Note that “Needs attention – Allocation” emails will not be sent if the question has already qualified for the “Needs attention – Response” notice.
Details about setting Needs attention – Response
Needs attention – Response provides tools to encourage staff to complete responses on time (complete before the Target date). It also provides a handy reminder tool for questions with recurring work that needs to be done – just reset the Target date to the next recurrence and you will receive a reminder before it is next due!
Untick the first box if you do not want to use either “Needs attention – Response” emails or the Open questions screen Target date change to the highlight colour when a question is approaching its Target date. Most customers will want to use at least the Open questions screen Target date highlight colour.
The Due in value in this pop up box is the amount of time before the Target response date for this question as showing in the Open questions screen, should change to the “Approaching target date” highlight colour used by your system. If the question is allocated the staff id will also change to this colour indicating the question “Needs attention” by that staff member. The Target date for this question in the Open questions screens will appear in the highlight color, your selected amount of time before the Target date of the question.
Make sure that the time you enter here is LESS than the value you have set for the Objective response date value and unit (near the top of this tab).
Tick the relevant Notify box/es if you also want an email to be sent when this question reaches its “Needs attention – Response” date and time.
The email will be sent out by the Needs attention batch process next time it runs (usually every 5 minutes). This means that the email will be sent out a maximum of 5 minutes after the time you specify in this parameter (between 1 hour and 55 minutes before the Target date if you set this parameter to 1 hour).
The email will go to the staff levels that you tick – the staff member currently allocated this question; or if the question is unallocated, to any address specified in the email address option in this popup. If the allocated staff member is Unavailable the system will escalate to their Work reviewer, and if they are not available, to the available Supervisor for the Staff location recorded for that question with the least number of allocated questions, or if there are none, to the System Administrator for that location with the least number of allocated questions, and if none, to the Active system administrator, even if they are unavailable – so if the allocated staff member is unavailable this process acts as an escalation process. You can choose to have more than one of these levels notified, in which case the same escalation process works for each level. If the same staff member is selected more than one, they will only receive one email.
Irrespective of what is selected in the tick boxes, if an email address/es is provided in the “and/or address(es)” box, a notification email will be sent to that email address/es.
Note that “Needs attention – Response” emails may be sent almost immediately on arrival of a question. This might seem unnecessary but is ONLY done where the response time is very short, to ensure that you have noticed the short response time (it may be as a result of the client choosing a very short Last useful (needed by) date.
Details about setting Needs attention – Overdue
Needs attention – Overdue provides tools to escalate a question when it has passed its Target date. It can also provide a handy reminder tool for questions with recurring work that needs to be done – just reset the Target date to the recurrence date and you will receive a reminder when it has reached its new Target date and time!
Untick the first box if you do not want to use either “Needs attention – Overdue” emails or the Open questions screen Target date change to the warning colour when a question has reached its Target date. If the question is allocated the staff id will also show in the highlight colour to indicate the question “Needs attention” by that staff member. Most customers will want to use at least these Open questions screen warning colours.
The Notify tick boxes allow you to decide who should be notified by email when the Target date is reached in the same way as they do for the Needs attention – Response function above.
You can choose more than one type of user to be notified. If the user type you specify is not available, no-one of that level will be notified, but if no-one is found to notify, escalation will occur based on the system finding the next highest level user – so if there is no Available allocated staff member, it will escalate to their Work reviewer, and if they are not available to the Supervisor for that Staff location with the least number of allocated questions, and if none of them, the System administrator for the question’s Location with the least number of allocated questions, and if none, the Active system administrator, even if they are unavailable.
Irrespective of what is selected in the tick boxes, if an email address/es is provided in the “and/or address(es)” box, a notification email will be sent to that email address/es.
OTHER OPTIONS TAB:

Location restriction – If you choose a location here, your choice will restrict access to this form to staff at that Staff location only. You will want to do this if a service is only available at one Staff location. If you need it available for more than one location (but not all locations) you will need to create a similar form for each of the other locations where the form needs to be available and set this Location restriction separately for each location where it needs to be available.
To restrict a form to specific client locations do not use this function. Instead, set the form for External client availability (in the Main access options tab), and then control the places where the form is inserted in your web pages, to only places that those clients can access.
Validation on this field will prevent you from making form’s with Staff location restrictions, available for client use.
Allow Post date – Defines whether the Post dated entry option (entry of the question at a later time to when it actually arrived) should be offered for this form. Generally a question being entered in Post date mode will have both its Question and Answer entered after the fact, so you would generally use the Post date function in Request forms being made available in the New screen in Close now mode (if you use it in follow up mode only the question can be entered Post dated). Note that even if you offer the Post date function for a form, you can restrict certain staff from using it by unticking Post date in that staff member’s signon permission tab. You could also restrict access to forms that allow Post dated entry, through the Use parameter above.
Display target date – If your library does not want to indicate to your clients that a response will be delivered by a target response date for this type of question, you can set this parameter to No. When this parameter is set to No the confirmation screen displayed to clients when they submit a question through the client interface using this form, will no longer show a target response date, and target response date will also be removed from any confirmation email sent to client on submission of their question.
Target date will not display if you have defined that this question should be closed on arrival, or if the client has selected “No response required” in the Response method field.
Item summary – Allows you to determine the fields that will be used to summarise the item being requested in this form. The item summary is provided on the Client confirmation screen and in the Client confirmation email, and for staff it appears in the Open questions screen and at the top of each Question action screen. The default setting for Item summary provides the appropriate fields for bibliographic requests, so you only need to make adjustments here if your form allows requests for other items, or there are other things that you want to display to your clients.
Any field used in this form can be used here, even User defined fields – just replace the bibliographic variables names in the default Item summary definition, with the variables that you want used to summarise your item (variable names can be found in your form’s Display mode screen – Variable column, and in the Data dictionary) and remove any that you do not need, including their delimiters. The benefit of this feature is that often forms are designed to request non bibliographic items, e.g. the form might be to request a training course – this function means that both the client and the staff member can see a summary of the fields that are key to this question e.g. training course name and requested date.
Taking into account that the client can see the Item summary, you can define the Item summary to include any data about this specific request, and you can use HTML formatting to make is stand out. In this way, Item summary can be used to add in any other important attributes of the question to the Search results screens, including the Open questions screen. If you need additional information summarised for your staff, that you don’t want clients to see, use Key attributes instead of ItemSummary.
The default Item summary definition is:
$rvb${bib_title}$rve$$rvb$ / {bib_article_title}$rve$$rvb$ / {bib_author}$rve$$rvb$ / {bib_callno}$rve$$rvb$ / {bib_volume}$rve$$rvb$ / {bib_issue}$rve$$rvb$ / {bib_pages}$rve$
The construct $rvb$ followed by $rve$ is used to prevent parts of this definition from appearing when they are not relevant to a particular question. They mean “If the RefTracker variable used between these constructs currently has no value, then insert nothing”. This construct is known as delimiters ($rvb$ denotes “RefTracker variable begin” and $rve$ denotes “RefTracker variable end”).
This means that for this standard definition, if an item only has values for Title and Author, the item summary might look like this:
River god / Wilbur Smith
Key attributes – Works in the same way as Item summary (so see above for details of how to set it up), but only displays in the question summary for staff – so you can use it to display things in the question summary that are important for staff to know at a glance, but that you don’t want clients to see!
Key attributes appears, if defined, appears below the Item Summary and in italics.
For example, this definition presents the Request type in bold red, in the question summary for staff, but not for clients:
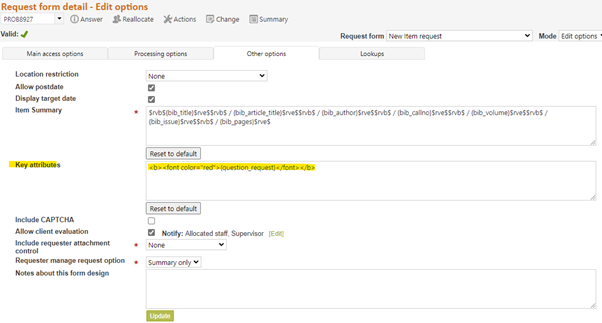
And here’s what it looks like in the Question summary (when specified to be red) – Remember the point of this feature is that it only shows in the staff interface – not to end users.

Include CAPTCHA – RefTracker forms have a number of functions built in to deter automatic form filling spambots. However the spammers are constantly finding new ways to fill online forms and occasionally they will break through our defenses with a new approach. If you have a spammer sending junk questions into your system, you can stop them immediately by including a CAPTCHA in the effected form, by changing this setting to Yes. Note that CAPTCHAs are effective against form filling bots – they cannot prevent spam coming into your system through email importing – that needs to be prevented with a spam filter on the applicable email box.
We do not yet feel that it is necessary to turn the Captcha function on for every form – it is a last resort that we don’t really want to submit your clients to unless it is absolutely necessary! For this reason the default setting for the new “Include Captcha” setting is “No”.
When you turn on the “Include CAPTCHA” parameter for a form, the form will display with a Captcha function in a separate division at the end of the form. The Captcha displays for client uses of the form only – it will not be presented if the form is used within the staff interface.
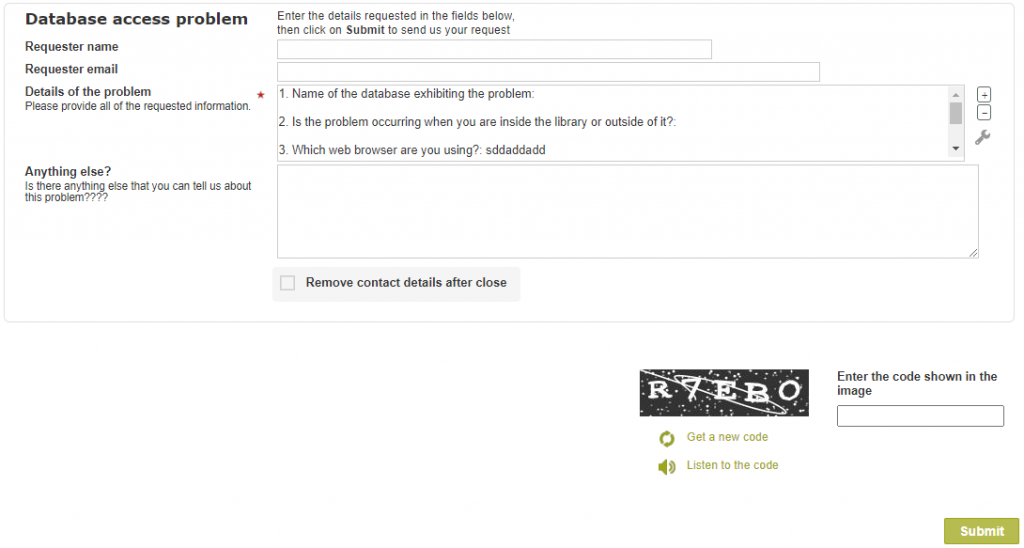
Features of our Captcha implementation are:
- In order to make this Captcha as easy to use as possible, there are only 5 letters/numbers to be entered, the letters shown can be entered in either upper or lower case, and the level of distortion used is minimal making the Captcha as easily read as possible without removing the protection that it provides.
- clicking “Get a new code” will display a new Captcha code – a client may want to do this to obtain an image that is easier to read.
- clicking “Listen to the code” reads the code to the users in the NATO phonetic alphabet (C is read as Charlie, E is read as Echo, etc.). Note that the “Listen to the code” function only displays if the user’s preferred language in their browser is an English language, or if they have specifically chosen to use the RefTracker client interface in an English language.
- the Captcha will only display once for each use of a form – if validation errors are detected, the form will redisplay with information about the validation errors, but, if the Captcha has already been successfully completed it will not display again.
Allow client evaluation – Tick the first box to include the star rating evaluation option in the Response email for questions using this Request form.
Click the [Edit] link to see the popup for managing the “Notify” options. Because these parameters are associated with each form by simply ticking the appropriate parameters here, it is possible to turn this evaluation function on for some forms and not others, or for just an audit period and then turn it back off again.
Click here for details about how to use the client star rating evaluation option.
Click here for more details about how to configure the client star rating evaluation option.
The master refm500 Answer email template includes code that will automatically include this evaluation function in that email, once you have ticked this “Allow client evaluation” tick box. If you are using a custom refm500 email template with this request form, you will need to check that the master template code for the table row that includes the {link_evaluation} variable is included in your custom template.
You can use the standard System>Statistics>Statistical reports to report on the Evaluation rating code table, and Data extract (reporting) report to report on Evaluation comments, but to simplify this important reporting there are two reports under System>Statistics>Statistical reports to make reporting on this important aspect of your operations, easy:
- System>Statistics>Evaluation ratings – to report on ratings
- System>Statistics>Evaluation comments – to report on comments
The “Notify” tick boxes in the pop up allow you to determine what levels of user are sent the evaluation notification email, so for example:
If you tick Allocated staff member, the Allocated staff member will be notified.
If you tick Work reviewer, the Allocated staff member’s Work reviewer (as specified in the Contact details tab of their User signon) will be notified.
If you tick Supervisor, the Supervisor with the least number of questions at the Allocated staff member’s location will be notified.
If you tick System Administrator the System administrators at the Allocated staff member’s location with the least number of questions will be notified, but if there are none the Active system administrator will be notified.
Further, you can specify a specific email address/es to which these emails should be sent.
Or you can specify any combination of the above choices.
If you do not tick anything or enter a specific email address, no-one will be notified by email when a comment arrives (but the information will still be recorded for reporting purposes).
Don’t forget that you also need to click Update in the Edit options screen after using this popup selection window, in order to save this change!
Note that emails are only sent to the selected parties if a comment is received (as the comment may require some action). You can be assured that whenever a comment is received the selected staff will be immediately notified by email. If the client just provides a rating without a comment, the rating is recorded for statistical analysis but is not individually notified to any of these parties, so if you want to monitor for poor rating where the client has not provided an explanation, we recommend that you do a daily System>Evaluation review report.
Note that your selections here do not change who can see Evaluation information in the Details and History screens of RefTracker. Only staff who have the “View client evaluation” function Granted in their user signons can see these evaluations in RefTracker (default is Supervisor).
Evaluation ratings and comments can be changed using the [Client options] link in the Details tab of the relevant question. The [Client options] link takes the user to the “Manage my question” screen of the relevant question where they can choose the Evaluation radio button to bring up the evaluation screen. Any data entered or changed using that screen will be clearly noted in the history of that question as having been done by the staff member when used this way. This functionality is important so that inappropriate comments can be amended by System administrators.
If you untick “Allow reopen by client” parameter in the Processing options tab, and you have this “Allow client evaluation” box ticked, an email that arrives from the client will be treated as an evaluation (as reopen is not allowed), but an email that arrives from a third party will be treated as an “email that could not be automatically applied”, which will result in an email going to the parameter 8.3 email address so a staff member can work out what to do with this email. Mostly these third party emails will be notices from email servers about non-deliveries, and will be able to be ignored.
Unticking this “Allow client evaluation” box will not prevent staff from using the “Record as evaluation” option in the “Manage reopen request” screen when evaluation comments come in as a reopen request, but it will prevent staff from recording evaluations using the “Requester option” link in the Details tab as that is a link to the Requester interface.
Include client attachment control – This parameter controls whether the Add attachments functionality will appear in this form when it is used by end users/clients, and if it appears, where it appears. When staff use this form, the [Manage attachments] links are provided to allow attachments to be added. This function is not relevant to staff usage of this form.
You can also amend the “Add any attachment” label used with this function by going to System>Utilities>Administration utilities>Literal editor and searching for Add any attachments to find and amend the literal that controls that label.
This new feature has four options that control whether the Add attachment option will appear in that form, and where.
Choose None to not include the Add any attachments option in this request form when it is used by end users.
Choose After request field to include the Add any attachments function directly after the Request text /Question field.
DO NOT USE THIS OPTION where the Request text/Question field is Hidden (as the attachment function will also be hidden)!

Choose End of request division to include the Add any attachments function at the end of the Division that includes the Request text/Question field.
DO NOT USE THIS OPTION where the Request text/Question field is Hidden (as the attachment function will also be hidden)!

Choose Separate division to include the Add any attachments function at the end of the form in its own separate division.

Requester manage request option –
This option is only effective if parameter 6.6. is set to its default value of Yes. For requests that use this Request forms, it allows you to determine whether requesters will be able to update their request using the client interface, and if not how much they can see about their request.
Options are Update (default); Review only; and Summary only.
Setting this parameter to “Update” makes all of the “Check on existing question” functionality available to the client, so they can use it to look up their question and correspond with your service about it. Update is the default setting for this parameter.
Setting this parameter to “Review only” means requesters will be able to send updates and queries regarding their question but they will not be allowed to change the information, that they originally provided. This option is provided because some information services do not allow clients to change their questions after the question has been submitted. When this parameter is set, the following changes are applied for use of that request:
– The “Change this question” link throughout the Client interface, is changed to “Review this question”, and
– The functionality behind that link provides a comment box and an unchangeable display of what was originally submitted by the client, using the Request form layout that they originally used. Here’s an example of what the client seems in this scenario.

* If your organization does not allow questions to be changed after submission, please let your end users know that they cannot change their questions after submission, via a note to that effect in the Request form, so they can see it when completing the form. This will also help with the usability of the display in this “Review only” version of this screen.
Further to the Review only option, the “Summary only” option limits the client interface to only showing the client a minimal summary of what they submitted (as provided in the email correspondence), but still allows them to correspond with you (including providing attachments) through the client interface (and email).
The most common reason for using this “Summary only” option is that your response answering procedure is to change the request form to another form that you use to control the processing of that request, where you don’t want the client to see the additional things that are in that new form. However, many customers will like to use this option just to ensure that data already being worked on is not changed without additional information being provided about the change.
When the “Summary only” option is selected, and the client chooses to review their request through the client interface so they can correspond with you about it, instead of seeing an image of the form they submitted, they just see a minimal summary like this:
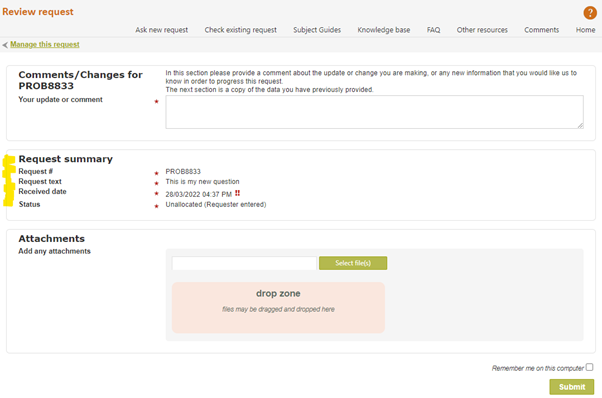
Notes about this form design – This is a space that you can use to make notes about this form design, for example, the contact details for the Business owner for whom the form was designed, or any notes about why specific fields were used, and perhaps even notes recording who made changes, when, and why. Use it for any record keeping or explanatory purpose you think appropriate! The contents of this field are not used anywhere else in RefTracker, and so can only be seen by staff with permission to amend Request form designs.
EDIT LOOKUPS TAB:
Organisations that are licensed for the optional Dynamic Lookups module will have a fourth tab showing – Lookups – how to use the Lookups tab is explained in the separate Dynamic Lookups Module Setup and Usage Manual.
Exercise:
Select the processing options that you require for your form (for example):
– check the Request type is the most appropriate one available
– set the availability of this form.- do you want to display target response date to the clients for this type of question?
– do you want to send client confirmation emails for this type of request?
– set the appropriate allocation/closing parameters.
Is there anything else that you need to set about the operation of this form, such as the item summary that is of great benefit if this form is about requesting an item that is not bibliographic?
If you have the layout of your form right using Edit layout and Edit defaults, and you have the processing options set to your satisfaction using Edit options, your form will now be ready for use! But you must give the form a try – sometimes you do not realise that you need to stop an email from being created for example, until you give the form a try!
If you need help, ask Altarama for assistance! It is highly likely that there will be many parameters on this page that you do not use regularly, so don’t be shy about asking for assistance.
The changes that you make using Edit options do not show in Preview mode. Despite the importance of these settings, they only show in the Edit options mode (though a summary of them can also be seen by clicking on the form icon in the top right hand corner of the New/KB new screen, when that form is being displayed, and this can be very handy when testing!).
Does your form do what you want it to do? If it does, then you are ready to show your staff how to use it and make it available for client use (set the client availability and add a link to it to your web pages if appropriate).