Colour scheme editor
The RefTracker Colour scheme editor is located at System>Utilities>Administration utilities>Colour scheme editor. It changes the colours used in both the staff and client interface in a way that ensures that the colours are maintained after a software upgrade.
Although this colour editor does change the colours used in the client interface, it is primarily used for changing the colours used in the staff interface. Anyone who is serious about changing the look of their RefTracker client interface should consider creating a custom client interface header that works with a customer provided head.inc file to provide custom css that specifically matches the look and feel of your corporate web site. Have your Web Manager look at Customising your client interface for the full details of how they can customise the client interface.
The Colour scheme editor provides a Default colour set and the ability for the customer to create a Custom colour set. If a Custom colour set is created it will be automatically updated each time a RefTracker patch makes changes to the css, so you only need to make the changes once. Changes do not come into effect until “Custom” is selected at “Active colour scheme”, in the top right corner of the Colour scheme editor screen.

This Colour scheme editor provides a great deal of flexibility in relation to colours that can be used. The various tabs list the places where colours are used and the specific colour used in each place. However, most customers will only need to change the colours in the Global tab to achieve a good result.
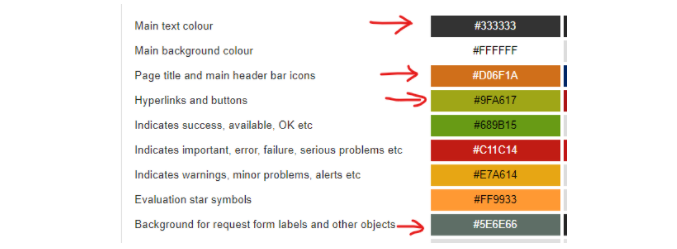
In fact, for most customers, just changing any of the red arrowed colours in the image below, that need to be changed, will produce a good result:
Saving your colour changes
After a custom colour change, some colours do not change until you log out and log back in to the staff interface.
And, importantly, some colours like those in email templates, do not change until you revert to the Default colour set and then re-choose the Custom colour set. This is because there are many css files and the subsidiary css files do not get updated until you re-choose the custom colour set.
So, best practice, when you change a colour is to save the colour change, select Default at “Active colour scheme” and “Set”, then choose Custom and “Set”.
Changing the colours in the Global tab
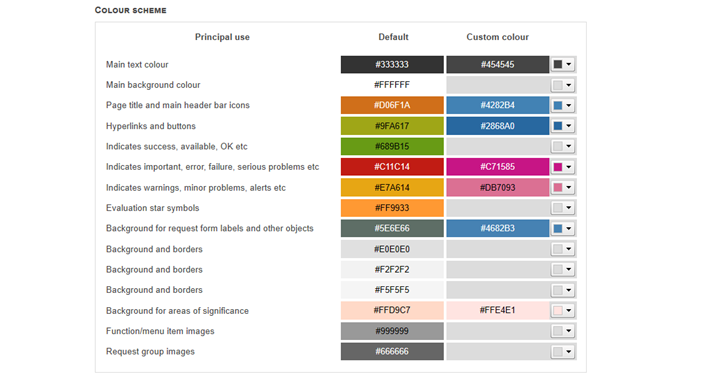
If you change a colour in the Global tab, everywhere that uses that colour will be changed in the Custom colour set. Changing just a few of the colours in this tab should be sufficient to have RefTracker appear in a colour set that matches your corporate culture. Here’s an example showing the seven key colours that should be considered for change when creating a custom colour set using the Global tab (but as pointed out above changing four of them is often enough. It is important that the system has at least two main colours to provide some contrast.
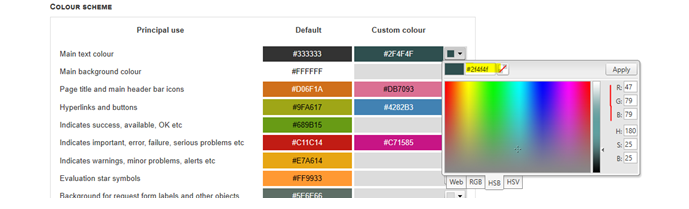
To change a colour, click the down arrow in the custom colour column. A colour selector will appear. Enter your HTML colour, RGB colour, or click a colour and tone using the colour gradient windows. Click “Apply” to save your colour.
Click the harlequin box with the diagonal red line to remove (clear) a custom colour selection you no longer want, and return to the default colour.
This colour change tool also allows colours to be specified in rgb or hex or web safe colours.
When you are finished changing colours, click the “Save changes” button near the top right of the screen to save or update your custom colours (and don’t forget to change to Custom at “Active colour scheme” to bring a newly created custom colour set into use, and log out and back in to see the full effect).
The default colours and fonts are in the main.reftracker.css file in the include/css directory. Customer colours get put into main.custom.css. You can add custom css into the main.local.css file.
If you want to change colours of individual items, just change the specific ones that you need to change in the other tabs, using the same techniques as described above for the Global tab. If you need to change the colour of a specific item please contact your RefTracker support person for assistance as there are far too many individual places where css is used, to provide individual documentation.
The “Other” tab provides the ability to change the colour of aspects of the client interface, however, more flexibility is provided via the features described in Customising your client interface. Using the client interface customisation features is the recommended way to change the look of your client interface.
The Images tab shows all of the images used in RefTracker. You cannot individually change the colours of these images, but the Global tab provides a way to change the colours of the Function/menu item images and the Request group images (bottom two colours in that tab). Also note that the green, red, and amber image sets automatically change colour when you select new colours at the 5th green, 6th red, and 7th amber lines of this page. There are also some options for providing specific images in the 3.x parameters and by providing local images for the Priority and Request group images.
Importantly, if you create a Custom colour set, it will be automatically upgraded each time a new release is applied to your system.
If you need help with the colours used by your system, please contact your RefTracker support representative.
How is css managed in RefTracker?
Email.reftracker.css (used for the css used in email templates) and main.reftracker.css (used for the standard css used by the RefTracker staff and client interfaces) reside in the include/css directory. They are fully maintained by the RefTracker system, and should not be touched.
Email.custom.css and main.custom.css are used for the custom colours provided by this Colour scheme editor and are also fully maintained by the RefTracker system. Similarly they should also not be touched.
If you need to provide custom css it goes in email.local.css or main.local.css in the include/css directory. Using this file protects it from being overwritten by software upgrades. If there is content in either of these files they will be automatically picked up and used by RefTracker. You can download them to edit at System>Utilities>Administration utilities>File upload/download. You can also download the email.reftracker.css and main.reftracker.css files for reference purposes, from this location, but do not put your custom css in these “master” files.
Because email.local.css and main.local.css are added as the last CSS file, it is be possible to override any of the existing RefTracker CSS with a style entered in one of these local files by specifying !important e.g.
.someCSSname{
Colour: green !important
}
You can create a colour set in one RefTracker systems and copy it to another
To copy across a colour set from one RefTracker system to another, go to include/css/custom.xml and copy that file to the same place in the other system, then, in the system receiving the colour set, go to the Colour Scheme Editor and click ‘Save changes’ to create the custom files and images, then in the top right corner change “Active colour scheme” to “Custom”.