Template editor (email)
The Email template editor function is accessed from the System>Utilities menu>Administration utilities and provides an inbuilt way to edit RefTracker email templates, plus functionality to download templates so they can be edited externally and then uploaded, should you prefer to do it that way.
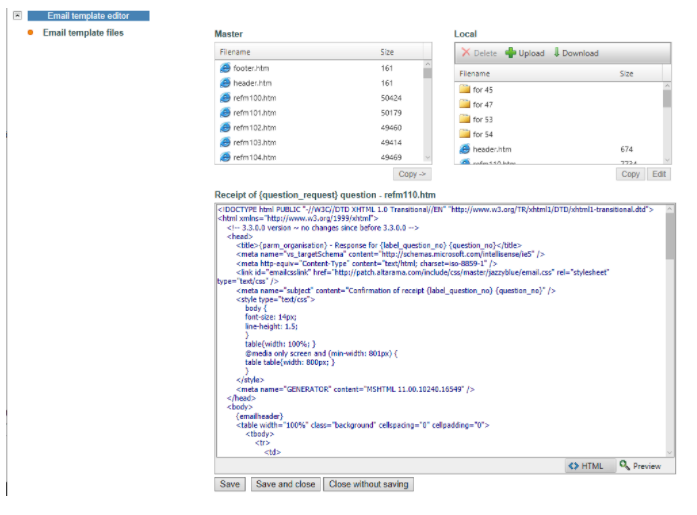
The Email Template editor screen looks like the screen print below and the following describes how to use it:
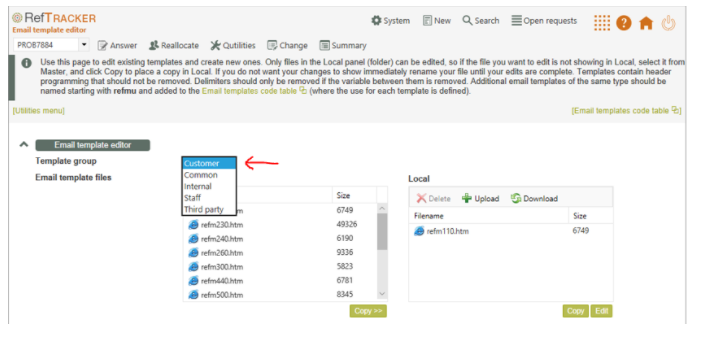
There are lots of templates, so they are presented in groups that you select at Template group – Client, Common, Internal, Staff, and Third party.
Make sure you are viewing the right Template group – if you are not finding the template you want, check the other template groups.
Most customers will only want to customise the Client and Third party group templates as they are the only ones that go outside of your organisation, but all templates can be customised to meet the specific needs of request, task and sub task workflows. Click here for information about the variables used to insert these files in our email templates.
The Common group includes the email template header, footer and signoff files, that can be used by any email template. They can be used by all email templates so that header/footer and signoff changes only need to be made in one place.
The Email templates code table (accessible from the links near the top of this page) provides more information about the templates and can help you find which template, in which group, you need to edit.
Master copies of templates are provided with your RefTracker system. The system uses those master copies unless you create customisations by copying the master version to the /local directory (where you edit it to meet your requirements).
You cannot edit the master copies. They must be copied to the Local directory to be edited. RefTracker looks for a template of the name that it wants in the Local directory first. If it finds you have customised a template of that name in that directory it will use that customised template. If there is no template of that name in the Local directory it will use the one from the master directory.
You can view Master copies by double clicking on its file name in the master panel.
To create a Local copy that you can edit , click on the name of the template that you want to edit, then click the Copy button.
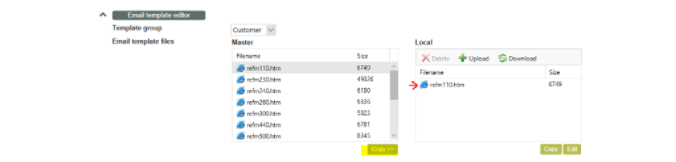
The copy proceeds and when complete your copied file appears in the local directory window.
If you are modifying the standard template, and you do not want your system to utilise the iterations of your template as you are changing it, it is a good idea to rename your copy of the template in the local folder before editing it, and rename it back to its standard name when you want the final version to go into live use.
If the file that you copy already exists in the /local directory, the newly copied version will have “_copy”, and a number if necessary, added to its name. Remember to give the file an appropriate name using the right click Rename function (something starting “refmu” if it will not be the standard template).
To rename a file in the local window, right click on the new file and choose Rename.
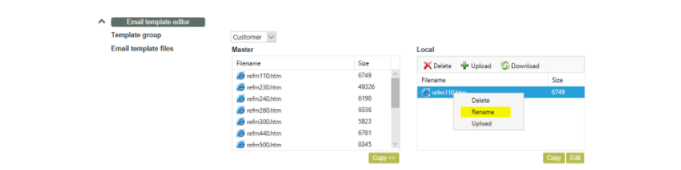
Supply your new name and click OK, and the file will be renamed.
Every template has a purpose in RefTracker and that is indicated to RefTracker via an entry in the Email templates code table (see the Email templates code table heading in the Other code tables help page). Master templates will always be provided by RefTracker for new RefTracker functions, however you can create your own versions of the templates for client and internal correspondence for particular forms/workflows. To do that, Copy the master for that function and rename it refmuxxx. . . where xxx is the same number as the master and you follow it with something that indicates the purpose of this custom template. You then need to create an entry for this new template in the Email templates code table to tell RefTracker its function and provide a subject line for it, and then link it into the template you want to use it, using the Request for design edit options (more information about this process is provided under “Adding your template to the email template code table” below).
The local panel header bar provides:
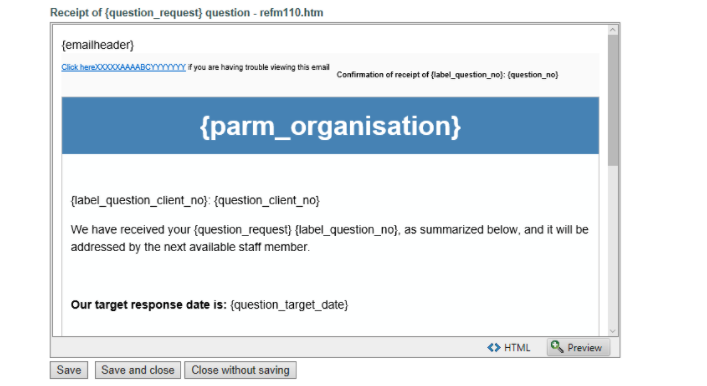
- a Preview function allows you to view the current layout of the template you select in the local panel. The template displays in a separate window showing all for the formatting that an end user of that template will see.
- a Delete function that works in the same way as it does in the Upload/download function (see the previous section for details of how to use this function).
- an Upload function that works in the same way as it does in the Upload/download function (see the previous section for details of how to use this function). Files uploaded in this way are Virus checked according to the settings of parameters 9.81 and 9.90.
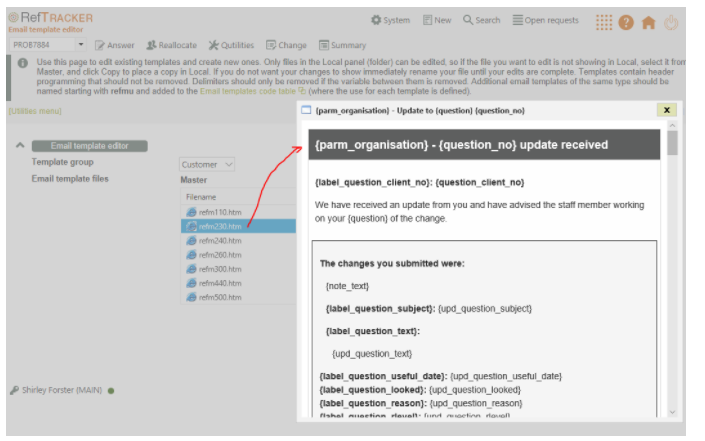
You are now ready to edit your template , so click on its name and then click on the Edit button. Your template will then display at the bottom of the screen ready for editing.
Email templates include special RefTracker coding so the file displays in HTML mode and can be directly edited in that mode – RefTracker email templates that are HTML, must be changed using valid HTML statements.
See the Customising the email templates and Qprint templates section of this manual for full details about how email templates can be edited to achieve the results you want.
Because the $rvb$ and $rve$ coding must be taken into account when editing templates, the template is presented in HTML mode. Always remember that when you delete or mode any part of the template containing a RefTracker variable, you must be sure to take everything from the $rve$ code to matching $rvb$ code, and including them.
To view the effect of the changes you have made so far, click on the Preview mode function.
If you want to Save your changes you MUST click a Save button.
“Save” saves your changes and redisplays the edit screen.
“Save and Close” saves your changes and closes the edit screen.
“Close without Saving” allows you to close the edit screen without saving the change/s you have made. Alternatively, moving to another screen without using any Save buttons will also result in your changes not being saved.
Should you wish to create another version of your customised template (for use with another Request form for example), you can copy the template. You do this by selecting the file in the local folder and clicking the “copy” button below that box. The copy will then display in the local folder panel named the same as the original file with “_copy” appended to the end (you can rename it using the rename function which is available by right clicking on the file name).
Adding your template to the Email template code table so it can be used
Don’t forget that when you create a new email template, you have to tell RefTracker how it relates to the RefTracker workflows. To do that you need to go to the Email templates code table and associate your new template with the correct workflow. To facilitate this additional step, a link to the email template code table is provided in the  text at the top of the screen and via the “Email templates” link in the top right of the screen. When these links are used the code table opens in a separate window so you can work in both screens at the same time.
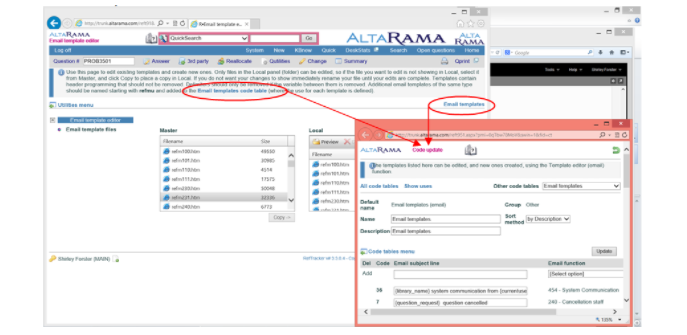
Click here (Other code tables) for information about using the Email template code table.
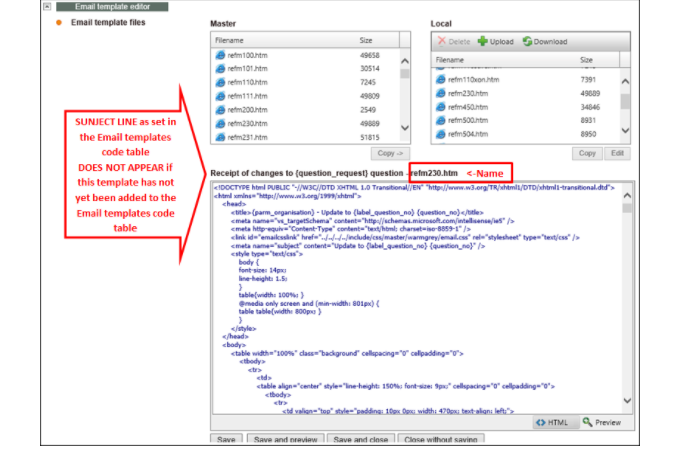
As a reminder to add your new template to the email template code table, the Subject line defined in the Email template code table for this template, will ONLY appear above the editing box, if one has been set.
Exercise
When you have investigated the features for editing email templates, click on the link back to the Utilities menu and then click on Template editor (Print).