ILL/Document Delivery
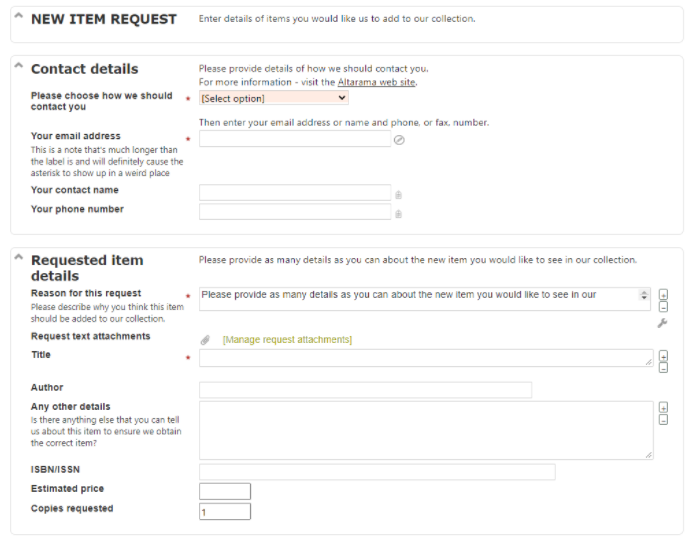
This screen print shows an example New book Request form. As we just closed the question you were working with in the exercises, to proceed with this training you should use it (or any other form that collects bibliographic item information) to enter a new question, selecting “I’ll respond now”, which will present you with the Answer screen. Then click ILL/Doc del – New in the Answer menu list. This page describes functions specific to the ILL/Doc del screen. See Refer to third party for more details about how to use the functions of this screen that are common to all third party screens (the ILL, Refer and Redirect functions).
ILL/Doc. delivery request (ILL /Doc del– New)
The ILL/Doc del function is designed to record that an ILL/Document delivery/Item loan request in relation to this question has been made using another system, or, it can be used to make the request, and track it through until completion. RefTracker is not an Inter Library Loan management package, but so many of our customers have requests that turn into ILL’s (or Document delivery requests), and no ILL management system, that we have provided a basic level of materials requesting functionality.
The Answer menu list initially provides the “ILL/Doc del – New” function which is used to initiate an ILL or document delivery or item loan request by email from within RefTracker, by XML directly to a Relais ILL system so that a request is automatically created in the Relais system, or to record that an ILL or document delivery or loan request has been made using a system or organisation outside of RefTracker.
Once an ILL/Document delivery/Item loan request has been started using “ILL/Doc del – New”, an “ILL/Doc del – Update” function will appear whenever the Answer menu list is viewed in relation to that question.
Some document delivery processes involve delivery of the item electronically and, if that is the case, all that needs to be done in RefTracker is to record the fact that the item was delivered separately and close the question. Some ILL/Document delivery processes progress through several steps, and for these the ILL/Doc del – New and Update processes allow those steps to be monitored to completion.
Both “ILL/Doc del – New” and “ILL/Doc del – Update” allow the question to be closed at any stage of the process ensuring that you can handle any sort of ILL or Item or Document delivery request using these processes, even those where the document is delivered directly from an online database.
RefTracker allows only one ILL or item request to be in process in relation to any question, at any point in time. However, when one request is complete (or found to be denied) another request can be started using “ILL/Doc del- New”.
Note that these ILL /Doc del processes monitor the progress of your ILL or document delivery process, but you can keep the client information as you do it using the built in Partial answer and Answer boxes in these screens.
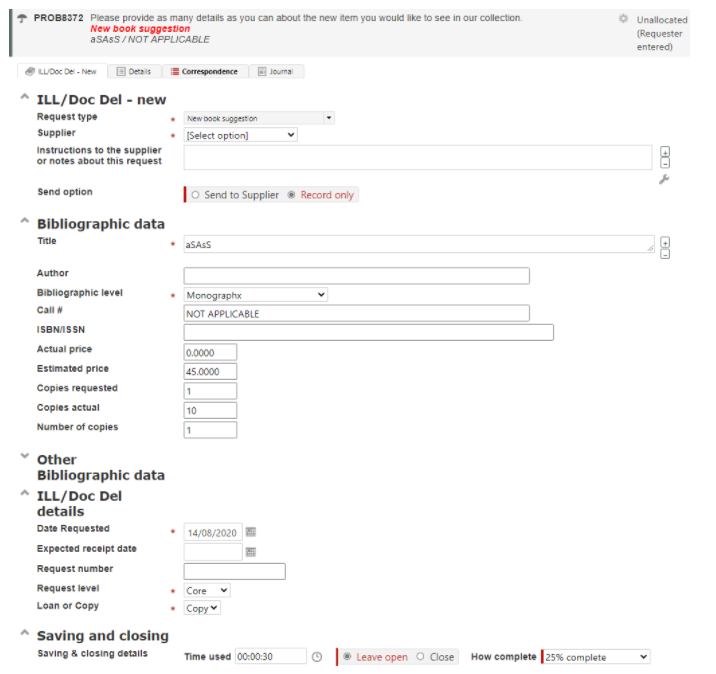
When you choose ILL/doc del – New, to start a new ILL or document/item delivery request, the screen redisplays as shown in the screen print above. In addition to the fields used by other Third party functions (ILL, Refer and Redirect), this screen can provide the following fields that are used to record the details of a new ILL/document delivery request. The fields provided cover all of the details that you will need to record, and you should use the fields appropriate for your organisation e.g. the ILL request number should be entered in the “Request number” field, if you use that data. In particular, the “Date requested”, and “Expected receipt date” are fields used by RefTracker to track the progress of this ILL/document delivery, and should be completed when the information is appropriate and available. The “Instructions” field can be used for general staff notes when this screen is simply being used to record that an ILL/Doc del was done outside of RefTracker, but when the ILL/Doc del is being communicated via an email, or XML and the web service to a Relais system, what you type in the “Workflow notes” field will provide your instructions to that third party about what you need them to do.
The fields that appear in this screen are:
The validation message section appears if the system has detected that action is required to complete required information. It can appear on initial display of this screen, or after Save/send has been clicked. It will describe the additional information required. Warnings can be overridden by clicking Save/send again.
Imported questions may have created a valid question but may still be missing some mandatory data for that type of request. If that is the case, the question will be marked as “Incomplete” as indicated by a construction icon  near the question number. The question will not be able to be changed without all the missing data being provided, but other screens like Answer, Query to client, and Refer or Redirect to third party, can be used to obtain the missing information.
A Question overview is presented above the tabs to confirm you are working with the right question. The overview shows this question’s Request group, Question number, Question text, Item summary, Status and Allocated staff member, if any.
Request type: Provides the ability to change the Request type of this question, when the question has been incorrectly classified, or is yet to be classified. The Request type drop down at this point displays all of the Request types under their appropriate Request groups, making it easy to assign an appropriate Request type, for important statistics about the types of requests being made of your organisation.
Supplier / Organisation name: A Supplier selection needs to be made in order to provide important statistics about the Suppliers being used. Your System Administrator maintains the list of organisations that can be selected from the Supplier drop down box, using the Organisation code table.
The contact method recorded for the selected organisation will appear to the right of that name (indicating how RefTracker will send to that organisation – email address or, Relais address), if RefTracker can contact that Organisation, or, providing helpful information like an URL to the Suppliers order system, or just a note about how to deal with that supplier. Some organisations do not have contact information recorded for them, in which case an email address field will display, and will be mandatory, if you are sending to that Supplier.
If the Supplier you are using is not in the list, select “Other organisation”, and an “Organisation name” line will appear to allow you to record who you are using.
Alternative email address(es): If you are sending by email, or you have selected to use “Other organisation”, you can enter the email address (or multiple addresses each separated by a semicolon) to which you wish to send or cc: this email, in the Alternative email address field (maximum 100 characters).
Instructions note: When used in the “Send to Supplier” mode, the text in this field is included in the generated email as your instructions to the Supplier. When used with “Record only” it simply provides the opportunity to record any staff notes that are not already catered for by fields in this ILL/Doc del screen or that will be helpful for others looking at this question, such as what you asked the Third party to do, when you expect a response, and contact details for who you are dealing with. This is a formatted text and QuickText enabled field!
Send option: Select “Send to Supplier” when you want RefTracker to generate an email or XML communication to this third party.
Select “Record only”, when you are just recording that you have made a request of a third party, in relation to this question, from outside of RefTracker.
This option remembers what you selected here last time and presents that option as the default next time you use this screen, so it will usually show your favourite option!
Bibliographic details: If some bibliographic details have already been entered for this question (e.g. through the use of an ILL Request form), the known bibliographic details will be automatically inserted in the displayed bib fields. The Bibliographic fields that display here are the bibliographic fields provided in the Request form being used for this question. Other Bibliographic data can be added by expanding the “Other Bibliographic data” Division. If there are no Bibliographic fields in the Request form, all enabled Bibliographic fields will display. Be sure that ALL of the bibliographic information that will be required by the ILL supplier is included in these fields if you are generating an email from within RefTracker. The details you enter will be automatically included in the email/automatic protocol transfer.
ILL/Doc del details: This section is where you enter the information specific to this ILL/Doc del request, for example ILL “Request number”, indication of requirement for “Copy for retention” or “Loan”, etc.
If any of these Bibliographic or ILL/Doc del fields have been used in the Request form used to accept this question, the data entered for them will already be showing in these fields. Be sure that ALL of the ILL/doc del information that will be required by the Supplier is included in these fields if you are generating an email from within RefTracker as the information you enter here will be automatically included in the generated email/automatic protocol transfer to the Supplier.
Whether generating an email, Relais request, or simply recording that a request was made elsewhere, the following ILL/Doc del fields are important for completion:
- Date requested: Entering a date in this field will ensure that the status of this question is automatically set to “ILL/Doc del requested” when you Save this screen.
- Expected receipt date: Entering a date in this field will ensure that the Target response date for this question is reset to be this date. Updating the Target response date means that the date on which this ILL is expected will show in Open questions, allowing its non arrival to be easily detected for chasing up. Use the Calendar icon to easily select the date that you want to indicate as Expected receipt date. If you do not fill out this field the Target response date will not be updated and you will not have the benefit of the Open questions screen showing the date by which this should be followed up.
Note that this process changes the original Target date. You should not be ordering an ILL if its expected receipt date is after the Target date (especially if, your organisation sets its Target dates according to the Last useful/Needed by date specified by the end user). - Request number: Entering the ILL Request number is important if you are simply recording an ILL ordered elsewhere, so that when the ILL arrives it can be tied back to the appropriate RefTracker question number (you can search for it using the RefTracker Search screen with the “Bib and ILL fields” text box ticked).
- Loan or Copy: Choose loan or Copy here according to whether the item needs to be returned or not.
Your System administrator can customise the Bib and ILL data elements requested by this workflow, including which fields are mandatory, using the Bib and ILL tables in the Data Dictionary.
Saving and closing details: Used to enter time used for this step of the answering process, if used by your library, and update the progression status of the question in the How complete box if leaving open, or the closing status, if using this step to close the question. Highlight boxes are presented to the left of these fields if they are mandatory for review – if mandatory for review, even if a value is already appearing in the field, it should be reviewed for correctness.
Note that the “Close” option is provided to reflect the fact that a requested item might already have been delivered electronically outside of RefTracker. An advantage of using this “Close question” option for ILL/document delivery type questions in this screen is that an Answer email is not sent to the client!
Your system administrator may have configured in any of the Saving and closing additional data capture options at this point.
Time used can be entered, if allowed by your System Administrator, as minutes e.g. 90 = 90 minutes, or hours and minutes in the form of hh:mm e.g. 1:30 = 90 minutes, or hours and a decimal fraction of an hour in the format hh.n e.g. 1.5 = 90 minutes where every .1 = 6 minutes (as described by the helpful tooltip). Time entered will be automatically reformatted to the hh:mm format when you move to another field to clearly show impact of the value entered. Only supervisors and administrators can enter negative values.
“Time to date” information only shows if time has already been recorded for this question. Its major benefit is for organisations that have policies regarding the maximum amount of time that should be spent on any question, and for customers where a lot of the work is done outside of RefTracker. It also makes it clear to new staff that they only need to record additional time spent, not total time to date. Total time recorded to date also appears in the Details tab of the Summary screen, and the Journal tab shows all of the details of the entries that make up that total. Time can also be entered using the Record time screen where the individual entries comprising time to date are also shown.
If there are costs associated with this third party action they should be entered using the Actions>Record costs screen, or your organisation may have included the Costs and payment table right in this screen, for the Request form you are currently using.
Optionally send email to client: Importantly, you can optionally let the client know about the step you are taking here, by putting your message to them in the Partial answer box that appears in the Saving and closing division. And if its a Doc del and you have the article to deliver straight away, you can chose Close and a closing status, and enter your answer in the Answer field that then displays (and attach the article for electronic delivery.
When you choose to communicate with the client in these ways, a Client contact confirmation box will show, indicating the client contact details, and allowing an email to be sent to the client when all of this ILL/Doc Del function step is complete. Your message to the client will NOT be sent to the client, if the third party action is not successfully completed. Check the History screen if you have any concerns about whether the note to the client went out. You may wish to click [Preview] to see what is going to be sent out, before it goes! The QuickText associated with this field is the same QuickText as used for the Answer and Partial answer fields.
Add contact attachments: Allows attachments to added to your client communication – handy for sending an electronic copy of the document they requested, to the client!
When you are happy with the choices on this screen click on Save, and move to the next section.
Exercise – requesting an ILL by email
To send an email to the Supplier, select the Supplier and then “Send to supplier”. It works in exactly the same way as the Refer to third party function in that you can use it to send an email requesting that the item be supplied.
Be sure you have provided sufficient bibliographic and ILL details to be able to find this request again using Search, and to create an email to the ILL supplier that contains all the information that they will need to supply your requested ILL. If you are creating an email, double check you have included everything by carefully checking the body of the generated email in the scroll box provided and any attachments. If you have forgotten something you can edit the email directly, or use the back button to go back to the “ILL/Doc del – New” screen to add more information and regenerate the email.
The system automatically sets the requested date to today’s date but you can correct this date if appropriate. If you have requested an item that will be delivered in the future, enter the date by which it should be delivered in the “Expected receipt date” field – the date that you enter will be reflected in your RefTracker Open questions screen target date, as an aid to ensuring that the item arrives on time.
See the following points about various scenarios for tracking progress.
Exercise – supplying a Doc del from an online database:
You should also try using this workflow for a document delivery request where you provide the item directly from an online database, and simply need to use this process to record that the document was delivered.
Choose “ILL/Doc del – new” and enter sufficient details of the item’s delivery to serve as a record of what happened, then choose a progress status, or a “Close question” option in the “How complete” drop down to close the question, as appropriate.
If you need to advise the client that an ILL the item has been sent to them separately, use the “Answer” box to write your message. Don’t forget to choose the Progress status of “Closed–redirected” if you are closing the question at the same time. An email will ONLY go to the client when you use the close function here, if you put a message in the “Answer” box.
What if the ILL or document is slow to arrive/monitoring statuses
Because the Target response date for this question in Open questions shows the date on which this item is expected to arrive (when you set a date in the “Expected date of arrival” field), you can monitor whether it has arrived on time using the information displayed in the Open questions screens (particularly the Open questions by target date screen).
If the item does not appear to be arriving on time, you should chase up the Supplier externally. There is currently no process within RefTracker for chasing up the supplier.
What if the ILL is denied
If the ILL is denied, you can simply use the ILL/Doc del – New process to request it from another Supplier. You can use the Partial answer box in that screen to advise the client of a delay while you find a different Supplier.
However, if you need to advise the client that all sources have been investigated and the item cannot be supplied, use the Draft answer field of the Answer screen, and close the question from there. By closing the question with Closing status of “Closed unsuccessful”, you will be appropriately recording that the client’s request could not be fulfilled.
When the ILL or document arrives (ILL/Doc del – Update)
When the ILL or document arrives you will want to match it to the original request in order to be able to advise the client of the arrival and to update the status of the request.
Enter the Request number or ILL/Document supplier name in the text box of the RefTracker Search screen and click on the “Bib and ILL fields” text box. The system will display all questions for which that number or Supplier name has been recorded.
Clicking on the question number will then allow you to start working on that question.
In the Partial answer box in the “ILL/Doc del – Update” screen to advise the client that the ILL or document has arrived and is ready for pickup (there may well be QuickText associated with that workflow that can be used for this purpose).
Then update the status of the ILL by going to the Answer menu list and using the “ILL/Doc del – Update” workflow that only appears in that menu list for questions where an ILL has already been instigated using the “ILL/Doc del – New” function.
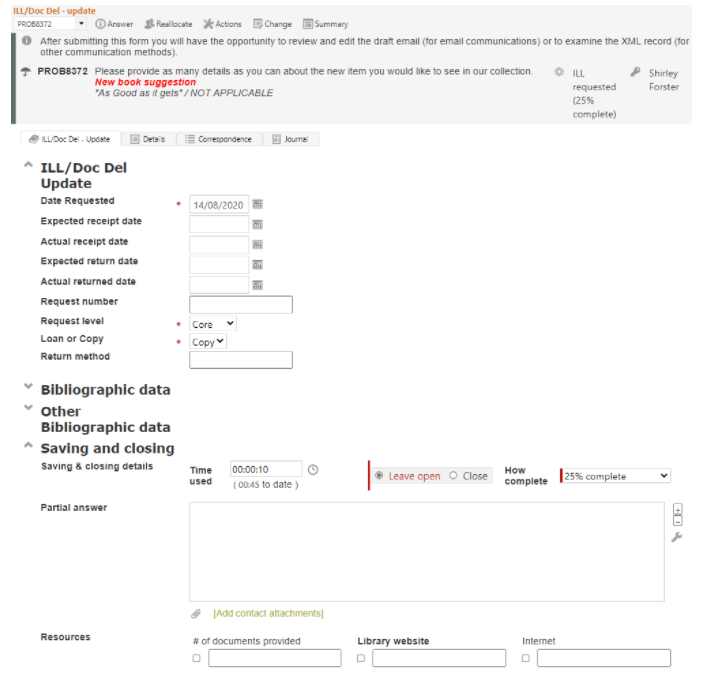
When you select “ILL/Doc del – Update” the screen will redisplay like the following screen print:
ILL/Doc del – update screen
Click the down arrow next to the “Bibliographic data” heading, or the heading itself, to see and change the bib details of this ILL/Doc del, if necessary.
However you will normally just update the status of this ILL or document/item request by adding in more dates. The dates in this screen have the following meanings:
Date requested: The date on which the ILL or document was originally requested will appear here.
Expected receipt date: If a date for expected receipt was entered in the “ILL/Doc del – New” process it will be showing here. If no date has been entered you can enter the date at any time. Entering a date in this field will ensure that the Target response date for this question is reset to be this date. Updating the Target response date means that the date on which this ILL or document is expected will show in Open questions, allowing its non arrival to be easily detected for chasing up. Use the Calendar icon to easily select the Expected receipt date.
Actual receipt date : Entering a date in this field will ensure that the status of this question is automatically set to “ILL received” when you Save this screen.
Expected return date : Entering a date in this field will ensure that the Target response date for this question is reset to be this date. Updating the Target response date means that the date on which this ILL is expected to be returned will show in Open questions, allowing its non return to be easily detected for chasing up. Use the “Calendar” icon to select the Expected return date. If the expected return date is not known at this stage you can leave the field blank, but the Target response date will not be updated and you run the risk of not following up on this ILL or document on time – you can come back into this “ILL/Doc del – Update” process and enter an Expected return date at any time.
Actual return date: Entering a date in this field will ensure that the status of this question is automatically set to “ILL returned” when you Save this screen (unless you take the opportunity to close the question at the same time).
Exercise
If you wish to try this workflow for recording the arrival of an ILL, document or item, use the Search screen to find the question that you were working on by searching for the request number or Supplier name by ticking the “bib and ILL fields” box.
Click on the question number of the right question when you find it, so you can start working on it.
In the Answer menu list select “ILL/Doc del – Update” and use the “partial answer” box to advise the client that the ILL is ready for pickup (QuickText might be available for this).
Then record the date of receipt, and the date the item is expected to be returned, so that the return date will show in the Open questions screen and the return can be managed.
Printing a pickup slip to go in the item
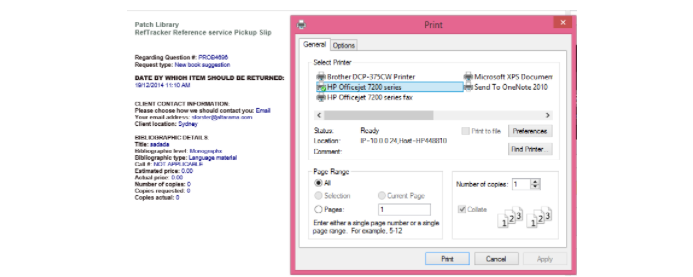
After you have recorded the arrival of the item and its expected return date (using the “ILL – Update” process), the target date for the request will be showing the date by which the item should be returned to the library. The Qprint function provides a handy opportunity to print a Pickup slip to the placed in the item as a reminder to staff of who will be picking it up, and as a reminder to the client of when the item needs to the returned to the library.
To print the Pickup slip go to Actions>Qprint and select Pickup slip, and select print in the pop up.
Your System administrator can create a pickup slip in whatever format is required for your library, but an example one is provided by the system as per the following screen print – notice the right hand formatting designed to allow the relevant information to be easily seen when the printout is placed in a book.
When the ILL is to be returned (ILL – Update)
Because the target response date shows the date on which this item is expected to be returned, you can monitor whether it has been returned on time by using the information displayed in the Open questions screen.
If the item does not appear to have been returned on time, use the Inform client workflow in the Answer screen to remind the client that the item should be returned (there may be QuickText for this).
However, when the ILL is returned to the library and you need to return it to the owning library – you will want to match it to the original request in order to be able to return it to the appropriate supplier.
Enter the Title of the item in the text box of the RefTracker Search screen and click on the “Bib and ILL fields” text box. The system will return all questions for which that Title has been recorded.
Clicking on the question number will allow you to start working on that question.
In the “ILL – Update” workflow, you will be able to see who the Supplier was, and arrange for return of the item.
Then update the status of the ILL by going to the Answer menu list and using the “ILL – Update” workflow. Enter the “ILL actual return date” and, if the question is ready to close, select Close and ensure “Closed-redirected” is selected at “Closing status” so that the question is automatically closed (without any further communication with the client) as you record that the item has been returned.
Sending ILL requests to Relais ILL systems
The “ILL – new” function allows ILL request information to be passed to Relais based ILL systems using a web service and XML record. This process results in the data collected in RefTracker creating an ILL request in the Relais based system without any separate rekeying of data into the Relais based system. System administrators can find more information about setting up this interface in the Organisations code table section of the Other Code tables page in the Administration manual.
When an organisation can accept ILL information in this format, your System administrator will create an Organisation code table entry for that Organisation that defines that ILL requests sent to that Organisation through RefTracker should be sent using the Relais web services interface rather than by email. When you select the Organisaiton and select to “Send to Supplier”, the Relais contact inforamtion will show. confirming that RefTracker knows to send by Relais.
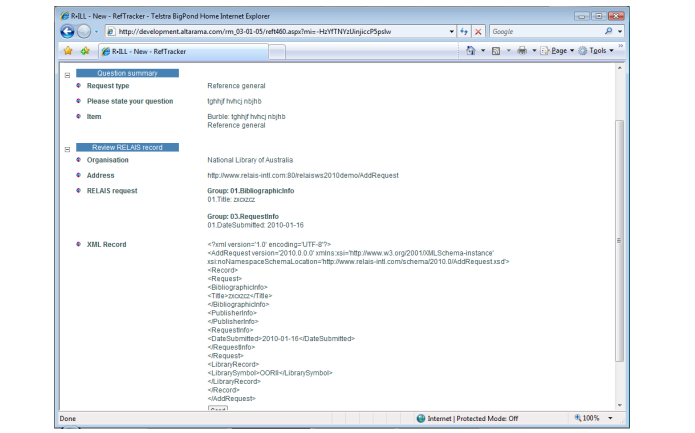
When you click on Send you will be shown a summary of the information that will be sent to the Relais web services/XML compliant system, and if it is not correct, you can use the Back button to go back and correct the data you have entered. The layout of the XML record created is controlled by a definition for that record defined by the Addrequest.xml file in the reftracker/export/relais directory set up by your System administrator.
Your information will not be sent to the Organisation’s web service until you click one of the Send buttons in this confirmation screen.
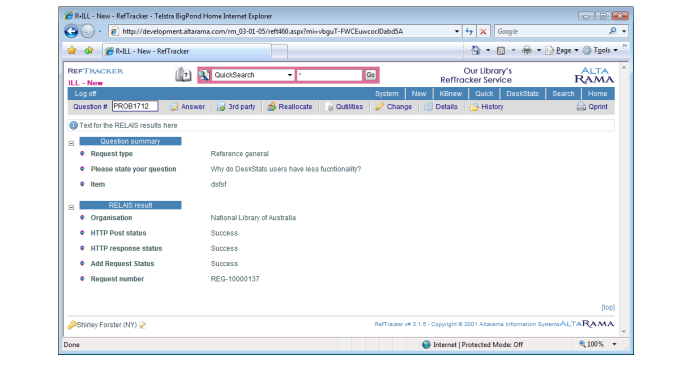
After clicking Send in the confirmation screen your request is sent directly to the selected Organisation’s web service and a confirmation from that web service is displayed. If your submission was successful the Request number reported in this confirmation screen is automatically written to this question’s ILL request number field, and the XML information sent can be seen at any future time by clicking the [View] link provided for that Event in the history tab.
The Relais sending confirmation page shows:
Exception: If the HTTP communication fails for any reason, a diagnostic message will be displayed here.
Add request status: Success means that the ILL request was accepted by the Relais service.
Response: The request number created for you in the Relais compliant system, or if an error was generated creating the request in the Relais compliant service, an error message indicating why the request was rejected. When the request is successful, the Request number returned from the Relais compliant organisation is automatically written to the RefTracker ILL “Request number” field.
Document delivery – What if the item is supplied electronically and does not need to be returned
If the item is supplied electronically and does not need to be returned, you only need to record that the item has been requested (using “ILL – New”). If the item is obtained electronically and has been delivered (either outside of RefTracker, or using the Answer boxe in “ILL- New”), the process is complete and you should select “Close” in the “ILL – New” process to close out the question.
If the item will arrive at a later time, set the “Expected receipt date”, and when the item arrives, use “ILL – Update” to record its ILL actual arrival date, and the appropriate “Close question” option in “How complete” to close the question as the request is now complete.