The Answer screen
This Answer screen can be brought up at any time using Answer in the Question actions bar, or Answer in the menu list under Answer. The question number showing in the Question number box of the Question action bar determines the question that the Answer screen will display for. A summary of that question displays at the top of the screen, so you can be sure you are working on the right question.
You can come in and out of the Answer screen for this question as many times as is appropriate to develop its answer. The Answer will remain a draft that the client cannot see until you close the question (at which point you can decide whether to send the Answer you have create to the client, or not).
You can access all the tools you need to correspond with the client, record notes about providing this response, develop the answer, and provide the answer to the client and close the question, from this screen (or directly from the corresponding entries in the Answer menu list).
The primary function of this screen is provided by the Answer tab however there are two other tabs provided for reference purposes. The purposes of the tabs to this screen are:
- The Answer tab is used to develop the Answer, to send the answer to the client, to communicate with the client in other ways, and to make notes about developing the answer. It is the active tab – the other two tabs provide information only.
- The Details tab provides exactly the same information as provided by the Details tab of the Summary screen – all the known facts about this question. It is provided here in the Answer screen so this information can be referred to while using the Answer screen.
- The Correspondence tab provides exactly the same information as provided by the Correspondence tab of the Summary screen – a summary of the correspondence that has occurred in relation to this question since it was created. It provides a quick way to familiarise yourself with the history of the question before trying to work on a question that you have not worked on before. Importantly, an exclamation mark icon will appear in the Correspondence tab if this question has been worked on by someone other than you (by another staff member, the client or a system process), so make sure you look at this tab before starting work on the question, to see what the update is if the exclamation mark is appearing.
Users of this screen can move around the tabs without losing work entered in to the Answer tab, but don’t forget that the information you enter in the Answer tab is not saved until you click on the Save or Save & send button in that tab.
The Question summary above all the tabs
A summary of the current question is provided above the tabs of most of the Answer screens so that it is viewable no matter what screen/tab you are visiting.
The information provided in this summary is:
- Request group symbol to allow the type of question to be quickly identified.
- Question number of this question.
- Question text providing the Subject line if there is one, a summary of the question text, any Question attachments, any item associated with the question (the ItemSummary and any defined Key attributes, both shown in italics), and the latest staff and client notes added to the question. This is enough information for you to be able to tell this question from any other, and to understand what it is about and where it is up to. Your System administrator controls what displays here using the QuestionActive template.
– if a [more] link appears here, click it to see the entire question text or note. Your System administrator controls the amount of text showing before the [more] symbol, using parameter 3.5 for Questions and 3.9 for Notes.
– clicking the [. . .] symbol will show you more details about this question. Your System administrator can control what shows here using the QuestionDetail template.
- Status of the question.
- Allocated staff member name, if the question is allocated to a staff member.
The Details and Correspondence tabs in the Answer screen provide the same Details and Correspondence information as is provided in the Summary screen in a way that the information can be reviewed without having to leave the Answer screen. Just swap to the tab you want to view and swap back to the Answer tab to continue answering the question.
Some functions bring you into the Answer screen at one of these tabs so you can familiarise yourself before moving to the Answer tab.
Validation messages
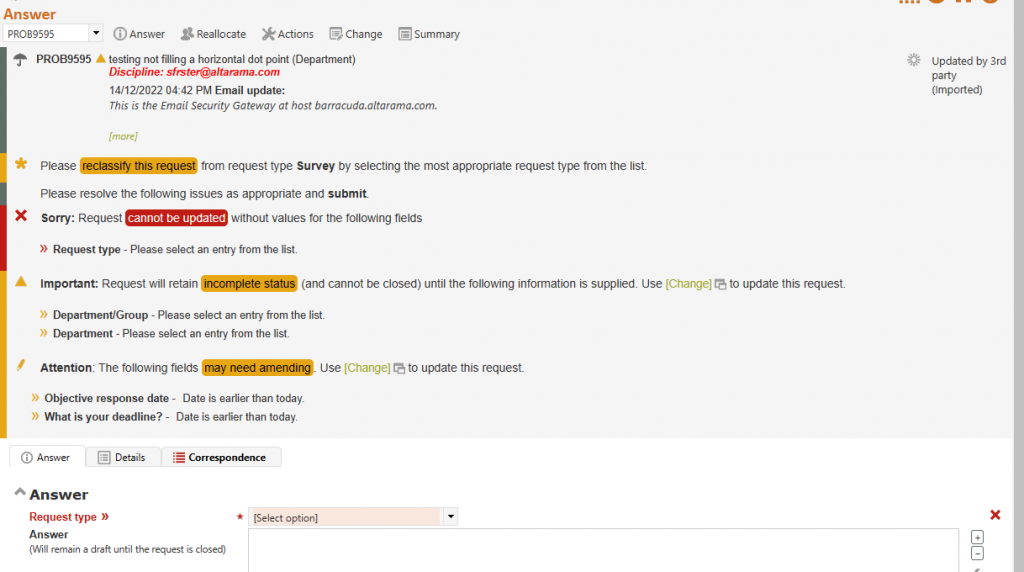
A validation section may also appear above this Question summary indicating missing information detected upon Submit, or detected as the screen is initially displayed. Common reasons for a validation message appearing when you enter this screen are that the question is incomplete, or it needs to have an appropriate Request type associated with it.
Imported questions will often be marked as incomplete, indicated by a construction icon

near the question number, as, although a valid question may have been created, the imported data may not have provided all of the mandatory information required by your organisation for that type of request.
The validation messages highlighted by red cannot be ignored and must be resolved before the screen can be submitted.
The validation messages highlighted by orange allow work to proceed in the Answer screen, though some may clearly indicate that the work cannot include closing the request (and closing options will not be displayed for those requests). Usually these issue will be able to be resolved using the Change screen, and in the mean time, the Answer screen, and other screens that allow the response to be progressed can be used.
If a request is incomplete, it cannot be closed and the options for closing the request will not appear on the screen. Further a red message indicating that the request cannot be closed at this time is added to the Saving and closing section of the screen to make it obvious why the closing options are not showing.
The Details tab of the Answer screen
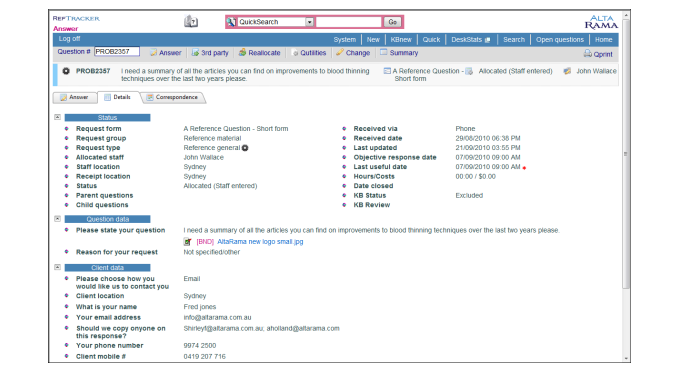
The Details tabs shows all of the currently known facts about the question that you are about to answer. For a full description of the meaning of the information displayed in this tab see the description of the Details tab in the Summary screen later in this manual.
At any time during the process of answering your question you can view the information in the Details tab without losing any information you may have already entered into the Answer tab – but don’t forget to go back to the Answer tab and click Save or Save & send to save that work after you have finished viewing the Details tab.
If the question is currently unallocated, and you are a user with a permission level of Probation or higher, a “Claim” button displays on every division header line in this tab. If you want to claim this question, click on any one of these “Claim” buttons – the question will be immediately allocated to you. This is indicated by the Allocation information at the right hand end of the question summary at the top of this tab, changing to “Allocated”. The “Claim” button does not show if the question is already allocated, and a pop-up message will display if the question cannot be allocated to you as the question has been closed, or allocated to another staff member, since your screen last displayed.
Exercise
For the question you have been working on, click on Answer and then click on the Details tab to see all the known facts about this question.
The Correspondence tab of the Answer screen
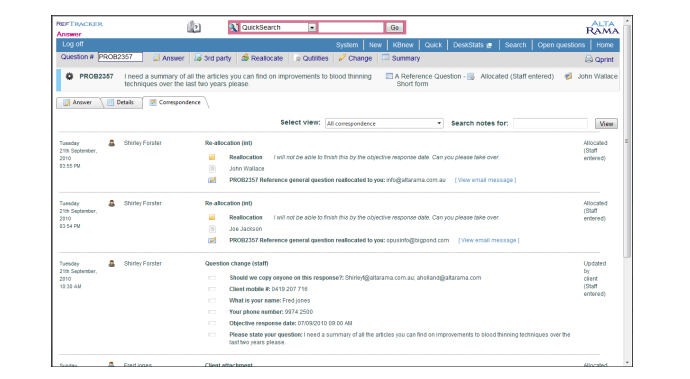
If you are going to the Answer screen for the first time in relation to a question, or need to re-familiarise yourself with the status of a question you previously worked on, the Correspondence tab provides a record of what has been happening to the question.
Importantly an exclamation mark icon will appear next to the Correspondence tab label if the question was last worked on by anyone other than you, so be sure to look at it if the exclamation mark icon is showing – this ensures that work by other staff, RefTracker processes like email importing, and updates by clients, is considered before working on the question. Newly created questions do not present the exclamation mark icon as all of the information you need to know about a new question is shown in the Details tab.
Full details of how to use this tab are provided in the later section about the Summary screen.

If the exclamation mark icon is showing you will be initially presented with the “All correspondence” View of the Correspondence tab, so that you can see correspondence by all parties. If the Exclamation icon is not showing you will be initially presented with the Correspondence tab view that you last selected (the “All client correspondence” View, for example) as this is likely to to be the view that you most often use.
You can view this tab at any time whilst working in the Answer tab without having to save the work you have done in the Answer tab – but don’t forget to go back to the Answer tab and click Save or Save & send to save that work after you have finished viewing the Correspondence tab.
Note that Query to client and any corresponding response to that Query are grouped together no matter what order the responses were received in.
This Correspondence tab summarises only the correspondence type actions that have happened in relation to this question. A full audit trail that includes even more things (like Time used, Categories and Resources, is accessible in the History tab of the Summary screen if more details are required.
Exercise
For the question you have been working on, click on the Correspondence tab to see the correspondence trail for this question. Notice how the client’s answer to a Query to client is recorded in the History, together with the associated question, no matter what chronological order it was received in.
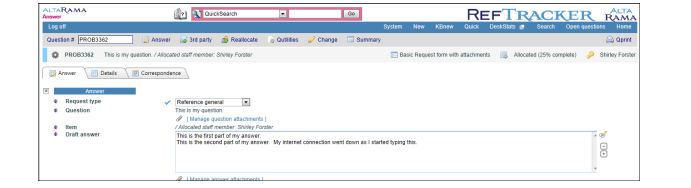
The Answer tab of the Answer screen
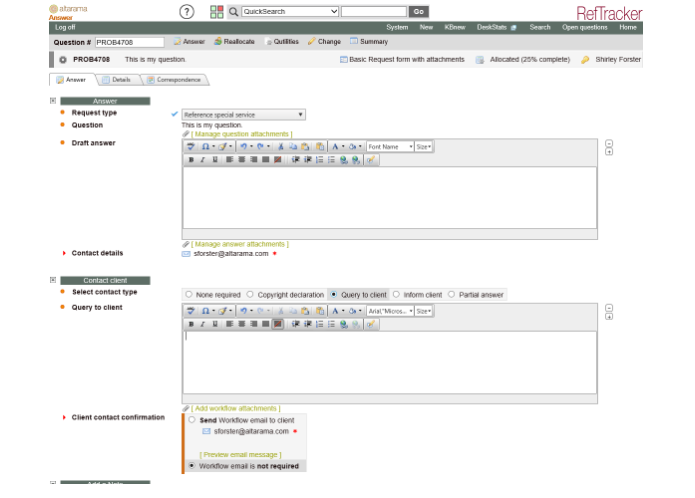
The Answer screen Answer tab is where you can do all your correspondence with the client including sending them your Answer and closing the question. The Contact and Note functions are also directly accessible from the Answer menu list.
To send an answer you must “Close” the question, but along the way, the “Contact client” functions provide other ways of communicating with the client – all correspondence with the client about this request is in the one place – the RefTracker History/Correspondence screen.
If you go directly to the Answer screen (as often happens when you click on a question number in the Open questions screen), you will see a screen like this:
You can use the formatted edit box features to create your response in the draft Answer field.
If you need to come back to this response to complete it at a later time, just check that the How complete value is sensible and reflects the current progress in achieving a response, complete any other fields that are important to your organisation such as Time used and Resources, and click Save or Save & send. Your partly complete response will be saved and you will be taken back to your Home page (Home or any of the Open questions screens) to work on other things. You can come back to providing this response at any later time.
If your answer is complete and you want to send it to the client, click the Close button. Incomplete requests cannot be closed, so the Close option is not offered. but a link to the Change screen is provided so that the incomplete information can be added, and you can come back to the Answer screen to send our the answer.
Answers only go to the client when the question is closed as closing it takes the question off the Open questions list. If more often than not, you enter the answer and send it off in one action, you can have this Leave/Close option default to Close. Just go to Home>My preferences and the Answering tab, and set the “Answer default action” parameter to “Close”.
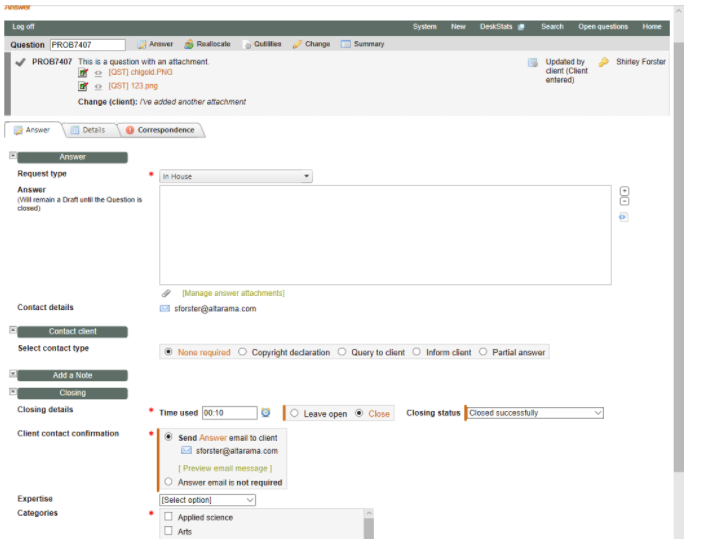
To emphasise that the Answer is about to be sent to the client, a Client contact confirmation box will appear directly under the Close button and Closing status drop down, indicating that the Answer email is about to be sent (or that correspondence by another method is required). If you choose not to send the email using the Client contact confirmation box, the question’s History will record that you chose not to send the Answer email.
This Client contact confirmation box is highlighted with a coloured bar on the left to ensure that you notice that the client correspondence will (or will not) occur, or needs to be done by other means. The Client correspondence confirmation box does not display if the option to send the Answer for the type of request being handled by this Request form has been configured out (when is never needed for this type of request).
But the Answer screen allows much more. . . .
If you want to correspond with the client in other ways than providing the Answer, the Contact client division provides what you need – more about that later.
If you need to make notes, the Add a note division provides that function – more about this later too.
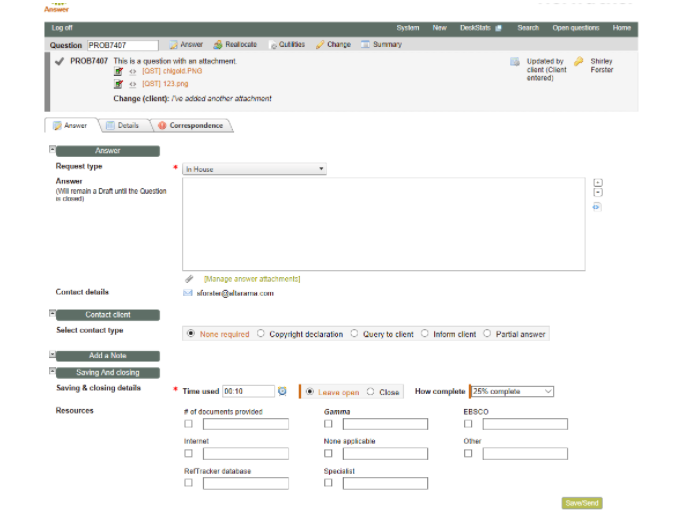
Answer screen fields
To facilitate your ability to develop an Answer and correspond with the client along the way, this Answer screen provides the following:
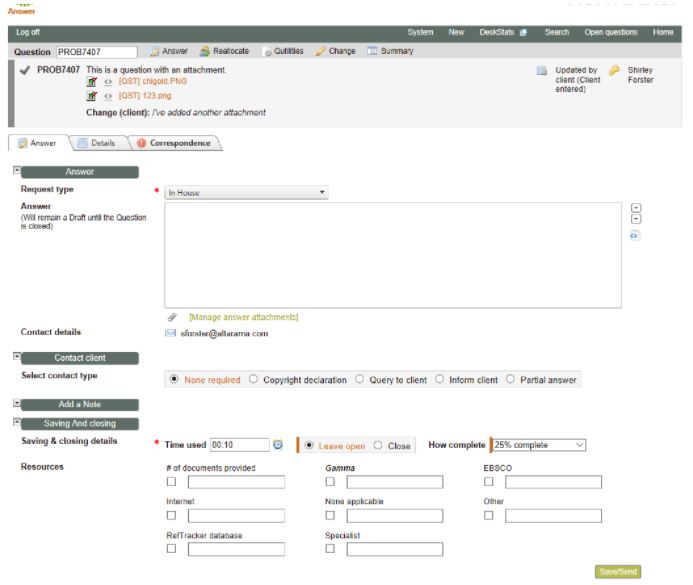
Answer division
- A validation message section appears at the top of this screen if the system has detected that action is required to complete required information. It can appear on initial display of this screen, or after Save or Save & send has been clicked. It will describe the additional information required. Warnings can be overridden by clicking Save or Save & send again.
Common reasons for the validation message appearing include that the question is “incomplete” as indicated by the construction symbol next to the question number, or that the Request type needs to be changed on arrival of the question.
If the Request type needs to be changed [select option] will appear in that field and the validation message will show the current Request type.
If the question is incomplete, the validation message will indicate the missing mandatory information, and, provide a link to the Change screen, where the information can be added when it is available. As the missing information may not yet be available, you will be able to use this screen without providing it – the question will remain marked as incomplete until the missing information is provided. The question will not be able to be Changed without all the missing data being provided, but other screens like Query to client, and Third party can be used to obtain the missing information. - Request type: shows the current Request type and allows it to be changed if not appropriate.
Clients don’t always use the right Request form to submit a question, which means that questions don’t always arrive with the right Request type automatically applied.
Your System Administrator may have set up some of your Request forms so that when you first work on a question (using the Answer, Third party or Change screens) Request type is set to a value that indicates it is unclassified – often something like “Unclassified” or “New question”. When this is the case, “[select option]” displays in the Request type field, and the box displays in a highlight colour, as a prompt to “classify” the question. The Request type drop down displays all of the appropriate Request types under their respective Request groups, making it easy to assign an appropriate Request type. Once the question has been classified by a staff member, the [select option] prompt will no longer display. The [select option] prompt will appear in the Answer, Third party and Reallocate screens, so that the reclassification can be done in whichever of these screens are used first by a staff member.

- Answer (will remain a Daft until closed): allows you to record your answer as you work on the question. You can come in and out of this Answer screen as many times as is required to build the Answer in this box. An answer can be up to 2 million characters in length, but longer answers are usually better provided as attachments, or by building the information into a web page (such as RefTracker’s Subject guides) and referring to the web page directly in the text of your answer.
The Answer field is QuickText enabled so you can use standard clauses to help create your answer (more about QuickText in an upcoming section of this document).
When drafting an answer remember that your answer will be presented within the body of an already formatted email. You only need to put the text of your specific response to this question in this box.
Clients cannot see your draft Answer until you close the question (to indicate that the Answer is complete) and click Save or Save & send to save that change and send the Answer to the client, if you choose to do that.
Most systems will have a note associated with this draft Answer field, “Will not be final until this question is closed”, that make it clear that this answer text cannot be sent to the client until the question is closed, by selecting the “Close” button.
Because of the importance of the work that you do in this box, the text that you type into this box is saved as you type it. Should your Internet connection fail, or should you accidentally close your browser window without saving what you typed into this box, just log back into RefTracker and, in the same browser, go to the Answer screen for the question you were working on. You will be prompted by a pop-up that asks if you want to restore the unsaved work. See the later section “Recovering lost draft Answer text” for details. - Contact details: a summary of the information known about how to contact the client who asked this question is provided here.
If “No response required” is displayed, an answer is not essential for this question, and you can simply close the question. To do this in the Answer screen you will need to enter text like “No response required” in the draft Answer box and then select the “Close” option in the How complete drop down, and select NOT to send out the Answer in the the Client contact confirmation box, and only then click Save or Save & send. However, a better solution for questions where no response is required is to select “Close without client contact” function from the Answer menu list as it ensures there is no risk of sending an email to the client.
In all other instances the system will show the primary contact details. The asterisked detail is the client’s preferred contact method. If more contact details are available a [. . .] link will appear and can be clicked to see any further client contact details. Your System administrator can control what client contact information displays initially, and what displays only after clicking the [. . .] link (the ContactDetails text file controls this).
If external communication software can be used with a contact method (outgoing SMS and Skype contact is currently supported) the client contact information will be shown hyperlinked, and if you have the required external communication software loaded on your PC, clicking on the hyperlinked communication details will bring up the right external communications product ready to make an outgoing call. It will also automatically put the Add notes section into Record conversation mode to ensure that you record a summary of your external communication session. More about these client contact methods and the Record conversation workflow later in this manual.
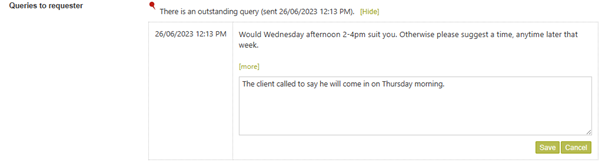
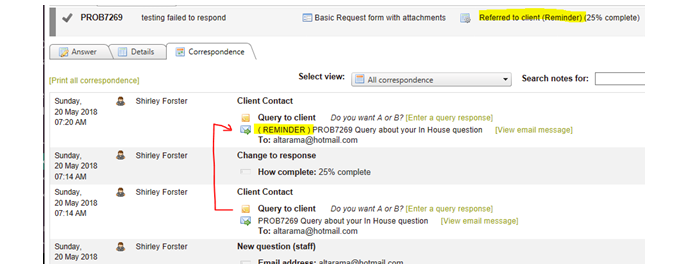
You can also see all the client contact details by going to the Details tab. - If there are any outstanding Queries to client, a note will indicate how many, and provide an option to [Show options] details of the outstanding queries, and either, enter a response on the clients behalf, send a reminder message, or clear the outstanding query so it no longer shows in the Answer screen (when it continuing to show would be confusing).
Links to send a Query to client reminder, enter a Query response, or Clear the query
System administrators can set up to have reminders sent automatically if a client has not responded to a Query to client within a specified time, and, optionally, for the question to be automatically closed if they do not respond to the reminder within a specified time.
Some customers may prefer to have staff decide when reminders should be sent in relation to questions where the client has failed to respond to a Query to client, so, whether or not the automated “Failed to respond” process is set up, staff can send manual “Failed to respond” reminder notices whenever they think they are necessary.
There are two places where staff can manually send a reminder (or enter the client’s response on their behalf) – in the Answer screen and in the Correspondence/History tab of the Summary screen. Here’s how to use it in the Answer screen.

Go to the Answer screen for the appropriate question, and if a Query to client has not been responded to using the link in the Query to client email, and, if a reminder has not already been sent (manually, or by the background process, if that is running in your system), clicking the [Show options] link to the right of the Outstanding query summary in the Answer screen, will show an [Enter response] link, a handy way to send a reminder to the client that the query needs a response, and an one click was to remove the reminder when it is no longer applicable using [Clear].
The three options provided after clicking [Show options] are–
– “Enter response” that allows you to enter a response to the query on behalf of the client. Click Submit to save you response note and close off the outstanding query.
When you submit the client’s response in this screen, the note about that outstanding query will disappear as it is no longer outstanding. If you go to the History tab, you will see that the History now records the query and its corresponding response in BOTH the history entry for the original query and the history entry for any reminder. Importantly the fact that it was a staff member who entered the response is clearly shown by the ”entered by” information.

– “Send reminder” that allows you to send a query reminder immediately. Click the [Send reminder] link and click “Yes” in the confirmation box when it displays, to send out a reminder.
But before you send the reminder, be sure to check any newer History entries that might show that a response has arrived in another way (such as via an imported email).

A “Send a reminder” pop up message then displays and when you acknowledge that message, the Answer screen redisplays with a reminder history record showing at the top. The [Send reminder] link no longer shows in either the original history entry, or this new reminder entry, as the reminder has now been sent.
The reminder email that is sent
The reminder email that is sent by the “Send reminder” process is just a copy of the original Query to client email but with a clear message about it being a reminder.

When the reminder email is sent out, the status of the question is changed to “Query to client (reminder)” which will ensure that another reminder is not sent out by the automatic process, if the automatic process is running, and serve as a clear indicator for staff as to what has been done.
If the automatic process is running and it calls for questions to be closed after the specified period, questions sent reminders manually will be automatically closed after that period, just like ones sent the reminder automatically.
If the automatic process is NOT running then staff will need to manually close questions if the client does not respond to the Query to client reminder, after a policy provided amount of time.
– “Clear” that allows you to close off this outstanding query without a response being recorded.

A “Clear reminder” pop up message then displays and when you acknowledge that message, the note about that outstanding query will disappear as it is no longer outstanding. If you go to the History tab, you will see that the History now records the query and a note that it was cleared by the staff member performing the clear.
So, use this function to remove this outstanding query reminder, from the Answer screen, whenever it is no longer relevant for it to appear each time the Answer screen is used.
Use the [Enter response] option if you want to record a note about why you are clearing the query.
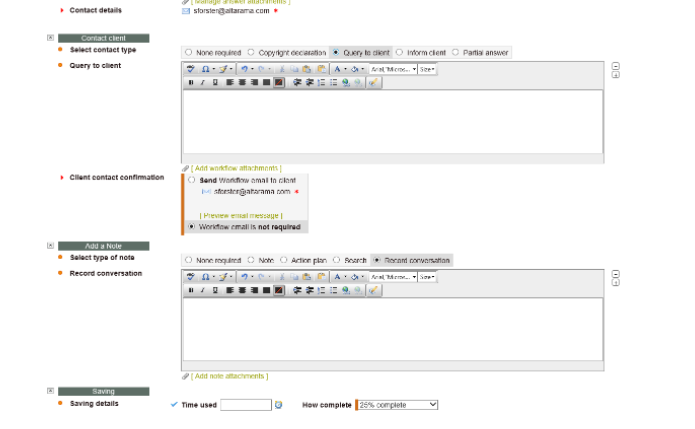
Contact client and Add a Note divisions
In the process of answering a question, you may need to perform other functions besides simply developing the answer and sending it to the client. The Client contact and Add a Note divisions are designed to allow you to perform all of these other functions at the same time as you work on developing the Answer – for example obtaining a clarification from the client or sending them a Copyright declaration – all in the one place.
Available workflows are as follows, but System administrators can remove any of these functions that will not be used by any particular staff member (using the staff signon Functions tab) :
– Copyright declaration
– Query to client
– Inform client
– Partial Answer
– Note
– Action plan
– Search criteria
– Record conversation
All of these Contact client and Add a note workflows can be accessed directly from the menu list under Answer if you know that is what you want to do. There is more about the uses for each of these specific workflows later in this manual.
In this Answer screen, the Contact client and Add a note divisions are provided so that you can do these things at the same time as you develop your response. RefTracker remembers whether you last used these divisions expanded or contracted and presents them the same way next time. Contracting both these divisions (by clicking on the expand/contract icon to the left of the division name) makes this screen easy to use, as the Saving and closing functions, like the option to Close, then directly follow the Answer box. User that more often than not just provide a short answer and then close the question, will want to contract both the Contact client and Add a note divisions.
To use the Contact client part of this screen, first select the type of contact that you want to make, then use the formatted text box to record your message. A Client contact confirmation box will display to indicate the communication that will happen, or needs to happen when Save or Save & send is clicked. See the Contact client section for more information about using the Contact client workflows.
To use the Add a Note part of this screen, first click the division name or show/hide icon to its left, to show the options available, then select the type of Note that you want to record, then use the formatted text box to record your note. There is no Client contact confirmation box displayed as this is just a note – there will be no client communication when Save or Save & send is clicked. The note will simply be saved to the question’s History. See the Add a note section for more information about using the Note workflows.
If you choose a Contact client workflow type, or an Add a Note workflow type, and then decide you no longer need to do that workflow, simple choose the appropriate “None required” button, to prevent the workflow from occurring and being recorded.
If you choose a Contact client workflow type, or an Add a Note workflow type, and then decide you have chosen the wrong one, simply click the correct radio button. The text you have entered will be retained, and the correct QuickText for the new workflow type will then be available. If there is Auto QuickText associated with the function that you are moving to, a popup will ask if you prefer to have what you have typed, replaced by the Auto QuickText.
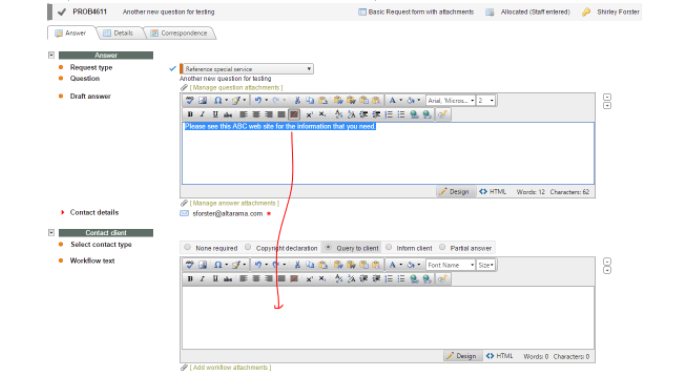
If you start entering text into the draft Answer box, and realise that you are actually asking the client a question (for example), simply click the Contact client Query to client radio button (so that the Formatted text box for that workflow displays), then select the text you wrote in the draft Answer box, and drag and drop it in the Query to client box (Note that not all browsers support this functionality).
If you start entering a workflow and realise that you need to close the question, a [Change to draft Answer] option is provided that will move your workflow text, and any attachments, to the draft Answer box so it can be sent as an Answer that includes the closing options such as reopen and any evaluation options. See the Contact client section for more information about this.
Saving
Time used: If your organisation collects information about the amount of staff time used to answer a question, the Time used field will appear in this section. Your System administrator may have made it compulsory to enter an appropriate amount in this field, in which case a coloured bar will appear immediately to the left of the Time used field to indicate that this field should be completed, and if defaulted, should be reviewed and updated if appropriate. Time used can be entered as minutes e.g. 90 = 90 minutes, or hours and minutes in the form of hh:mm e.g. 1:30 = 90 minutes, or hours and a decimal fraction of an hour in the format hh.n e.g. 1.5 = 90 minutes where every .1 = 6 minutes. Time entered will be automatically reformatted to the hh:mm format when you move to another field to clearly show the impact of the value entered. Supervisors and Administrators can enter negative values as adjustments.
The timer  works with the “Time used” field as an optional aid to measuring the time used in answering a question. Click on the clock image and it starts the timer with accumulated time showing in the Time used field in minutes (rounded up or down except for the first minute where it shows seconds adjusted every 5 seconds – this helps to indicate that the timer has been turned on and that 1 minute of time is only recorded if more than 30 seconds has been used). Click the clock icon again to stop it. You can adjust the time showing in the “Time used” field at any time, even when the timer is running in order to ensure that the total logged time will be correct. You can even restart the timer if you need to do more work in the screen. If you click on Save or Save & send in order to save the contents of the Answer screen, when the timer is still running, the timer will be stopped, and the time then showing in the “Time used field” will be the amount recorded in the History as the time used. Some staff find it handy to click the timer as soon as they start working on a question.
Staff can set the timer running automatically each time they enter any of the Answer based screens that include a timer by setting the “Auto start timer” parameter in the Answering preferences tab of the My preferences screen, to “Yes”. If you do this, you need to be sure to adjust the timer before saving your screen if you have left your RefTracker screen open while doing another activity (coffee break, checking email, phone call, etc).
“Time to date” information only shows if time has already been recorded for this question. Its major benefit is for organisations that have policies regarding the maximum amount of time that should be spent on any question, and for customers where a lot of the work is done outside of RefTracker. It also makes it clear to new users that they only need to record additional time spent, not total time to date. Total time recorded to date also appears in the Details tab of the Summary screen, and the Journal tab shows all of the details of the entries that make up that total. Time can also be entered using the Record time screen where the individual entries comprising time to date are also shown.
Leave open/Close: Leave open/close will only appear where the option to Close the question (and send the Answer) is applicable.
If you choose Leave open a How complete field will show for you to indicate level of progress.
If you choose Close, the Closing fields will appear with the Client Confirmation box immediately under the Leave open/Close options to make it very clear that closing also means sending out the Answer, unless you use that box to prevent the answer from going out. (Close without client contact in the Answer menu list may provide a better way to close the question if the Answer does not need to go out). When you choose “Close”, Closing status appears instead of How complete.
By default, the Answer screen displays with “Leave open” showing, but for those who, more often than not, complete the answer and send it off in one action, staff can set the “Answer default action” parameter in the Answering preferences tab of the My preferences screen, to “Yes”, and that will result in the Answer screen displaying with “Close” already selected, so that in order to send off the Answer they only need to enter the Answer and click Save or Save & send. If an email is to be sent, the Requester contact information box is showing as a clear warning that the Response email will be sent.
How complete: This field MUST be reviewed, and updated if necessary, every time you use the Answer screen and leave the question open. The coloured highlight block immediately to the left of this field serves as a reminder to do that. If a progress value has not already been recorded for this question, the default value in the Progress code table will appear here. It will indicate the first level of progress in responding to this question. The value that you select in this drop down box, not only provides information to other librarians about your estimation of the completeness of this answer, but the value you select here determines what the client who asked the question can see as the status of the question if they use the RefTracker client interface to obtain an update on the status of their question. Your system administrator will have created appropriate values for the client to see – so that if you choose a status like “Request denied”, the client may see something like “Progressing” so that you can manage how the client is advised of this sort of status change.
When you click Save or Save & send, the question will remain open and you will be taken to your Home screen.
Your System administrator controls this values appearing in this list via the Progress code table.
Closing Status: This field MUST be reviewed, and updated if necessary, whenever you choose to close the question. The coloured highlight block immediately to the left of this field serves as a reminder to do that.
When the Close option has been selected the system will display all the fields required to close out the question and will result in the answer you have been developing in the draft Answer box, being sent to the client if appropriate. See the next section for an introduction to what happens when you indicate you want to close the question by choosing Close in the Leave open/Close selector. Your System administrator controls the values appearing in this list via the Status code table.
Costs (and payments): If your administrator wants you to be reminded to enter costs/payments as you work on questions they can include the costs/payment function here, where it is relevant to the particular type of request that gets entered using the Request form you are currently using. If this section has not been included you should be able to record costs and payments using the Record costs (and payments) screen available under Actions, as that screen opens in a separate window so it can be used at any time.
When updating a question the Costs and payments table looks like this (but your system might only provide the options to enter costs):
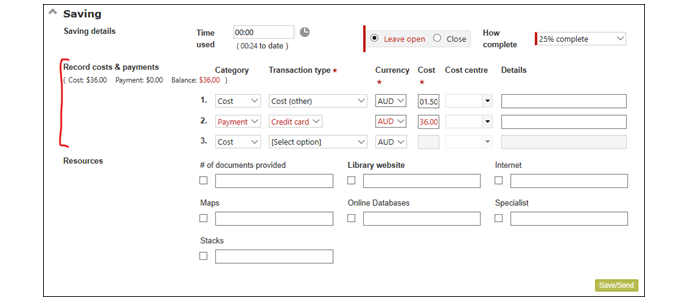
Use this Costs and Payments section in exactly the same way you would use the Record costs and payments screen. Notice that the current total of costs, payments and Balance owing are displayed to indicate the closing costs and payments that might be required. These totals do not include any time that you are billing for this last closing step and do not include any last minute costs, so there are three cost and payment lines provided for entry of these last minute costs and payment actions.
Resources: If your library wants statistics about the Resources that are proving effective in answering questions of this type, your System Administrator will have set your system to show the Resources section on this screen. It can be set for use in some forms and not for others. If the Resources section is showing you should use it to record information about the Resources that you used to answer the question, during this use of the Answer screen. You can indicate that you used a resource by simply ticking the small box under the Resource’s name, or, if you need to provide more details, enter them in the larger box using up to 2000 characters (and the small box will be automatically ticked). If the Resources field is indicated as Mandatory you will need to make at least one choice in this area every time you use this Answer screen for this type of question.
Every time you use the Answer screen the Resources that you use are recorded in the question’s History. The History can be viewed in the History tab of the Summary screen, or if you System administrator allows you access to the Summary screen Resources tab, you will be able to see the cumulative effect of the Resource information you, and anyone else who has worked on this question, have entered by looking at the Resources tab. (More about Resources later in this section).
Exercise
The first thing that you are likely to want to do in answering a question is to research it – use Answers to research a question whilst you are in this screen. You can cut and paste any useful information that you find in an Answers window straight back into your Answer screen.
Try using Answers to find some useful answer material and cut and paste its text into the draft Answer field. To the end of your draft Answer, add something like “More useful info can be seen at” and then cut and paste a URL into the draft Answer.
For the purposes of this exercise we are going to simply save a partially complete answer.
So if you do not already have a partially complete answer in the draft Answer box, add some text as your partially complete answer.
To simply save the work that you have done on this question, choose an appropriate How complete status, if an appropriate one is not already showing. When you the click on Save or Save & send the information you have entered into this screen will be saved, the status of the question will remain open, and you will be presented with your Home page (Home, or an Open questions screen).
In this way you can use the Answer screen as many times as is required to fully develop your Answer. In fact it is good practice to save the information you have entered into the Answer screen regularly in order to ensure that you do not run the risk of losing a lot of work as a consequence of a power or Internet failure.
Note that if the question is not already allocated to another staff member (unallocated), the system will automatically allocate the question to you at this point on the presumption that as you have done some work on the question you are taking responsibility for providing the complete answer. If, for some reason, you do not want to take responsibility for the question, you can Reallocate it back to the Pool (change it back to unallocated) by using Reallocate on the Question action bar.
Answer screen: recording resources used
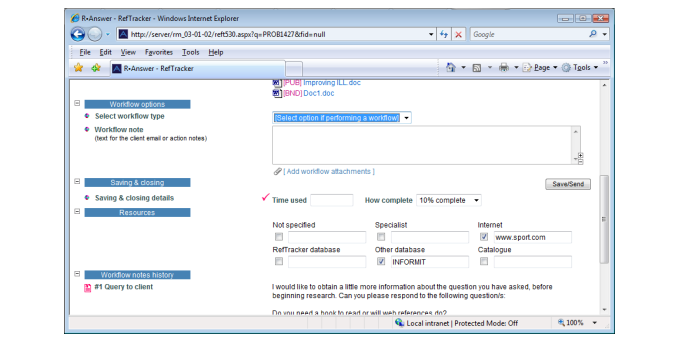
If statistics about use of resources are important to your library, this Resources section will appear in the Answer screen, and your library policies will require that you record the resources that you used in each step of researching this question. This should be done each time you use the Answer screen in relation to a question.
To record resources used, scroll down to the Resource section of the Answer screen (below the Save button).
The resources that appear here have been set up by your System Administrator so speak to them if you think it would be helpful to include other resources.
To record the use of a resource, simply click on the small check box below its name. To record further details such as the specific resource name, or feature of that resource that you used, type details in the larger data entry box (up to 2000 characters).
Exercise
Try recording some resources used. Don’t forget that they are not recorded until you click Save or Save & send. On this occasion choose the “Close” option and an appropriate “Closing status”, as we have finished examining the features of the Answer screen.
The restore function – recovering lost text
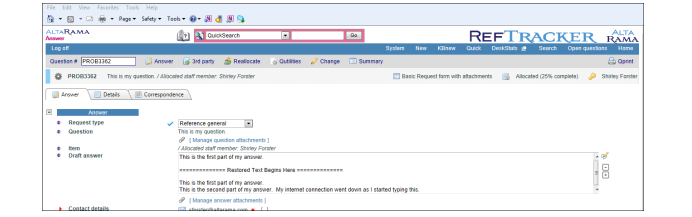
If you encounter an Internet disconnection, your browser session is unexpectedly lost, your browser crashes, you accidentally close your browser, or you accidentally navigate away from the Answer screen without saving what you have entered in the draft Answer or any of the Client contact boxes, The Restore function means you will be able to recover the text you entered in these boxes. Because the text you are entering in these boxes may have taken some time to develop, RefTracker saves that text onto your local computer, as you type it, so that it can be retrieved if any of the previously mentioned scenarios occur.
When text is lost in this way, RefTracker will let you know, via a popup, that it is available for restoration the next time you go to the Answer screen.
For the restore function to work you must be working on the same computer or device, and using the same browser!
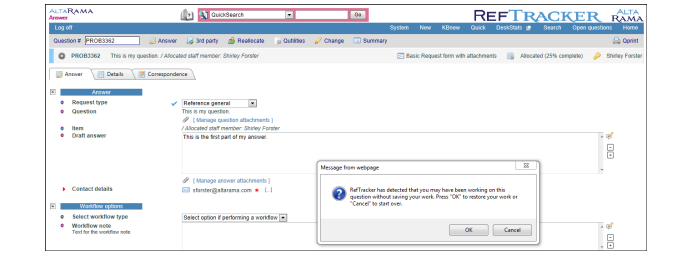
Clicking “OK” will append your recovered text to any text that is already in the draft Answer or Client contact box (Query to client, Partial answer, etc) that it was originally typed into. It appends to ensure that you can use this feature with confidence that nothing will ever be overwritten. Notice that the recovered test starts with ======Restored text======= to make it clear that the recovery process has occurred. Check any text above the Restored text indicator – you should then delete everything above and including the Restored text indicator, as that text should all be included in the text inserted by the recovery process.
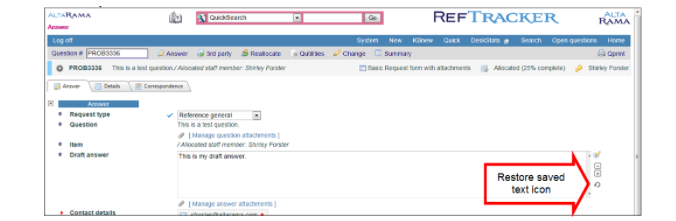
If you click “Cancel” to dismiss the alert, the restored text will not be inserted in the draft Answer box, but a second chance to restore it will be provided – a restore

icon will appear to the right of the appropriate formatted text box. Click it if you have now decided that you do want to insert the restored text. Note that this
icon will disappear if you use it to restore the text, or if you start typing in the box, as at that point the text then appearing in the box will have been saved and will be able to be restored if necessary.
If you go to the Answer screen for another question it will warn you that the restorable text will be lost if you click OK to the warning popup.
Click OK if you do not want to restore the text for the other question. You will then be able to start working on this question normally.
Click Cancel if you want to restore the text for the other question, or even if you are unsure if you should restore it. When you click Cancel you will be automatically taken to the Answer screen for the question for which restorable text is available. A popup will display asking if you want to restore the text (confirming that you are now in the correct question for the restorable text). Click OK to restore the text. If it should have been saved, click Save or Save & send and it will now be properly saved to that question. If, when you click OK, you find that the text did not need to be restored, just navigate away from that screen without saving it. Of course this means that next time you want to use the Answer screen, you will once again be reminded that there is restorable text available to be saved, but this time you will know that you can safely click OK in the popup to delete the restorable text.

Each time you successfully log out of RefTracker, all the auto-saved text is deleted from the local computer, ensuring no security issues are created by this feature.
This function can “save the day” if your Internet goes down, or you accidentally close your browser without Saving, but it can be annoying when you are just doing testing (which is often what you are doing when you first start using your system! If you are finding it annoying please ask your RefTracker support person to turn it off (Parameter 80.8), and make a note to have it turned back on again later.
Using the Answer screen at a later time
In Saving the Query to client workflow, you have completed one set of work on this question, but you have not completed the work on this Answer. You can use the Answer screen to do more work on the question as many times as you like in order to complete this answer. To do more work on the question, simply ensure the correct question number is in the Question number box on the Question action bar, then click on Answer. Another way to return to working on a question is to use the Search function to find the question, then click on the correct question number, and choose Answer if appropriate (more on the Search function later in this manual).
When the Answer screen is displayed you will notice that any draft Answer that you previously developed is shown, so that it can be corrected or improved.
Exercise
To further examine use of the Answer screen we are going to choose to use the same question we just developed the Answer for. Click Answer on the Question action bar, and see that you are automatically presented with the Answer tab of the Answer screen.
Note the question overview at the top of the screen to confirm you have the right question.
Also note that the “How complete” value that you previously selected is showing, and the draft Answer that you previously created is showing, ready for improvement.
The Answer tab of the Answer screen just shows enough of the information about this question to ensure you are working on the right one. You can see more information about past activity on this question by looking at the Details and Correspondence tabs of this screen. You can see a complete audit trail of every action that has ever happened to this question by going to the History tab of the Summary screen.