Viewing Attachments to questions
Where a hyperlink to an attachment is provided (in the client interface, staff interface and in emails), clicking the file name will result in the file being displayed in your browser, if your browser knows how to display it, with the Alt/F Save as an option to allow it to be downloaded.
If the file type is associated with an application on your computer (such as word processing, spreadsheet and PDF files), the file will open in that application and will be able to be downloaded using the native features of that application.
Where the file cannot be viewed using either of these options, an option to download the file will be automatically offered.
You can also download attachments by right clicking on their name and choosing the Save as option.
The links to attachments in RefTracker use permanent URL’s (ones that include “guid” in the URL). These URL’s can be copied for reuse in answers and elsewhere by right clicking the URL and using the “Copy link” option (sometimes called “Copy shortcut”).
When a permanent attachment hyperlink is clicked, the attachment will display using a temporary URL, for security reasons. Temporary attachment URL’s have “attachment/view” in the URL, and should not be copied as they are designed to be one time only use URL’s.
If you need to provide a link to a public attachment (such as to make the file downloadable form a QuickText entry, the URL to use is <yourRefTrackerdomain>/public/<Publicfilename>
However please note that the file name needs to be encoded e.g. spaces replaced by %20
e.g. https://abc.altarama.com/public/Annual%20report.pdf
Attachments can be added to questions
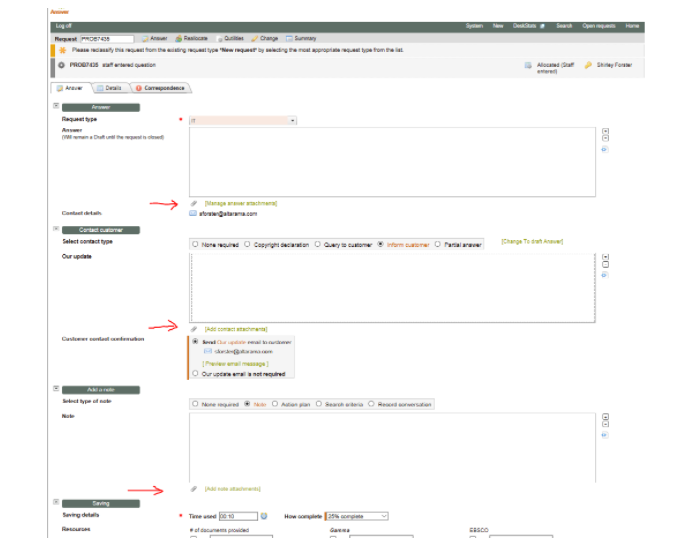
The Answer screen provides three ways to add attachments: Answer attachments, Contact client attachments and Add a Note attachments.
The process for adding attachments is the same for all these attachments types, and is described below, but first, here’s some information about the different attachment types:
- Question attachments : Will show in the summary at the top of the Answer screen, if there are any. Question attachments are supplied by the client or added by staff when entering the question on the client’s behalf, in the New screen. If you need to add Questions attachments or delete question attachments after the question has arrived, use the Change screen or QA review.
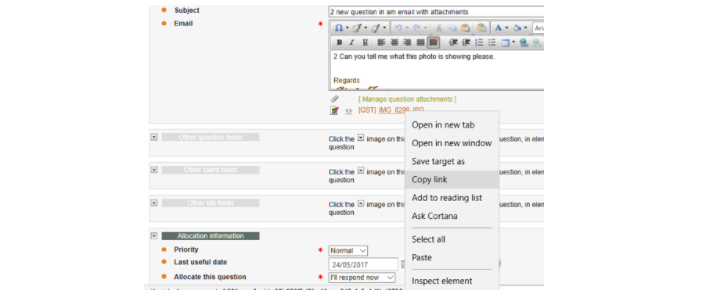
Question attachments are indicated as such by the (QST) indicator.
To view an attachment provided by the client, simply click on its name. If the attachment can be viewed by your browser it will appear in a separate browser window. If the attachment is not viewable by your browser, a download box will appear – if you have a viewer for that file type you can simply click the Open button in the Download box, but if not, you should click the Save button (you will then be able to run the file or use a generic viewer like Notepad to see the contents of the file). - Note that Question attachments are not viewable by clients when a question is included in the knowledge base – if a question attachment needs to be accessible in the knowledge base it should be copied and re-saved as an Answer attachment. Hint: If you would like to include a reference to the client’s attachment in your response to them, simply right click on the display of the Question attachment name in the Answer screen summary, and use the Copy URL (sometimes called “Copy link”) option, then paste that URL in where you need it. – for example the following, where the blue text is the text that was pasted in from the attachment URL: “This response is in relation to your attachment http://patch.altarama.com/reft301.aspx?guid=6f30d300-b799-4d20-b831-c3216d3f494e&md=10 We wish to advise that this photo is a duplicate of one already in our archives. Thank you for taking the time to make us aware of it.”
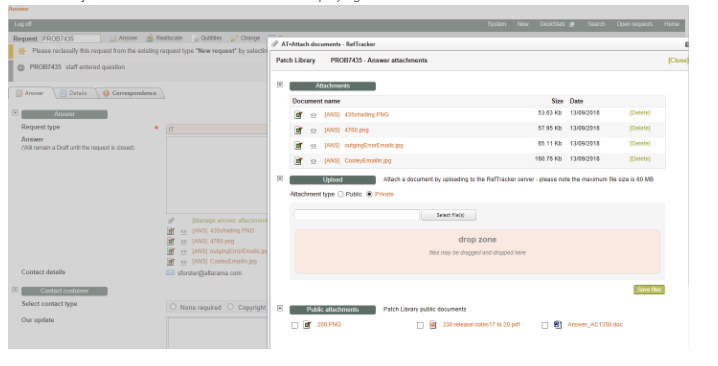
- Answer attachments : When you need to send the client a large amount of information, it is often best to develop that information in a separate document using say, word processing. Further, you need to send information to the client that is not in a textual format, and is not already available on a web site or an accessible web enabled location (e.g. you may have scanned an item specifically for sending to this client). In these cases you need to use the Answer attachments link. Answer attachments can be of type Private or Public – more about these different types in a later section.
If you add attachments that total more than the size specified in parameter 8.5 (usually 9Mb), the attachments will be provided to the client as hyperlinks provided in the body of the email instead of as traditional email attachments. This ensures that large amounts of attachments do not cause your response email to be rejected due to limitations of the client’s email inbox size.
Click on the file name to view it.
Answer attachments to questions that you include in the KB, will be able to be viewed by those searching the KB.
- Contact client attachments : In the process of answering a question you may need to send an attachment to a client e.g. if you want them to see a draft of the answer you are working on in a WP document. When this is required you use the Contact client link under the Client contact message that you are preparing.
Contact client attachments will NOT be accessible by clients when a question is placed in the KB. - Add a Note attachments : Should you need to add an attachment to a note that you are adding to a question, use the Add a note attachment link.
Note attachments will NOT be accessible by clients when a question is placed in the KB.
The maximum size of any attachment that can be added by staff is set by your system administrator (Parameter 8.6). It is often set at 50Mb.
Your email system will also have a limit as to the total size of an email that can be sent through it, that will limit the total size of all attachments that can be sent. Your system administrator will usually have set this value in parameter 8.5 so that, if your total attachments exceed that amount, they will be automatically sent by RefTracker as hyperlinks rather than traditional attachments.
If you need to send a really large file – one that is larger than the parameter 8.6 limit set by your System admin – you will need to use a large file transfer product to make that file available. There are lots of such products available such as WeTransfer and DigitalPidgeon. We have provided information about how to use http://send.firefox.com in conjunction with RefTracker, as an example of how to use one of these large file transfer products, at Send.firefox.com secure large file transfer.
Attachments cannot have names (RefTracker domain plus file name) of more than about 200 characters. The length is different for each system as the 260 file name character limit includes the directory path. If a staff member tries to upload a file that will produce a file path of more than 260 characters they will received a validation message advising that the file name needs to be shortened.
Also some characters are illegal for use in file names in some environments or when used in some ways. To ensure that attachments can be used in the widest number of environments and ways, the following characters are replaced by an underscore (_) if they occur in an attachment file name, before it is loaded into RefTracker:
{ } | \ ^ [ ] ‘ , ; / ? @ = & * : % ” +
Further, very long file names can cause display issues in browsers if they do not include any “breaking” characters (like space or hyphen). To prevent very long file names displaying out past the right of the browser window or forcing columns to be inappropriately wide, RefTracker automatically inserts a <wbr> break tag at 15 character intervals,when displaying long file names, to ensure a good display. This tag is invisible to the end user.
In all these situations you Attach a file to your RefTracker question using the RefTracker Attach subwindow. The Attach subwindow works the same for all three attachment links:
– you must always have entered some text into the text area to which you are adding the attachment before adding the attachment (for example “See the relevant information in the enclosed attachment.”).
– there is a Public area where your organisation can keep documents that are used regularly (such as bibliographies for particular subjects), up to date so that clients always see the latest copy.
In addition to these ways of adding traditional attachments to a RefTracker question, you can also include copies of attachment permanent URL’s in the body of your RefTracker response. To insert an attachment in this way, right click the attachment URL and choose “Copy link”. Then paste that link anywhere that you want to reuse it. Attachment hyperlinks provided by right clicking RefTracker file names are permanent and can be reused by anyone anywhere – they do not have to be signed into RefTracker to use it.
Exercise
Be sure you have some text in the draft answer box, then click on the Answer Attachment icon, or the words [Manage attachments] next to it, to bring up the Attach documents subwindow.
Also try copying and pasting a permanent link for a question with attachments that is already in your RefTracker system.
Attachment window

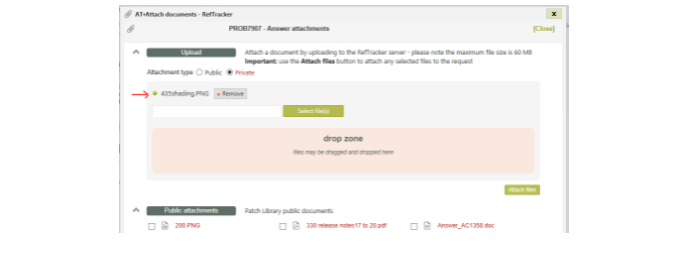
There are two parts to the Attachment subwindow, to allow files to be attached in two different ways. Upload and Public attachments – we will look at Upload first.
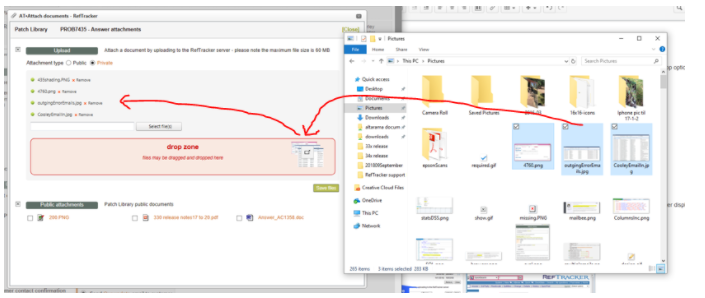
There are two ways that files can be selected for attachment: “Select a file” or “Drag and drop”.
When you have selected all the appropriate files you must click the “Attach files” button to complete the attachment process.
Upload Section (Overview and “Select a file” method)
To attach a file that resides on your PC or in your local network, click on Browse in the Upload part of the subwindow. A new subwindow will open that allows you to move about your local network as you would to select a file using any other Windows product. When you find the appropriate file to attach, click on it and then click on Open. The selection subwindow will close and the address of the file you chose will be showing in the browse data entry box in the Upload section of your Attach screen. If the file is too large to upload a popup will display to let you know.

You can upload any type of file (word processing, spread sheet, voice, image, etc., even special file types like access key files for records in document management systems) that is allowed by your system. A validation system checks for allowed file types and, if set up by parameter 9.80 (as it usually is), also virus checks the file to be uploaded.
Now you should select an upload type (see the radio buttons above) – your organisation may use one or both of the types mentioned here and the Type value will default to the one most commonly used by your organisation (usually PRIVATE).
PUBLIC puts the file into the web-enabled attachment/public directory you see in the centre panel of the subwindow. Files in this area can be kept up to date by your System administrator using the File upload download Utility. All questions with PUBLIC attachments will always show the latest version of the attachment in the attachment/public directory.
PRIVATE puts the attachment in a hidden location where it can never be changed. Consequently, an answer with a Private attachment will always show the version of the attachment that was delivered to the client, not any updated versions. Normally you would choose to PRIVATE your attachment. You should only choose PUBLIC if you specifically want to add this document to the body of documents that can easily be kept up to date by the library, and reused for other Answers).
When you have selected the appropriate attachment type, simply click on the Upload button, and the document will then be uploaded to the RefTracker server.
Files must be copied to the RefTracker server because your RefTracker clients are Internet users, so all information you give them access to must be accessible to the Internet.
Your library will have a policy about the maximum size of attachments that you can use (usually 50Mb) and this will be stated on the top line of the screen in the Upload area. If you try to load an attachment larger than this limit you will see a message about it being too large.
Uploading large files can take a little time as the file is being uploaded across the Internet, so please be patient. You can move away to another screen while the upload is occurring. If you have moved to another window, the Start bar tab for the Attach documents sub window will be highlighted to attract your attention when the upload is complete.
Note that some file names contain special characters like “&” that cannot be handled by a web browser. When a file with such a character in its name is uploaded, the incompatible characters will be replaced by an “_”.
Exercise
Follow the above instructions to select a Private attachment followed by a Public attachment, for the question you are working on.
Notice that the selected file names will appear at the top of the selection zone. When the files are ready for uploading a green dot will appear to their left.
To upload the files click the “Attach files” button. The files will be uploaded and the attachment sub window will close. But before you do that, lets look at the drag and drop option.
“Select a file” when your device supports a camera
When you are using the RefTracker staff interface on a device that supports a camera, clicking on the “Select file(s)” button will provide an invitation to take a photo, or to select a photo that already exists on that device. It couldn’t be easier to snap a photo of something interesting that you find in your collection and send it to the end user as part of your response.
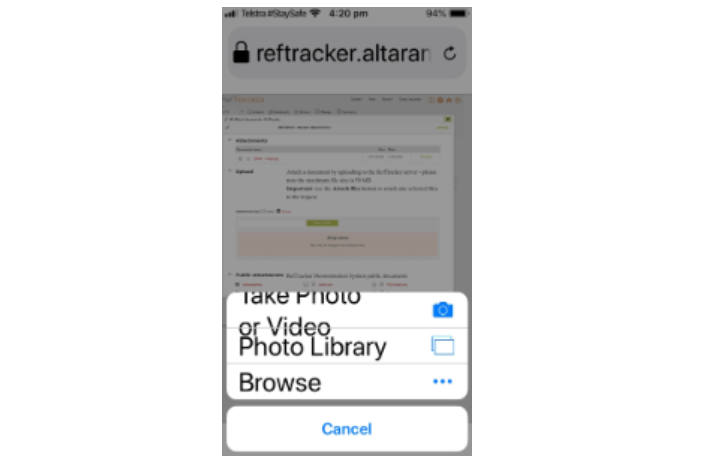
Don’t forget to use the “Attach files” button when you have taken or attached your photo’s!
You can do this on your phone or on a tablet. Frankly, a phone is awkward as there just isn’t enough space on such a small screen to fit all the staff interface features, but even an 8 inch tablet works really well!
Upload Section (“Drag and drop” method)
An alternative method for selecting files for attachment is the Drag and drop method. This method allows you to select as many files as you like in a Windows file explorer display and drag those files onto the “drop zone”. The names of the files selected in this way will also show at the top of the selection zone.
To upload them click the “Attach files” button.
Exercise
Now, upload the files by clicking the “Save files” button. The files will be uploaded and the attachment sub window will close.
Notice that in the main window, the files you just uploaded are now showing.
Attachments added when Saved
To upload the selected file click the “Attach files” button.
The file/s you uploaded are now showing in the main window. To make any adjustments click on [Manage answer attachments] and the Attachment subwindow will display again.
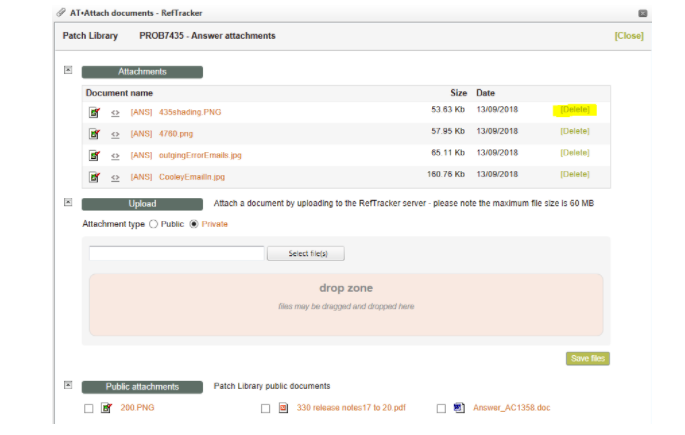
The files that you have attached are now showing in a Attachments section at the top of the Attachments subwindow.
And any file that you loaded as PUBLIC are now showing in the Public attachments section of the screen, as a newly available Public type document. Note that as it is already attached to this question it is showing as ticked in the Public attachments section.
You can view any attachment by clicking on its name. If the file type cannot be viewed by your web browser, or any associated applications on your computer, you will be offered an option to download the file. You can also right click the file name and use the “Save target as” option to download the file.
You can remove/delete an attachment using the hyperlink on the far right of the summary of that attachment.
Size indicates the size of this attachment. Your library may have rules about the maximum size of attachments that should be used due to clients sometimes having limited mailbox sizes – generally RefTracker will be set up to limit the maximum attachment size to 50Mb, however this may have been set to a smaller value by your system manager. Further parameter 8.5 controls the total size of all attachments to an email, that will result in the attachments being sent as hyperlinks in the email instead of traditional email attachments (this is so that emails from RefTracker will not be rejected due to the recipients email in box size limitations).
Date is the date on which this file was uploaded into RefTracker.
Public attachments section
The Public attachments section of the Attach subwindow allows documents already on the RefTracker server to be used as attachments. This section shows the PUBLIC directory which is a directory where material that needs to be kept up to date, is stored for quick reuse in answers.
To attach a Public document to your question, simply click on its tick box.
You can check you are attaching the right document by simply clicking on the document name, and its contents will be displayed in a separate window.
Exercise
Select a Public document and Attach it.
Security of adding attachments
When clients add attachments, the types of files they can add are controlled in order to ensure that dangerous files are not loaded. To fully protect the RefTracker server it is also necessary to restrict the file types that staff can attach to RefTracker questions and answers, in the same way.
RefTracker can’t force the browser to restrict access to the allowed file types, so, if the end user or staff member selects a file type that is disallowed, a validation message is displayed and the file is not uploaded.
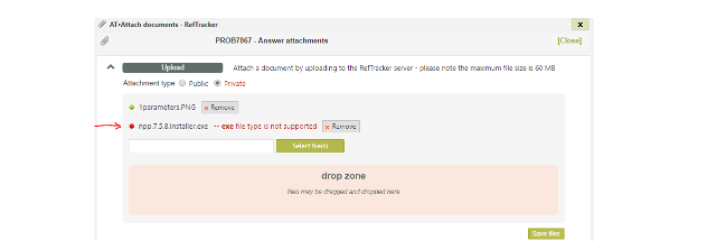
The file types normally allowed cover images, pdf’s, web pages, txt files, Microsoft Office files, and some other common word processing file types, as recommended as safe by Microsoft. Zip files are also allowed for staff, but not end users. There are also some file types that are commonly used by libraries.
If additional file types need to be allowed, they can be added to the MimeMap.XML file in the config/settings directory by contacting your RefTracker support representative. File types can be allowed for adding by clients and staff, or just for staff (e.g. .zip files are usually only allowed for staff).
For example, the following are some of the file types that are not included in the allow list. These file types – in fact all file types not specifically allowed by the MimeMap.XML file – will be rejected. e.g.
.exe
.aspx
.css
Despite these protections it is still possible for someone to give a file a different extension – for example a .exe or .zip file can be renamed as a .pdf. Even though the file might in fact, be a .exe – the Operating System will not attempt to execute it if it doesn’t have the .exe extension, making it safe.

Further, your system is usually protected from bad content in attached files by a system that virus checks files before they are uploaded (System administrators should see parameter 9.80 or more details).
All this security is also applied when questions are created by email importing. A history note is added when attachments to imported emails are removed by the RefTracker “Allowed file types” security control. Here’s an example of the History where one attachment to the imported email has been allowed and the other has not.
Removing attachments
Attachments section
The Attachments section of the Attach subwindow allows you to manage the documents already attached to a Question, Answer or Contact client/Note workflow.
You can remove or delete an attachment by clicking the link to the right of the appropriate document name. This link will say “Delete” if your system completely deletes the attachment (all references to it in the History are no longer hyperlinked as the attachment no longer exists in RefTracker), or “Remove” if your System administrator (using parameter 2.4 Attachment delete type) has specified that attachments should be removed from the current status of the question, but retained as active links in the History. When an attachment is deleted (or removed) an entry is placed in the history clearly identifying who removed/deleted the attachment.
Note that there is a Delete attachments batch process (System>Batch process menu>Background processing>Delete attachments) that your System administrator may have set running to automatically delete attachments from questions closed for more than a certain period of time.
Exercise
Remove one of your attachments.
When you are happy with the attachments to this question, click on the [Close] link in the top right of the screen to close without uploading any more files, and be returned to the Answer screen.
How attachments are stored in RefTracker
It is not necessary for any level of user to know how attachments are stored in the RefTracker file structure, so this information is background information only.
Attachments are stored in the Attachments directory of the RefTracker file structure (not in the Database). There are a number of sub-directories used as follows:
Embedded – these are images that are associated with an <img> tag that is contained within the data for a given record
For example could be an image embedded in the question_text field that has been pasted into the question by the client.
RefTracker detects any IMG tags in this format and convert the data into an image file which is stored in this folder.
Private – contains document (or other permissible file types) that have been attached to the question as an attachment
There is a record in the attachment table associated with each of these files
The files are named using the attachment_id that they are associated with – but the original file name is contained in the attachment record. This helps with retaining anonymity of these attachments when that is required.
The files are considered ‘private’ in the sense that they are associated with a specific question
If your system uses attachment indexing for retrieval of attachments by their content, these files are included in the search index
Public – these are files which have been attached to a question but which are not private and might be attached to more than one question
These files retain their original name
If your system uses attachment indexing for retrieval of attachments by their content, these files are included in the search index
Thumbnail – holds a thumbnailed version of images in the embedded folder
When we display a data field that contains an embedded image – we display only a thumbnail of the image
If the user clicks on the thumbnail we display the full image
View – this folder is used to temporarily display (or make available) files held in the private folder
The file is copied from the private folder to the view folder and given its original name – and is then made available to the user so that it displays with the original file name, not the name it is being stored as.
Files are regularly removed from this folder by the housekeeping after a certain period.