New questions
The New question function is accessed through the New link in the main header bar. If you place your cursor over the New entry in the main header bar, you will be shown a menu list of all of the available Request forms, allowing requests to be recorded by library staff.
You may see forms under New grouped by their category – Requester services, Internal tasks and Direct to KB.
Place your cursor on the category of request you want to enter under New, and you’ll see all the forms for that category of request.
The Internal tasks, and/or Direct to KB categories will not show if your System Administrator has not implemented any of these types of forms, and if you do not use either of these other types, the Requester service forms will appear directly under New.
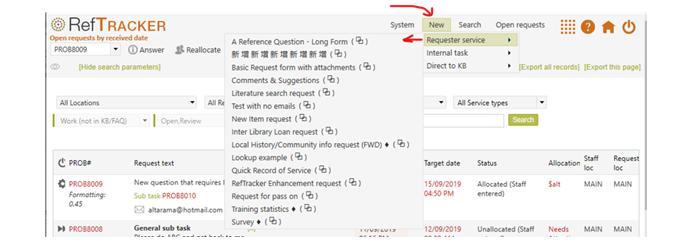
The request category groupings are:
Requester service forms allow end user requests to be captured for response, and statistics about services to end users to be captured. Where a form closes on the spot (usually statistical capture forms) it is followed by a solid diamond symbol. Requester service forms can also be accessed from the New request block in the Home screen if the user has access to Requester services. Some examples of Requester Services might include; a Literature search, Training request, Suggestions and complaints, Local history request, Inter library loan, New item request, and much more!
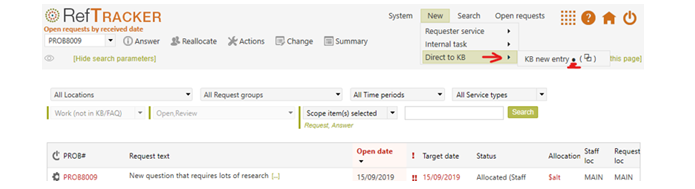
Direct to KB forms allow questions and answers to be prepopulated into the knowledge base without adding to either the Requester service or Internal task statistics.
To help identify forms that directly add items to the KB, the name of those forms is followed by a solid circle icon.
Internal task forms allow tasks, projects, information and statistics, that are not direct services to end users, to be captured, and subsequently managed and responded to, with statistics for these Internal tasks reported separately to the Requester service statistics.
Provision of this category of forms under New provides a whole separate role for RefTracker – not just managing the responses that need to go back to end users, but managing all of the tasks that need to be delegated to your information delivery team members, and gathering all the statistics required to report on your different workloads. Your System administrator can create as many different Internal task forms as are required to handle your different staff tasks, projects, and statistics gathering (work that is not a direct service for an end user).
Here’s a screen showing some example Internal task forms under New.

If your System administrator has made Internal task forms available in your system, they will look much like Requester Service forms except that you will be able to select the details of the staff member making the request from a list of your RefTracker staff members (and, perhaps, consultants), though the system will suggest your own contact details as the requester, as the task being entered is most likely required for you! Some examples of Internal tasks include the following – the key thing is that they are something that is not being done directory for an end user, and so should not be included in the service statistics:
– Organize a Book Week display on the second floor.
– Digitize the Walden & Eliza Darnell collection for inclusion in our web page about them.
– Evaluate whether our National Geographic subscription should be renewed.
– Record time spent on administration tasks like meetings, staff training, shelving, and binding.
Internal task forms are also able to be used to create sub tasks to Requester service and Internal task requests, allowing a large task to be broken into a number of tasks that can be worked on by different staff.
More about forms under New
Your System administrator will have made a variety of forms available for use under New covering the different types of requests that your organisation handles, and other detailed statistic information that needs to be collected. Your organisation may record simpler “on the spot” service statistics through DeskStats. All remaining services should be recorded through New.
The “windows” icon to the right of any entry in the New menu list allows that New form to be opened and used in a separate window (i.e. it allows new questions to be entered without disturbing what you are already doing in your RefTracker main window).
The ♦ diamond symbol after a form’s name indicates that this form is set to close as it is entered (it collects information/statistics, rather than requests that need follow up).
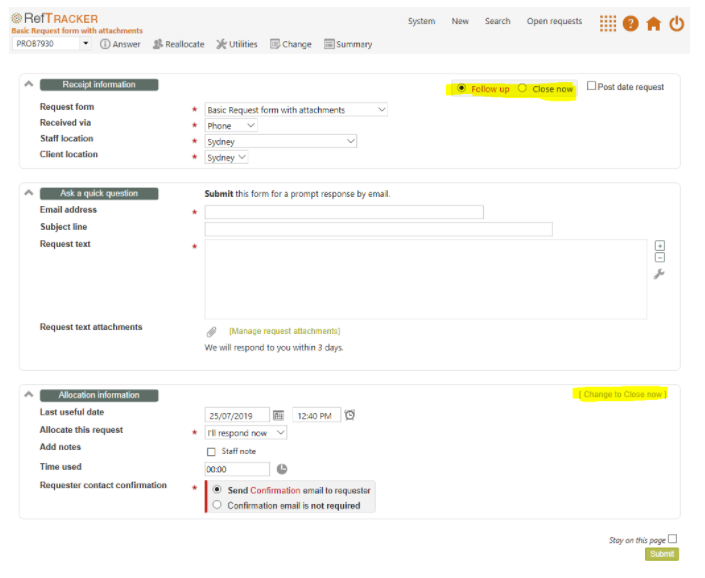
Where a form is not specifically designed to be closed as it is entered you may be able to choose between “Follow up” and “Close now”, either at the top of the form, or in the Closing or Allocation sections at the bottom. “Follow up” means that further work needs to be done by you or another staff member, and the Allocation section allows you to select who that work needs to be done by. “Close now” means that no further work is required so the question needs to be closed now.
The system remembers certain attributes of how you use a form and presents you with those attributes already selected the next time you use that form (Post date ticked/unticked, Allocate to me/I’ll respond now, Stay on this page selected/not selected). It remembers these things separately for the form when it is used in the main window, and when it is used in a separate window.
New is able to be used by all levels of RefTracker users, however your System administrator may have designed your Request forms so that some are not available to lower levels of user, some may only be available to staff at a specific location, and your System administrator may even have entirely removed this function from your signon.
Individual staff member signons can be set to allow or disallow access to the Service request, Internal task, and KB forms under New. This means that, for example, System administrators can allow some staff to add Service requests and KB entries, but prevent them from adding Internal tasks. System admins do this by setting the user’s Functions.
The effect of Request forms on New
Your system administrator specifically makes Request forms available for staff to use under New as appropriate (as well as for clients to use of course), so not all forms are available in each of these places.
The first line of the New screen allows you to choose the Request form that is most suitable for the request you are currently handling. The name of the Request form will reflect the type of request it is designed to handle, and the question will come into the system clearly labelled as that Request type.
The layout of each request form will have been designed to capture the information that is required to answer that specific type of request (in other words it will reflect the reference interview that a staff member would have undertaken if the question was asked in person).
However there are many other things that your System administrator can design into the way that a Request forms works. For example, they can control:
- Which of the New screens the form will be made available in.
- What levels of staff member will be able to see that the form is available.
- What levels of staff member will be able to close the form (request) and what fields are presented when closing the request.
- Whether the form can be used in Post date mode (which allows the requests to be entered at some time after when it was actually received).
- Whether confirmation and/or response emails should be sent to the client, and if, so what layout email should be used.
- What will happen to the question when it arrives in the system – whether it will go to the pool, be allocated to a specific staff member, automatically closed, automatically redirected to a third party, etc.
- What level of staff member can override the email and allocation settings designed into the form.
- and a whole lot more.
All of these things will affect how New looks and work for each form that you choose to use.
Request forms are also used in relation to questions that come into your system in other ways – email importing, RefTracker to RefTracker, and the RefTracker API.
Exercise:
So with that background, let’s take a look at how the New screen is used by staff to enter questions in full. Click on New in the header bar or New question in the Home screen to bring up the screen that staff use to take details of questions that need to be researched before an answer can be provided, or that need to be referred to another staff member.
Entering a New question
When you click on New in the main header bar, you are presented with the Request form you have indicated as your default for the New screen, in your My preferences, but you can individually select a form from the menu list under New.
Your System administrator will have provided a range of forms for specific purposes that can be selected from the menu list under New. Each will have been designed to provide a reference interview applicable to that sort of question, and to be processed appropriately for that request type.
- A tick or red asterisk to the left of a field means that the field is mandatory for completion. Be sure to complete all mandatory fields. A form cannot be submitted without all of the mandatory fields being completed.
- An orange asterisk to the left of a field means that the field is mandatory for completion before the request can be closed. This field does not have to be completed before submission of the request in this New screen, but, as you work on the request (Answer, Change, Copy , etc. screens) you will be reminded that this information still needs to be obtained before the request can be closed, and options to close the request will not be offered.
- If Dynamic Lookups or Contacts Lookups have been defined for the form they will be able to be used in the New screen to easily fill requester contact details.
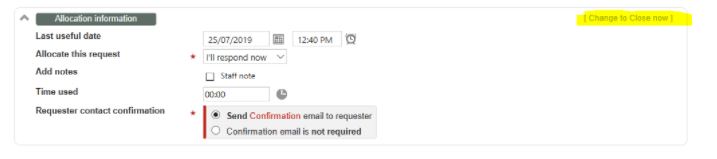
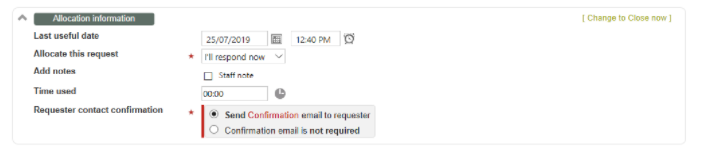
- If both Follow up (further work to be done on the request) and Close now (completed before, or as, you enter it) mode are available for a form, you can swap between them by clicking the radio button for that mode in the top right of the form. You can also switch between Follow up and Close now by clicking the [Change to . . . ] option on the right of the final division. If after starting to use this form, you realise that the answer is simple and should be sent to the client straight away, you can do so right in this form by clicking on the [Change to Close now] link on the right of the “Allocation information” heading. The mode in which a form opens initially is controlled by how your System administrator has set up each form.
- If your System administrator allows use of this form in Post date mode, a Post date tick box will appear in the top right hand corner of the screen. If you wish to use the form in Post date mode you need to tick this Post date box. If you last used this form in Post date mode, the system will remember that that’s the way you use this form and open it in Post date mode next time. More information is provided about how to use Post date mode later in this manual.
- Some fields in a form (the main Question and Answer fields) may be format enabled – this means that you can copy and paste formatted information from web pages into those fields, and you can use basic formatting functions like CTRL/b for bold. It also means that QuickText is available for these fields (see special note below about QuickText in the New screen). Click here for more information about using format enabled fields.
- “Stay on this page” – tick this box if you want the system to redisplay an empty copy of the same form you just used, each time that you Submit a request. This is useful if you have a number of similar questions to submit, and particularly useful if you have chosen to use the New screen in a separate window as it means that you can have the screen open and ready to use at all times.
When New is operating in the main window, “I’ll respond now” overrides “Stay on this page” and will take you to the Answer screen rather than leaving the form displaying.
When New is operating in a separate window, “I’ll respond now” is not provided as an allocation option.
Your “Stay on this page” selection is remembered for each form. You can of course, check and uncheck this option appropriately as your work requires it.
Using the New form in Follow up mode:
- Last useful date and/or Priority will appear in the Allocation section if they have not been included in the form that you are using, as these are attributes of the question that you (the staff member taking details of the question) may also need to provide details of.
- If your System administrator allows you to override the staff allocation designed into this form you can use the “Allocate this question” line to determine who the question will be allocated to. If you choose “I’ll respond now”, or “Allocate to me” the system will remember your choice and present the form with that selection in the “Allocate this question” option next time you use this form. If you choose “Automatic”, “Unallocated pool” or “Individual” your choice will not be remembered and the allocation designed into the form will be presented to you next time. “I’ll respond” is not an available option when you are using New in a separate window.
Note that when working in the main window, the “I’ll respond now” option is designed to take you to the Answer screen when you click Submit. If you have “Stay on this page” checked, but also select “I’ll respond now”, you will be taken to the Answer screen for that instance of Submit, without re-setting your preference to “Stay on this page” for future uses. Your system administrator can remove some of these allocation options so you may not have all of them showing in your system (Using System>Code tables menu>General code tables> Allocation mode code table). - To add a note for the staff member who will work on this question, tick the Staff note box and a box for entering your note will display. Anything you enter in this field can never be seen by the client. However it will show in the History and in the notification email to the allocated staff member.
- If your System administrator has enabled “Time used” in your system, it will appear in this part of the screen. If it is Mandatory for completion it will have the Mandatory icon, AND will be highlighted to remind you to enter this information. The field may already have an amount of time showing in it, in which case you should review it and change it as necessary. Use the “Time used” field to enter the amount of time that you have spent evaluating the client’s needs and doing initial research while taking the details of this request and entering it. If you decide to Change to closing, any time used that you have entered will be retained (it can be started automatically as you enter this screen if the “Auto start timer” parameter in your My preferences, Answering preferences tab” is set to Yes). You can adjust the time showing (for time spent on coffee breaks, doing email etc.) at any time, even if the clock is running, but you’ll need to restart the clock if that’s appropriate. If you Submit this form without stopping the clock, the system will automatically stop the clock before saving the details of the question.
- The “Client contact confirmation” area shows the client contact required by this form (such as sending a confirmation email). If your System administrator has allowed you to change the client contact, radio buttons will be provided in this section to allow you to make changes when appropriate. Contact by email is automatically handled by RefTracker. If contact outside of RefTracker is required, such as by phone, the required contact will be described in this box and you will have to click the radio button indicating the action that you took, or will take – your choice will be recorded in the history so be sure to make the contact.
Additional things you need to know when using New in Close now mode:
- Close now mode will show all of the additional fields that are required to close this question. The fields that show will be different for each form, according to the fields configured by your System administrator.
- If it is allowed, you can change back to “Follow up” mode, even if you have already started completing fields in the Closing section.
- The Answer field does not necessarily display – especially if the form is designed to gather statistics rather than a request.
- The Client contact confirmation box will make it clear as to whether client contact is required (such as by phone) or if an email will be sent. When using the New screen with Close now, the system is sensible enough to know that it should not send both a confirmation email and an answer email at the some time. If both are configured to be sent, ONLY the Answer email will be sent.
- Closing status is defaulted to “Closed successfully” as that is what is required in the majority of cases, but this drop down box provides a number of other options that may be applicable in some circumstances, such as “Closed unsuccessfully”. The “look at me” coloured highlight bar is a reminder to check that this defaulted value is the most applicable for this particular request.
- KB recommendation, Expertise, Category and Resources are all configurable and so my not appear for any given form.
Exercise:
To view the other Request forms available in your system click the Request form drop down arrow – or select them from the main header bar menu list. You will be shown a list of all the Request forms in your system that have been made available for use in the new screen by staff of your level and at your location.
Click on a few different forms (the screen will redisplay) to see how the forms, and features available for use with each, can differ quite remarkably for each type of request.
Note how the Request type usually changes with each form. Request type is used in RefTracker to indicate the type of question. It is not only used for statistical purposes, but it can be used to allow questions to be allocated to the most appropriate staff member, so it is important to make the most appropriate form selection. Request type does not display in the New screen if the form has been set to “Classify on receipt”. When “Classify on receipt’ is set in the request form design, the first staff member to work on the response to this question will be asked to select a Request type.
From the Request form drop down in the top line select a simple Request form to complete, such as the one above, as we are going to submit a question.
Another way to select the request form that you want to us is to hover over New in the Main header bar. A list of all of the forms available in the New function will appear and you can go directly to the form that you want to use by clicking on it (you can even open it in a separate window by clicking on the window icon to the right of its name).
When doing this and further exercises, don’t forget that you can use all the browser functions and web based application conventions that were discussed earlier in this training – for example, cut and paste, tab between fields, entering the first letter of a drop down box entry to quickly move to it, and the +/- boxes for collapsing and expanding sections of the screen and the large data entry boxes.
Only when you are happy that all the information on this screen is letter perfect and the closing information has been correctly completed, click on Submit . According to your selections the answer will be sent to the client and the question will be closed. See the client interface training for an example of the response email sent to the client.
Using the New question screen
Each Request form allows you to enter details of the question, client contract information and further information that will assist the staff member who has to work on this question – remember that the person who works on this question may not be you, so be sure to enter enough information to prevent them having to re-do the reference interview and any research work you have already done.
The information entered in Request forms is also used to obtain statistics about questions coming into your library and so, the better information you enter, the better will be your library’s statistics.
The New screen is presented in three parts: Receipt information at the top of the screen, and Allocation or Closing information at the bottom of the screen, that allow librarians to enter additional information; and the Request form details section in the middle, that may well be the same as the equivalent form provided for clients to use in the client interface.
Receipt information fields
This section appears for every form when it is being used by staff. We have already discussed use of the Request form and Request type fields. Other fields that might appear in this section include:
Received via: is used for statistics on how questions are arriving into your library e.g. by phone, at a service desk, via web page, etc. It defaults to the value you have chosen in My preferences, so to minimise the need to change this field you should change My preferences if, for example, a shift change means you move from generally taking questions by phone to generally taking them at a service desk. Received via will not appear in this area if it is already defined in the form itself.
Staff location: is used for statistics on where questions are being accepted in your library. It defaults to the value you have chosen in My preferences which is usually the branch or service position that you work at. If, for example, you are temporarily working at a different branch, you should change your setting in My preferences rather than continually changing this field. Staff Location may not appear in this area if it is already defined in the form itself, or if your system only has one Staff location.
Client location: is used for statistics on where client questions are coming from. Client location may not appear in this area if it is already defined in the form itself, or if your system only has one Client location.
Exercise:
Check that appropriate values have been selected for the lines in the Receipt information section.
New question: recording the reference interview
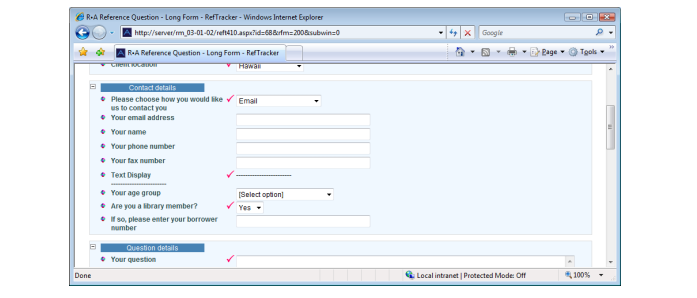
Previously we have shown an example of a very simple Request form. The Request details simply asked for email address, name and question. This screen print, and the following one (both part of the same form), show an example of a Request form that performs a full reference interview in the Request details section.
Your system may have Request forms that include only some of these fields, or other fields entirely. Some may even look entirely different, for example a different form might be for an Inter Library Loan Request where the form collects bibliographic information as well as information about the requestor and their question.
As the fields that are included in each form are quite different, and even the labels associated with each field, and group of fields (field division), can be quite different, this section will just discuss some of the fields that might occur in the Request details section of the forms you have, and how you would fill them with appropriate information.
Hints:
- Fields with the Mandatory symbol (usually a tick or asterisk) next to them are mandatory for completion. Fields without a tick are optional.
- Don’t forget that you can move between fields in this form using Tab.
- Multi list fields allow more than one selection to be made by clicking more than one of the provided check boxes.
- To choose an entry in a drop down list you can enter the first letter of that entry and the system will go to the first entry starting with that letter e.g. in the Response method box, enter the letter “e” and email will automatically be chosen.
- Multi line text areas can have up to 2 million characters typed into them. To make dealing with large amounts of text the box can be doubled in height by clicking on the “+” symbol to the right of the box (clicking on the “-” symbol halves the height).
- Single line text boxes can have up to 2000 characters typed into them.
- Email address fields (Client email, cc:, cc:conf/answ, cc: answer, bcc:, bcc:conf/answ, bcc: answer) must have validly formatted email addresses entered – they can contain one email address, or more than one separated by a semicolon and a space, up to 2000 characters in total.
- Money fields that allow input of up to 8 digits and a decimal point.
- Numeric fields that allow entry of up to 9 digits (no decimal point).
- Date fields can be amended directly or by using the calendar function accessed by clicking the calendar icon.
- Time fields are amended by clicking the clock icon, or entering time in the minutes (5 = 5 minutes), hours and minutes (5:05 = 5 hours and 5 minutes), or decimal (1.5 = 1 hour and 30 minutes).
- Some fields may be set up to bring in data from a data file:
 indicates a field that will suggest entries form the lookup data as you type characters into this box. Select the suggested entry you want to use from the ones shown below this field.
 indicates a field that will be used to retrieve data from the lookup file to complete other fields.
 indicates a field that fill be filled by one of the lookup fields indicated by one of the symbols shown above. You can type into these fields and even change data automatically inserted in them by the lookup.
Contact details: Most forms have a contact details (or similarly named) section where the client’s preferred method for contact can be selected (or has been defined behind the scenes), and details about themselves can be provided. When you submit your form the system will check that you provide matching response method and client contact details. If you choose a contact method other than email the system will insist that you provide a name as well as the appropriate contact numbers to match the Response method you have selected.
If the Response method is “Pickup response” or “Private contact details” only a name is required.
If the Response method is “No response required”, no contact details need to be entered. The system presumes that you will use “Close without client contact” to close this question and will default its closing status to “Closed – no response required”.
The “External” Response method is used where all correspondence, including the response to this request, will be (or has been) delivered outside of RefTracker. It presumes that “Close without client contact” will be used to close this question, if it hasn’t already been automatically closed, and will default the closing status to “Closed successfully”.
Question: Every form must have a question field that is Mandatory for completion (though sometimes it may be labelled differently e.g. “Please confirm your agreement to pay the fee associated with this service”, and in some Request forms it may even have been preset and hidden). You can enter up to 2 million characters in this field. Provide as many details as you can, especially of the question will be responded to by someone else.
A [Manage question attachments] hyperlink will appear under the Question field. Click it to add attachments to the question. For security reasons, the file types that can be attached here are limited to safe file types (controlled by the mimemap file).
The other fields appearing in this section of the form are entirely up to your System administrator. The ones shown here are typical of an in depth Reference question request form – but for other types of questions entirely different fields will be appearing. Your library will have defined the meaning of each field in your forms and how they should be used consistently.
Bibliographic details: A number of fields are available for the provision of bibliographic details. If any bibliographic details are requested then the system will check to ensure that you have provided at a least a Title.
Exercise:
Fill in, or select values from the drop down boxes, for all the relevant fields, appropriately for your question.
Choose Email as the Response method (some forms have this set as a “hidden” feature of the form), and enter your email address in the Email address box, so that, for the purposes of this training, you are the client, and will be able to see the client emails for this question. Leave the question open as we examine this screen further, later in this section.
Differences between using a form in the staff interface and the client interface
Your system administrator may provide different forms for staff to use, than the ones that are provided for client’s to use, but sometimes a form is used in both interfaces. When a form is used in both places they will be identical except for:
– When “Classify on receipt” is on for a form, Request type will NOT be displayed in the staff interface in Followup mode unless it has been specifically designed into the form, as “Classify on receipt” means that Request type should be set by the staff member providing the answer, not the one entering the request.
When “Classify on receipt” is on for a form being used in Close now mode, Request type displays as the default request type for that form. Staff need to remember to change the Request type value when that is applicable (it is likely to be something like **Unclassified” that clearly indicates that it needs to be changed).
Differences between using a Requester services form, an Internal task form and a KB new form
Apart from the requester being a selected staff member, entering and responding to an Internal task is no different to a Requester service, except that the emails the staff member receives use the Internal task directory email templates. When used under New, Internal task forms create individual Internal task requests in RefTracker (the same forms can be used for sub tasks). In these forms the Staff member name field is defaulted to the signed on staff member but, if the answer needs to go to another staff member you can select a different staff member. Contact details for the selected staff member are automatically added to the task so the the response can go back to the right person.
Similarly using Direct to KB forms are similar to using Requester service forms, except that the forms are specifically designed to add the entered information to the KB.
Special note about using QuickText in the New screen
Because the question currently being entered in the New screen, has not yet been saved, the data for that question is not yet available for use with QuickText.
This means that variables in QuickText about the details collected in a question, have no value whilst in the New screen. If such a variable in inserted QuickText is surrounded by $rvb$ and $rve$, nothing will be inserted. Staff using that QuickText will see that nothing was inserted and have the opportunity to enter a correct value themselves.
However, any variables relating to data entered in the question that are NOT surrounded by $rvb$ and $rve$, will appear as unsubstituted variables.
In the New screen ONLY (not in the Answer screen), unsubstituted variables will be filled with the appropriate values from the request being entered, on submission of the request.
This feature not only works for variables used in QuickText, but for any variable that you want to type into the Question or Answer fields in the New screen!! It is particularly useful for scenarios where both the question and answer are being entered in the New screen. For example – typing {bib_title} is so much more efficient than re-typing the entire title that the client has requested!
However, please note that this post submission substitution step ONLY applies to the New screen – it does not (yet, perhaps) apply to the Answer screen.
System administrators might want to check any QuickText that is used in the Question and Answer fields of the New screen for ways you can take advantage of this special feature.
New question: Allocation information or Closing
No matter what information is included in the Request details section of a Request form, an Allocation information or Closing section will be provided at the end of the New screen, so that the librarian entering this question can decide how the question should be allocated to a staff member for completion, or that the question needs to be closed immediately.
A [Change to Close now] link will display on the allocation information heading line. If at this point, you decide that the Answer is simple to provide and you want to provide it now, you can click on [Change to Close now] and the Closing section will display to allow the Answer to be entered in this same page and the response to be sent to the client. Similarly, if you are closing the question and you realise there is more to do on it, just [Change to Follow up] at any time. When changing between Follow up and Close now, any data you have already entered in that section (such as resources used) will be retained, so you can change back and forth if necessary.
Exercise
Click on [Change to Close now] and examine the different fields provided. We will look at how to use these closing fields in the Quick screen section of this training, so for the time being, simply click on [Change to Allocation] to return to the normal New screen layout.
New question: Allocation information
Allocating a question to a staff member means that they are responsible for providing the answer by the Target response date, or, if unable to do that, for passing it onto someone else, or back to the pool of unallocated questions so that someone else can take responsibility.
The allocation that shows by default is the allocation that your System Administrator has chosen as the normal allocation for the type of question you have entered. Usually you can override it as discussed below but some forms may not allow this setting to be changed by some levels of users and, for those users it will appear unchangeable.
The number of fields that will appear in the Allocation information section will vary according to what fields have been included in the Request details section. In this section we will discuss all the fields that can possibly occur in this section.
Allocation information fields
Add notes / Staff note: Tick the staff note box to show the Staff not field. This field is for any additional information you want to enter for the benefit of other staff who will work on this question. The information entered in this field can never be seen by the client and so it is an ideal place for comments about the client, or to note the name of the specific staff member who took details of this question when a shared signon is being used by more than one staff member, as is often the case at service points like information desks. QuickText can be used in this field!
Priority: An indication of the priority of this question (values available have been set by your System Administrator).
Last useful date: The date shown here on display of the form is an indication of the library’s objective response date – a time in the future determined by a parameter set by your System administrator, that indicates when the library expects to be able to respond by. RefTracker indicates these times to clients using the client’s time zone, and to staff using the staff member’s time zone. Change the Last useful date if the client will require a response earlier than this date. This will allow the system to take this information into account when indicating whether a question is approaching the time by which a response needs to be provided, if your organisation takes this into account. You can use the calendar and time icon’s to assist in resetting this field (see the Client Manual for details of how to use the time and calendar functions). The date you enter must not be earlier than the date the question was received, and, if it is earlier than the current date and time you will receive a validation warning to ensure that you check this. For this reason the Time component of Last useful date will round up to the next available time value (this means that, if you display the form at 10:17am and the next value showing in the time drop down list is 10:30am, the time value will default to 10:30am).
Time used: If time used appears in this section, use it to enter the amount of time that you have spend analysing the client’s needs and doing initial research.Time can be entered using the m, h.d and hh:mm formats and will be automatically reformatted to the hh:mm format when you move to another field so that if you enter 105 it will reformat to 01:45 to clearly show the time used.
Confirmation: The confirmation line shows the client contact required by this form. If your System administrator has allowed you to change the client contact, you will be able to change the radio buttons provided in this section to either prevent or allow the confirmation email to go out. If you select to send an email here it will be sent out by RefTracker using a standard template layout set by your System administrator.
Exercise
Click on the Allocate this question drop down box.
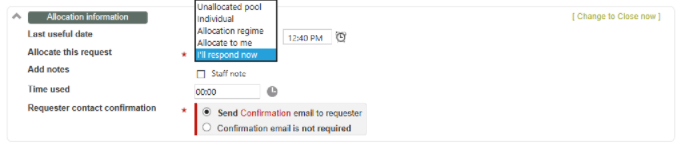
The drop down options presented are:
Unallocated pool – Send the question to the unallocated questions pool where a staff member/s will be monitoring Open questions (more about that later) for such question arrivals. The Unallocated pool can be used to allow staff to pick up the questions they want to work on, or a designated staff member/s may triage questions and allocate to the most appropriate staff member. Not all libraries use the Unallocated pool concept. When a new question is placed in the unallocated pool it remains unallocated until it is reallocated, or until a staff member records some work on it, at which point the question is automatically reallocated to the staff member who recorded the work.
Individual – You can choose to allocate this question to any librarian by choosing their name from the list that displays. The system will send them an email asking them to work on the question.
Available staff are indicated in a dark colour, unavailable staff in a lighter colour.
You can allocate a question to an unavailable staff member, but the system will provide a validation warning to highlight the staff member is unavailable. If you wish to allocate the question to that staff member despite them being unavailable (for example, you may know that that they will be returning in the morning), simply Submit the form again and that will override the warning and allow the question to be allocated to that unavailable staff member.
Automatic – The Automatic option allows you to automatically, and evenly, spread questions around the staff who are appropriate for answering this type of request – by choosing to allocate to anyone in the system, to someone at the same Staff location at which the question arrived, or to someone specialising in the Request type of this question. Your system administrator can also set what levels of users should be considered for allocation. (More information about allocation of questions by the system is provided in The Automatic allocation by RefTracker upcoming section).
Allocate to me – Allocates the question to you, with a tick box option for sending an email to yourself to remind you to work on the question, and returns you to your Home page so you can work on something else. The system will remember that you used Allocate to me, and present that form with “Allocate to me” already selected, next time you use the form.
I’ll respond now (only available when New is used in the main window) – This option allocates the question to you, and takes you straight to the Answer screen so that you can work on the answer. The system will remember that you used “I’ll respond now”, and present that form with “Allocate to me” already selected, next time you use the form.
Your System administrator can remove any of these allocation options that should not be used in your system by disabling them in the System>Code tables menu>General codes>Allocation mode code table.
Exercise:
For Allocate this question, choose I’ll respond now, so that for the purposes of this training, we can go directly into answering this question. Then click on Save. If your form passes validation (see next section), the Answer screen will be presented to you next.
New question: Closing
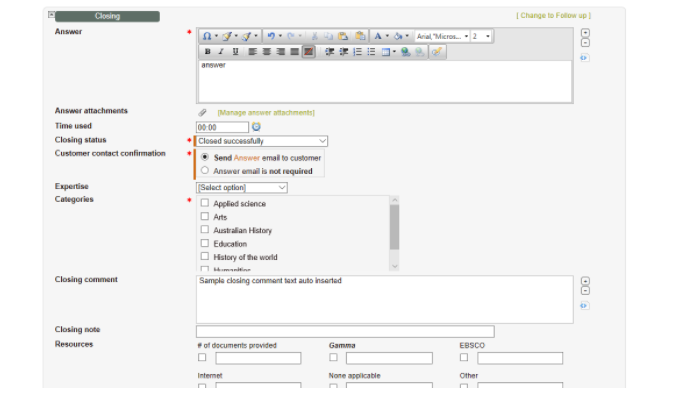
Closing a question means that the answer will be sent to the client if that has been configured and the statistics will be updated to indicate no more work is required. This means that the question will not appear in the Open questions list.
- Answer may display so you can record the Answer provided, but for forms designed specifically for use in Close now mode, it may not be appropriate to record an Answer and it will have been configured out – for example a form designed to record training statistics does not require and answer! You can use QuickText in this field (see special note below about QuickText in the New screen)!
- A [Manage answer attachments] hyperlink will appear under the Question field. Click it to add attachments to the answer. The file types that can be added are limited for security reasons, If you need to add a file type that is not allowed, speak to your RefTracker support representative.
- If this screen is used in Postdate mode, two additional fields will display – Answered by (defaults to the signed on user) and Date closed (defaults to the current date and time). These fields allow details of who closed a question and when, when it has been closed at some previous time, to be accurately recorded.
- NOTE that if a Request form defines that both a confirmation email and a response email should be sent, when that form is used in the Close now mode, only the response email will be sent – there is no point sending both a confirmation email and a response email at the same time!
- Closing status may already be defaulted to an value, but be sure to check that it is appropriate, and change it if necessary.
- KB Status allows you to indicate whether the Question and Answer should be added to the Knowledge base (but only if you have the permission to do this and it is applicable to this type of question). Only questions and answers that you want your clients to be able to see should go into the KB. Questions do not need to be put in the KB to be retained for librarian reference. The selection you make here places the question in “KB review” status clearly marking the question as “recommended for KB inclusion” so that it can be reviewed and included by someone with appropriate permissions at a later time. However, if you have permission to place the question in the KB, and you are using this screen in the main RefTracker window (not in a subwindow), once you click on Submit you will be automatically shown the KB review screen which allows you to check the Question and Answer text that will be put in the KB, fix any typo’s and remove any references to private information. See a later section for an example of the KB edit screen.
- Categories (subject or authority control according to how your library uses this field if they use it at all) and Expertise (expertise used to answer the question, if your library is interested in this, or perhaps so other closing classification created by your System administrator using this field) allow you to add closing classification information. These fields could have been given different labels by your System administrator and may have been removed for specific types of requests.
- Client contact confirmation describes how the client will be advised of the Answer (in the above example the form has been set to send a response email to the client and it is indicating so). Radio buttons are provided in this section so you can override the default response setting and choose not to send a response email. If the form options are set so that no response is required, this confirmation section will not appear.
- Resources allows you to record the Resources that proved useful in answering this question. See a later section for details of how to use the Resources function
If Resources has been set as Mandatory for question using this Request form, you must enter information about at least one resource used to provide this response (there may be an entry such as “none applicable”‘ that you can use).
To record a Resource simply tick the box, OR, enter a description of up to 2000 characters and the box will be automatically ticked.
Your System administrator may have configured this feature out using the Request forms Edit options parameters.
New question validation
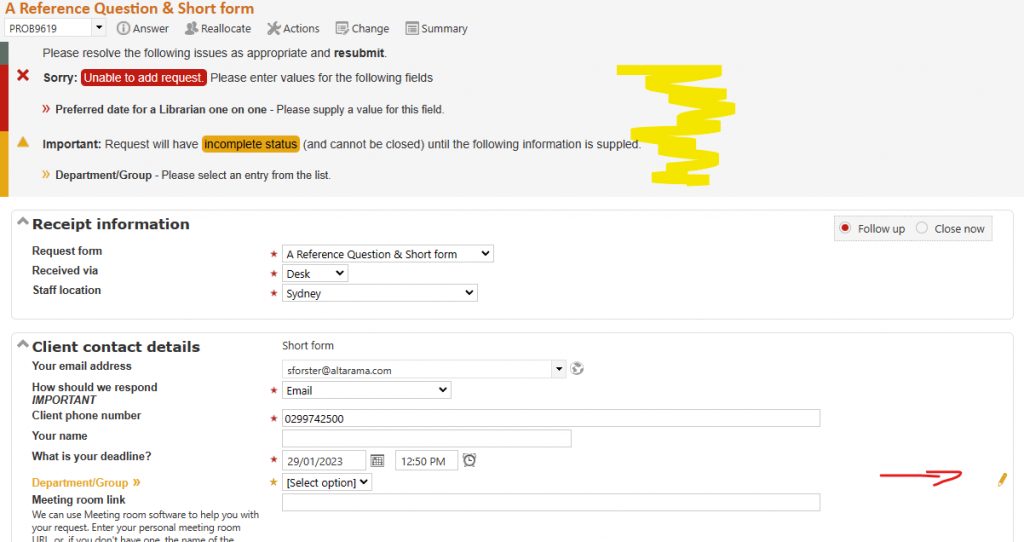
Whenever you submit a question the system does a validation check to ensure that all required information has been submitted. It also provides warnings for some things that you should double check before submission.
If your question passes the validation check it is processed by the system. If it does not pass validation, information such as shown above appears at the top of your form, in a “Validation” section.
The field/s related to problems that must be corrected before the questions can be submitted are indicated with a cross and their field label is highlighted with a red under score.
The field/s related to warnings are indicated with a pen icon and their field label underscored. You can override a warning simply by clicking on Submit again. A warning will only be displayed once.
Don’t forget that you can quickly get to the Submit button by pressing your End key.
Examples of the validation system in action:
- the staff member may have forgotten to enter an email address for a question with contact method Email, generating an error message. The system will always insist that sufficient contact information is provided to be able to achieve the Contact method indicated.
- the email address/es entered may be in format that is not valid for an email address (e.g. it does not contain an @ sign)
- the staff member has chosen to allocate this question to an unavailable staff member, generating a warning. This may be a valid thing to do, for example the staff member may be due back imminently, so the system allows the question to be submitted for allocation to an unavailable staff member once you click on Submit again, to indicate that you are sure you want to allocate to this staff member.
- A question has a Last useful date or Target date that has already expired will produce a warning. Adjust the date/s if applicable or just click re-submit to have your data saved without changing the expired dates.