Saved and scheduled searches
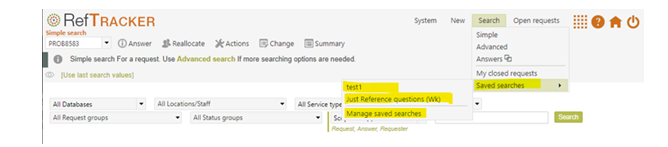
Selecting a Saved search from the Saved searched menu list, runs that search immediately.
The saved searches appearing here are per user – each user must create their own saved searches.
Cursor over the name of the Saved search in the menu list and you will see a pop-up describing the purpose of the search.
If a search has been scheduled then the frequency will appear in brackets after the name of the search (Cal= Calendar yearly, Date=Monthly by date, Day=Daily, Fin= Financial yearly, Hr=Hourly, Min= Minutely, Mth=Monthly by day, Qtr=Quarterly, Wk=Weekly).
How to create a Saved search
Whenever you are seeing search results in the Simple search or Advanced search screen, the [Save this search] option appears in the top right of the screen. You can only create saved searches in the Simple search and Advanced search screens (but if you want a variant of one of the Open questions screens you can do that by creating the appropriate parameters using the Simple search screen).
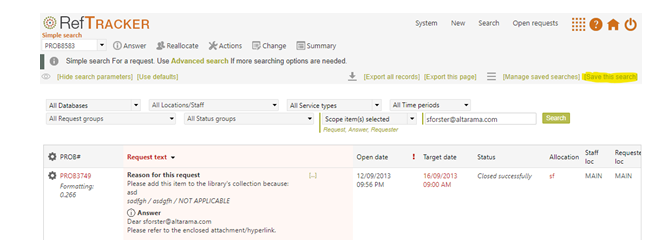
If you want to save this as a search you can run regularly (manually or scheduled), click this [Save the search] link. You’ll be shown a summary of the parameters that you used, and will be asked to provide some more details:
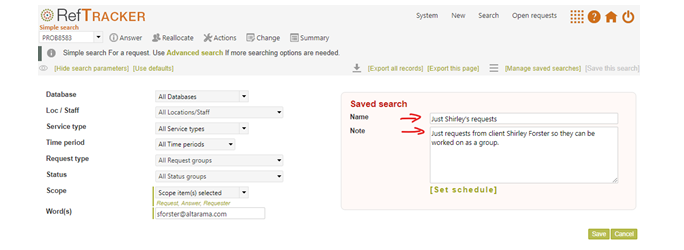
Give your saved search a helpful short name (max 50 characters) and in the Notes field, provide a description of why this search is used (and if it is scheduled, when it is scheduled to run). This note will prove very helpful as it appears as a pop up from the menu list, and at the top of the screen whenever you run this Saved search, providing an explanation as to what the search is showing and why.
Only if you want this search to be run automatically, on a regular basis, click [Set Schedule]. Note that some users will not be offered the [Set schedule option] (usually only Supervisors and above can do this).
Be sure to Click Save when you’ve finished with the parameters (and scheduling, if it needs to be scheduled).
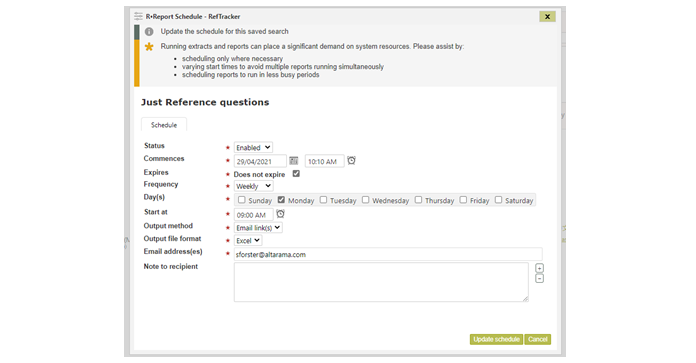
The Scheduling screen will show the scheduling parameters for this Saved search. Adjust them to meet your needs.
Commences: You only need to change this if you do not want the report to start running until sometime in the future (only after the date you set here).
Expires: Untick and set the date and time at which this scheduled task should stop running, if it needs to stop running at some time in the future.
Frequency: Set how frequently you want this report to run – further parameters will appear according to your selection here, in order to allow you to select the appropriate values for your choice.
Minutely = trigger this x minutes after the last time it was run
Hourly = trigger this x hours after the last time it was run
Daily = trigger this at the time specified each day
Weekly = trigger this on the selected days of the week at the selected time
Monthly by day = trigger this on the xth (e.g. 2nd) selected days of the week in each month at the selected time
Monthly by date = trigger this on the xth day of the month (1-28 and last day)
Quarterly = trigger this on the xth day of the quarter (1-28 and last day)
Calendar yearly = trigger this on the xth day of the calendar year (1-28 and last day)
Financial yearly = trigger this on the xth day of the financial year with starting month specified in parameter 2.19 (1-28 and last day)
Start at: Set the time at which you want this report to run on the chosen day (in your own time zone – RefTracker will adjust this time so it is run at the correct time by the server). The minimum amount of time between runs is 1 minute, and at each run the server looks for processes that have exceeded their specified frequency to run. Please take the overall processor load into account and only run processes as frequently as necessary. If the processes due to run take more than one minute, the system will not look for more processes to run until the next minute deadline arrives after the run finishes – so, for example, too many processes running every minute will result in all processes running, at best, after two minutes.
Output method: Choose Email link(s) to send the report as an email with a clickable link to the report. Using this method saves mailbox space and Internet traffic especially if the report does not actually get looked at every time it is sent. This option is not available to General and DeskStats users, should they be given access to use this function. The file is saved in RefTracker, and can be viewed for parameter 0.3 amount of time (usually 45 days) before it is automatically deleted by the housekeeping. The email that delivers the link, advises how long the link will remain clickable. If you want a report to be available for a longer period, the best option is to deliver it as an attachment rather than as a link.
Choose Email file(s) to send the report as an email with the report/s as an attachment/s. This is a more convenient method where the report/s being sent are always reviewed. This option is not available to General and DeskStats users, should they be given access to use this function.
Output file format: Choose Excel (default as this is the best format for humans to read), CSV or XML as appropriate.
Note that if there is nothing to report the Batch processing log will show “No results” for that run, and so that you know that the report has been run, an email will be sent showing the parameters and “No results to report”. If the scheduled run errors out for any reason, the log will show “Failed”.
Email addresses: The email address/es that should receive this report (semicolon separated with no spaces, if there is more than one).
Note that an email is only sent if a search result was produced by that run. If the report is run manually, you’ll see a message about there being nothing to report. If it is run by the background processing, the Batch processing log will show “No results” for that run. If the scheduled run errors out for any reason, the log will show “Failed”.
Note to recipient: This field should be used when the search is being sent to a user on a regular basis – use it to explain what the recipient is required to do with the data they are receiving.
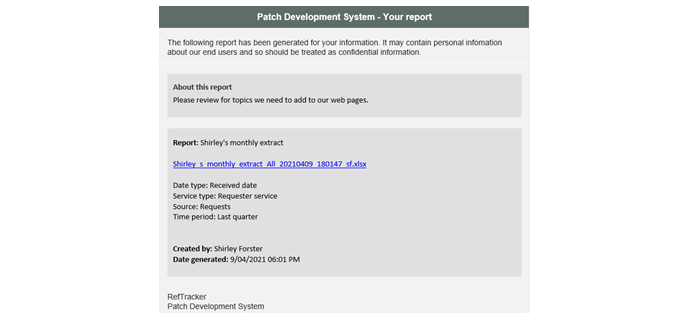
Here’s an example email providing a link to the scheduled search results, with a message to the recipient.
When you click Update in the Schedule sub window, the sub window will close.
Once a set of saved parameters has been scheduled, the schedule can be adjusted, by going to the saved parameters screen in the Search menu, or the Background processing screen for that saved search (at System>Batch process menu>background processing>Search export and then the name of the particular Saved search).
Saved searches use a lot of resources, so please make sure that a report is only being run once (and delivered to each required recipient) rather than being run individually for each recipient.
Changing saved search parameters and scheduling
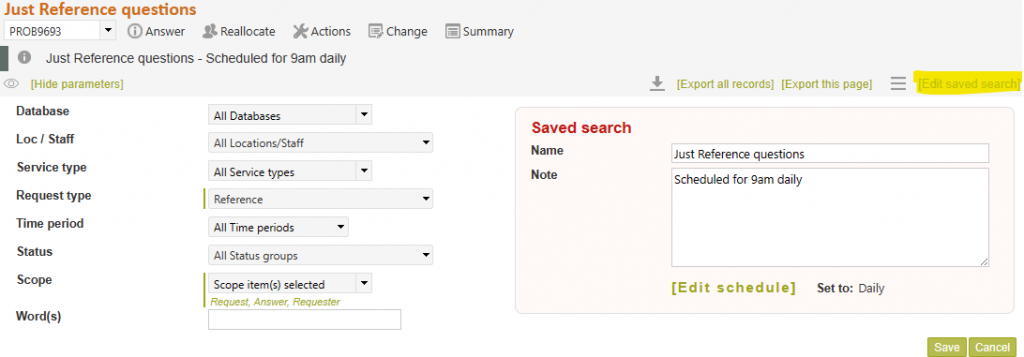
If you need to change the parameters for your search or set up or change scheduling for it, at any later time, you will find an [Edit saved search] link appears in the top right of the screen whenever you run that saved search. Clicking [Edit saved search] will display the saved Search parameters and allow them, and any scheduling, to be amended.
Managing saved searches (delete and rename)
When you click that [Manage saved search collection] link in the Search>Saved searches menu list you can set the order in which your Saved search will display in the Saved Searches menu, rename your saved search, or delete it, as appropriate.
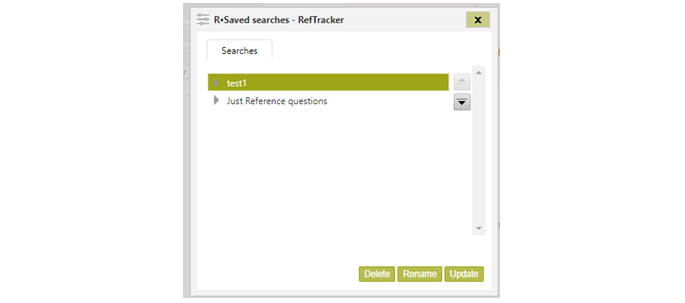
When you are finished using this window always click Update to save your changes and close the Managing saved searches window.