My preferences
My preferences is accessed from the body of the staff home page, or from the menu list under Home, or, a really easy way to get to it is to click your user name in the left of the footer of every staff interface page. My preferences allows each staff member to manage their own user signon, which includes a number of settings and defaults that determine how RefTracker operates for you, as opposed to any other staff member in your organisation.
All Full users have full access to My preferences.
ServicePoint users can have access to a smaller range of preferences through this screen, but only if their System Administrator has allowed it.
The following pages describe the full range of settings available to Full users.
At this stage, you may not understand the importance or meaning of some of these settings, but we have introduced this function to you now, so that later in the manual, when we say that a feature can be set in My preferences, you will know where to find it!
Exercise
Click on My preferences in the body of the staff Home page.
Using the My preferences screen
The My preferences screen is a tabbed screen. You can change any field that appears in a text entry or drop down box, in any of the tabs of this screen. When you have made all of your desired changes, click on Update in any tab, to save your changes in all tabs.
In the My preferences screen, your name and permission level are shown in the header, and all other information is displayed in logical groups on separate tabs. Click the tab name to move between tabs.
The information that needs to be entered into this screen is:
Details:
ID: The value that you enter into the ID box when logging on to RefTracker, and the value that appears in the Open questions screen to indicate questions allocated to you. Only your System Administrator can change your ID. If SSO is in use at your organisation, this could be your SSO signon.
Staff name: Your name should appear here. This information is not made available to clients by RefTracker, unless your library has specifically decided that it should be included in your responses.
Staff title: Your title should be entered here if it is your organisations policy to do so. This information is only used by RefTracker if your library has specifically chosen to include it in any personal signoffs they may have included in the layout of emails that you generate through RefTracker.
Staff number: Your unique staff number should be entered here if this is required by your organisation. This information is not utilised within RefTracker, however it is held in your staff record so that it can be used for things like inclusion in information that is exported from RefTracker to other applications such as time billing systems.
Network login: If your library uses Autologon, your Autologon access information will appear here e.g. your network login or IP address. If SSO is in use at your organisation, this could be your SSO signon.
Locale: Select your Locale here e.g. English (Australian), English (United States), English (British), etc. Locale sets the way in which numbers and dates are presented to you so choose the one that presents in the format that suits you best. Only Locales for the languages supported by your RefTracker system (enabled in the Language code table) are displayed here.
Default currency: When more than currency/money is enabled in a RefTracker system, staff users will be able to specify the default currency/money that they will use in RefTracker. System administrators/Supervisors will be able to set it for them, using System>Users Full. The System administrator controls the values appearing in this drop down list using the International currency codes code table.
Staff location : Sets the default value for Receipt location in your New question screen. It should be set to the location where you work. If you are temporarily assigned to another branch you should change your location here. This information is also used to determine which questions will be allocated to you, when the system is automatically allocating questions by staff location.Your system administrator may have Denied you the ability to change your Staff location because you only ever work in one area. If this is the case then your Search functions will also be automatically restricted to questions from your own location, as questions from other locations will be of no interest to you.
Your location for DeskStats is separately set in the DeskStats preferences tab because you may well be responsible for answering full questions for one location at the same time as being rostered on to a service desk where you are recording DeskStats.
Email: Your email address should appear here. As RefTracker sends Full users notification emails, it needs to know the email address of all Full users. If you change your email address you will received an email with a link that you must click to verify that new email address.
Phone: Your phone number should appear here so that your System administrator, and third parties that you correspond with, know how to contact you.
Mobile phone: Your mobile phone number should appear here – it is not yet used by RefTracker other than as reference information for your System administrator.
Start page: By default RefTracker presents you with the Home or Search results page that you used last time you were logged on (if you have logged on within the last week), otherwise the Home page, because the default for this “Start page” parameter is “Last used”.
However, using this parameter you can set that another page should consistently appear when you first log on.
This is particularly useful for staff who only ever do Statistics, those who consistently want to see a particular Open requests screen on logon, and those who prefer to always see the Trend graph in the Home page before starting work on the questions in the Open questions screens, for example.
To take advantage of this, select the page that you want to be consistently taken to after log on, in this “Start page” parameter.
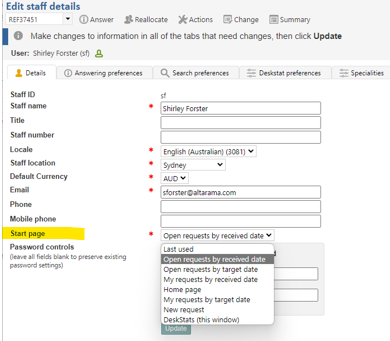
If you select “New request” you will be taken to the “Default New request form” that you select in the “Answering preferences” tab of My preferences, or the top form in the Requester service list if none is specified there.
DeskStats users can only select between, DeskStats, Home and New request.
Password controls: If a password policy has been set at parameter 9.34, it will display below the Password confirmation box to help staff provide a password of appropriate strength.
Password/Confirm password: If you wish to change your password, enter the new password here, and again in the Confirm password field. Your system may have been set up to ensure that you change your password regularly and/or provide a password of an appropriate strength. If password change controls have been applied and you have not changed your password within the required time, a grace period may be offered during which you will be presented with a message that explains that your old password has expired and presents the My preferences screen so that you can provide a new one. If your password has expired and you do not have access to My preferences, your System administrator will be advised by email that you need a new password.If a password timeout policy is NOT in place in your organisation, and you are shown the validation message “Password – you must change your password to a new value” after entering new password information, it simply means that the new password information is identical that already stored and making the change would have no effect.
If you change your password you will received an email that lets you know that the password has been changed (so you will know if it is changed by a system administrator).
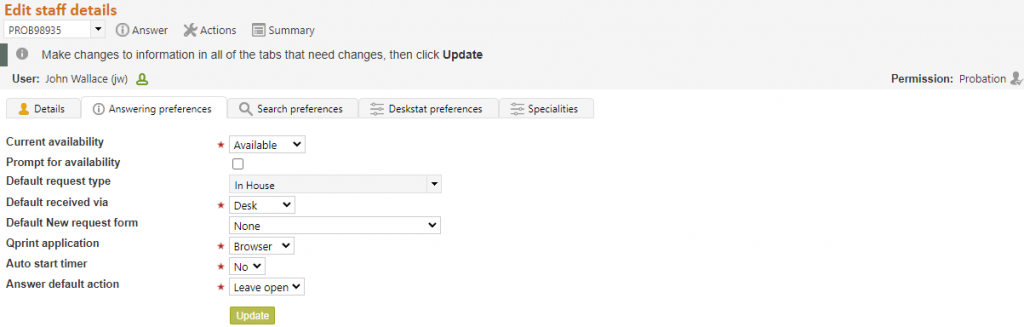
Answering preferences:
Availability: This setting determines whether you are available for automatic allocation of questions by the system. The system will never allocate you a question if your availability is set to No. If you are going on leave you should set your availability to No and back to Yes when you return. Some users will want to make this change at the start and end of every shift. Your Availability is also shown in the staff Reallocation screen, where staff can override it and specifically allocate you a question even though you are Unavailable (for example if they know you will be back from leave tomorrow). Your availability is also taken into account when you need to be emailed about a question. If you are Unavailable, the email will be escalated to your Supervisor or above according to their Availability. We recommend that you keep your Availability setting up to date, and to encourage this, an image providing a reminder of your setting is provided in the Home screen, and the footer of every RefTracker page, that can be toggled to reset your Availability. The next two parameters may also help you to keep your Availability up to date.
Prompt for availability: Tick this to have the system prompt you with an option to change your status at log off and log on (see examples below). Set this if “who is available” to respond to requests is important to your organisation – such as if your organisation uses the escalations provided by the Needs attention functionality, or the availability showing in the Reallocate screen when deciding who to reallocate questions to. We recommend most staff have this turned on as it is unobtrusive, yet a fantastic reminder to keep your availability up to date.
Automatic availability: This option is only available to Supervisors and above. Tick this to have your status automatically set to Available whenever you log in, and Unavailable whenever you log out. Set this if you do not work on responses to requests when you are not rostered on to do so. Supervisors can set this option on behalf of staff so you may notice that you have been set to be automatically made Unavailable whenever you log out, and Available whenever you log back in, even though this option is not showing for you in this page.
When BOTH “Prompt for availability” and “Automatic availability” are ticked, RefTracker will reset Availability at log off, and log on, but provide the opportunity to override the change.
When ONLY “Automatic availability” is ticked, the status changes are automatically made without any indication to the staff member.
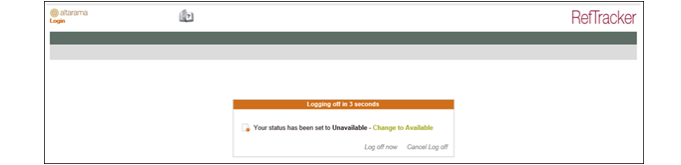
If “Prompt for availability” is on and the user is available at the time of Log Off – the log off page will display a panel like this for a time set by your System administrator (Parameter 2.29 with default of 5 seconds). If, for any reason, the timer does not run or is interrupted (such as by the browser window being closed manually), a post back will automatically occur to complete the log off.
The staff member can click “Change to Unavailable” to reset their Availability status to Unavailable. The new status will show in the icons on that screen, and the Change option with change to ”Change to available” and the log off will continue.
If “Prompt for availability” is ON and the automatic status is on – the status will have been changed to Unavailable automatically, but the user can over-ride by clicking the “Change to Available” link.
“Log off now” provides a link that can be clicked to provide immediate log out.
“Cancel Log off” provides the opportunity to go back into RefTracker if you decide not to log off after all. If your status is automatically changed at log off, it will not have been changed as the log off was not completed.
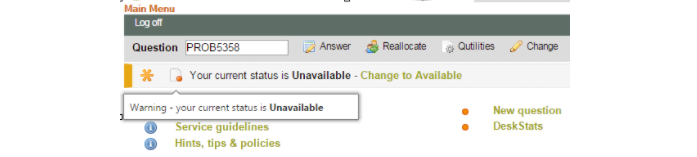
If “Prompt for availability” is ON then the user will also be reminded of their Availability status after log on with an alert display like the following.
Preferred request type: Sets the question request type that should be allocated to you when the system is automatically allocating a question by its request type. The values in this drop down list are the request types (types of questions) set up by your System Administrator. They will reflect the types of questions that are regularly asked of your library. This information is also listed on the Re-allocation page to assist other staff in allocating appropriate questions to you. Select “Any” if this user does not work primarily with one type of request.
Default received via: Sets the default value for Received via on your New question and DeskStats screens. It should be set to the way in which you usually accept questions, but can be changed whenever required, for example if you take a desk shift, but normally take questions by phone.
Default New request form: Sets the Request form that will be displayed if you click New in the Main header bar, or New question in the body of the Home page, rather than selecting a specific form from the drop down menu list under New. So set this field to the Request form that you use most often (type of request that you handle most often). Of course this is only your default setting, and you can always choose a different Request form once you are in the New screen.
The None option is provided for those who have not yet made a choice and will result in the first form in the list of Request forms being used as default in the New screen.
Billing rate: Shows the name of the billing rate that has been set for you. This information is used to calculate the cost of librarian time to answer a question. Selecting “None” indicates that Billing rate is not in use for this staff member – their time used will not be multiplied by any billing rate. Your system administrator may have denied you the ability to change your own billing rate if you will never need to do this.
Qprint application: Shows the application that will be used to display and print the output when you use the Qprint function. “Browser” means your web browser will be used (provides simple one step printing). “MSWord” means Microsoft Word for Windows will be used (provides high quality prints plus the opportunity to amend and save the output). See later in this document for more information about using Qprint.
Auto start timer: Default is “No” – this setting means that to use the timer in the Answering screens you need to deliberately turn it on.
Set this to “Yes” to have the timer automatically turn on as you enter any Answering screen that contains a timer. It will automatically turn off and record the time since you entered that screen, whenever you Save/Send/Update this screen. You can still turn the timer off at any time, and adjust the time it has measured (adjust for coffee breaks, time spend attending to your Outlook, etc.), and restart if necessary. Note that this option turns the timer on automatically for ALL screens containing a timer, so that means, Inform client, Query to client, Copyright declaration, and Partial answer, as well as the New screen, Third party screen, etc.!

Answer default action: Default is “Leave open” – to Close a question and send the answer off to the client from the Answer screen, you need to manually Choose “Close” at “Saving and closing details”. This is the default because it is the safe option that ensures you only send an Answer off when you specifically indicate that it is ready to “Close”.
Set this to “Yes” to have “Close” already selected as you enter the Answer screen so that in order to send off the Answer you only need to enter the Answer and click Save/send.
Notice that, if an email is to be sent, the Requester contact information box is showing as a clear warning that the Response email will be sent. Use this option if, more often than not, you develop the answer and send it off all in the one action. It only applies to the Answer screen.
Search preferences:
This tab provides settings that allow this user to adjust how the Search function works for them. The Search screens will also remember some things about your use of it and present those as defaults. System administrators can limit a staff member to only seeing questions in their own location by denying the “Ability to change operating location” Function in that user’s signon.
Default search location : If you only deal with requests for one or more locations (rather than all locations) you can set a default search location/s for all your Open requests screens, here. Staff can also set a default location themselves using the [Set default] links in each Open requests screen, but the benefit of doing it here is that, with one action, it does it for ALL Open requests screens. Another important benefit is that System administrators can do it when they are initially setting up signons for users that will only work in one or more specified locations.
Search refresh (mins) : Sets the amount of time between automatic refreshes of the Open questions screens. If you are working in a quick response environment, or if you rely on Open questions to advise of incoming unallocated questions, a low value in this setting will prove invaluable. Otherwise a higher value should be chosen.
Answer database: Determines whether the Answers function under Search will, by default, search all closed questions in RefTracker, only questions in the knowledge base including questions in the FAQ (staff who work with only qualified answers should select “Knowledge base”), or only questions in the FAQ (staff who want to be able to utilise any previous work should select “Any”). The KB and FAQ options are only offered if the KB and/or FAQ options are in use.
The Answer search only searches closed questions as it is about finding relevant answers previously provided through RefTracker.
If you tick all options here, the Answers screen will provide an easy way to see all closed questions.
DeskStats preferences:
This tab will not display if your system is not licenced for DeskStats or if your specific signon does not allow for use of the DeskStats functions. DeskStats preferences can also be changed using the Preferences function in the DeskStats screen itself.
Staff location: Allows the default value for the Staff location drop down box in DeskStats to be set for this user. It can be reset here if the staff member is rostered on to a different location. If you make a change here, you may also need to change the Client location setting below. This may not be in use in your system. This Staff location setting refers to DeskStats only. Your Staff location default for full questions is separately set using the Contact details tab of My preferences.
Client location: Allows the default value for the Client location drop down box in DeskStats to be set for this user. It can be reset here if the staff member is rostered on to a different location where the most common location of the clients is likely to be different. This may not be in use in your system.
Received via: Allows the default value for the Received via drop down box in DeskStats to be set for this user. It should be set to the most common way that requests arrive when this user is recording DeskStats. This may not be in use in your system. This Received via setting refers to DeskStats only. Your Received via default for full questions is separately set using the Answering preferences tab of My preferences.
Visible request groups: Shows the Request groups that will show in your DeskStats data entry grid. Untick the groups that you will never use to save space in your DeskStats screen.
Specialities:
This information is shown to other staff in the Reallocation screen to assist them in choosing the most appropriate staff member to reassign a question to. Your System Administrator will usually have set up the choices in this table to reflect staff specialties outside of the day to day question types used in RefTracker. If you have a skill outside those shown here, please contact your System Administrator to have the skill added to the list.
This tab will not display if your system has the Specialties code table disabled (as that removes this concept from your system).
Functions:
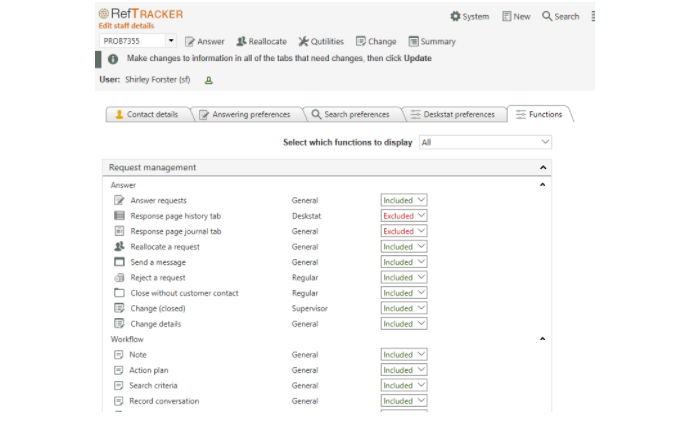
This tab is only available to you if it has been specifically allowed by your system administrator. If allowed, a display of all of the RefTracker functions, showing whether you have been granted access to that Function by your System Administrator, will display. If you have access to this tab, it gives you the opportunity to remove (exclude) any of these functions that you have been allowed to use. Excluding a function here, removes if from your RefTracker interface.The Functions all have sensible names, but where a function is identified in RefTracker by a symbol, the same symbol is displayed next to that function’s name in this Functions tab, in order to make it easier to identify.
To remove access to a Function, simply change its setting to Excluded and click on the Update button. For example you may be entitled to use DeskStats, but you know that in your specific role you will never need to use it – You can remove it from your header bar by changing it to Exclude and clicking on Update. When this is done the link to DeskStats in your Main function header bar will disappear making your user interface simpler to use, and removing any possibility that you might use it by accident. Ask your system Administrator if the Function that you want to exclude is not obvious in this list.
Exercise
Make any appropriate changes to your signon by using this screen. Usually, when you use this screen, you will be making a simple change like changing your Availability to “No” before going on leave, but when you first begin using RefTracker you should check each parameter carefully and adjust it to meet you specific needs – then click on Update . You can move around the tabs making changes. However you must click Update before leaving this screen in order to have the changes that you have made in all the tabs recorded.