Using the staff interface
Access for staff is via a web browser
RefTracker can be used for a wide range of processes within your organisation and from a wide range of devices. Having been designed to be W3C compliant its staff interface can be used on any device that supports a JavaScript capable browser. All computers, all tablets, and any mobile phone that supports JavaScript (almost all these days).
Staff with browsers that allow cookies will have access to some additional functionality like automatic logins, so we recommend that staff computers should be set up to allow cookies.
Popups are used in some places, so you should “Always allow” popups for your RefTracker web site, if your browser asks you about popups. Safari on an iPad does not ask about popups – all iPad RefTracker staff users will need to go to the Settings app, select Safari and then turn “Block Pop-ups” off.
Some secure organisations untick “Enable DOM storage” in IE (in Internet options>Advanced). If this has been done in your browser, features that use local storage like the Answer screen Restore function will not be offered.
RefTracker also uses sound files for emphasis in some places, so you should “Allow” use of a sound file player (such as Windows Media Player, Quicktime, etc.) for your RefTracker web site, if your browser asks you.
A great deal of work has been done towards WCAG 2.0 compliance – the ability to use ADA Assistive devices with the RefTracker staff interface. Please contact Altarama if you notice any accessibility issues that need to be improved. A test by a legally blind user of JAWS for Windows version 10.0 reported they were happy with the level of usability of all of the RefTracker staff functions required to be able to send responses to clients.
This manual explains how staff use RefTracker’s features presuming some normal types of requests that occur in libraries and other information seeking organisations. At the end of this manual is a section covering some other uses your organisation may be making of this product, and other software products you might be using it with.
Utilising web browser features
All parts of RefTracker are provided through a web based interface ensuring that it can be accessed by anyone without any special software being loaded onto their computer. The browser that you use to access the Staff interface must be JavaScript compatible, but even browsers on mobile phones and tablet computers are generally JavaScript enabled.
Normal web browser functions and conventions all work in RefTracker, as you would expect for a browser based application. Browser based functions that you can use with RefTracker are:
- Hyperlinks link to other functions.
- The Back button allows you to go back to the page most recently visited.
- The End button allows you to move to the end of a screen (to quickly move to the Submit button for example).
- Pgdn (Page down) is also a good way to quickly move down the screen (a screen-full at a time).
- The Home button takes you to the top of the page (to quickly move to the header bars for example).
- Tab moves you from data entry field to data entry field.
- Print allows the current page to be printed.
- Cut and paste allows information from other applications to be copied into RefTracker. Select some text from anywhere e.g. another web page or a word processing document, copy it (‘Ctrl’ and ‘c’, or right click and choose Copy), and paste it into a field of RefTracker (‘Ctrl’ and ‘v’, or right click and choose Paste). Rarely, the RefTracker system you are using may remove all HTML as you paste – System administrators should talk to their RefTracker support representatives if they want this – according to parameter 2.40 and 2.41, but usually your system will allow both HTML formatted text from web pages, and images, to be copied and pasted into RefTracker html edit boxes by staff.
Important hint: When you copy and paste text from another source, it is possible that you might not pick up all of the formatting for that text, or you may pick up some unwanted formatting. We recommend that you always add two new lines and then paste your copied text between those two new lines so that you can select from new line to new line, and then use ‘Ctrl’ ‘x’, to cut out any text that pastes in badly formatted.
Another handy hint is to use the “Paste as plain text button” whenever you are copying in text from an HTML source like RefTracker, or any other web page, as that will prevent any unwanted formatting from being carried over.
If you paste text using ”Paste as plain text”, it will appear on the same line.
If you paste text from an email, it will appear on the same line.
But if you paste text from Word for windows using Ctrl v and answering Ok to the question about cleaning the text, it will appear on a new line. There is because all text copied from WP comes across with paragraph coding around it, and perhaps other formatting. Its the same thing as copying text from a web page – the relevant HTML comes across from the source and will be saved into RefTracker. You will want this if the text is formatted e.g. bolding, or hyperlinks! - When you are in a drop down box, you can type the first letter of the entry you want and you will be automatically moved to the first entry in the list starting with that letter. This is a handy trick for fast entry in commonly used drop down boxes, and for quickly moving down a very long list of drop down box entries.
- Radio buttons, tick boxes and drop down boxes are all used to allow selections to be made
Even features specific to particular specific browsers work with RefTracker, for example Edge’s spell checking and predictive text.
Edge’s voice recognition, can be particularly useful for capturing your initial thoughts for first drafts of responses in RefTracker, so here’s some information about how to set it up, and use it:
Go to Windows>Settings>Privacy & Security and turn on Online speech recognition.
Once that is done, any RefTracker text box (single line box) or text area (multi line box) can accept text via voice recognition.
Just place your cursor in the field where you want to use voice recognition, and hold down the Windows key while you hit h.
Once your system shows “listening” you can start speaking and your dictation will be typed.
A box with the microphone symbol will appear and you can use that to start and stop voice recognition. The microphone control looks different on different computers and sometimes includes a ? logo that, when clicked, shows voice commands you can use to do things like “Stop dictation”, “Delete that”, add punctuation like “hyphen” and “comma”, and add symbols like “dollar sign” and ”smiley face”.
To stop voice recognition you can also hit a key, for example, full stop (to end a sentence).
The quality of the voice recognition is very good, but you do need to check your work, especially for punctuation.
Note that voice recognition can also be used by your clients to submit their requests using RefTracker client interface forms, used on their Windows 11 computer/device.
There are also some conventions used within RefTracker that apply across all screens and browser.
RefTracker conventions for screen usage
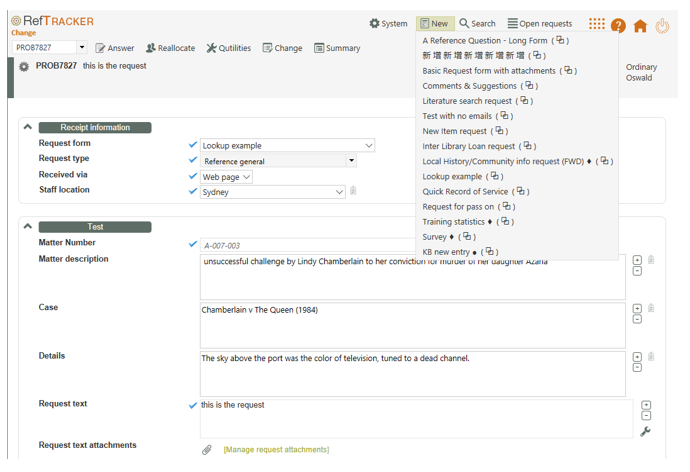
There are a number of standard ways of doing things in RefTracker. Let’s look at them now, so that you will recognise them when you come across them in future sections of this document. In fact you will most likely recognise them anyway as they are all common ways of doing things in web based products. Above is a RefTracker screen showing most of the features:
 or
or ![]() The Required symbol is usually one of these symbols, but your system may use a different symbol. Presence of the Required symbol to the left of a field indicates that the field is mandatory for completion. (This image can be changed using parameter 3.24)
The Required symbol is usually one of these symbols, but your system may use a different symbol. Presence of the Required symbol to the left of a field indicates that the field is mandatory for completion. (This image can be changed using parameter 3.24)
 The Required (for close) symbol to the left of a field indicates that the field is mandatory for completion before the request can be closed. You can work on the request as normal, until this information is available, but a validation message will remind you that it is still missing, as it must be provided, before the request can be closed. (This image can be changed using parameter 3.25)
 The “Look at me” Highlight symbol appears as a thick coloured border at the left of any field that may have been defaulted with a value that needs checking before the screen is submitted. Fields highlighted in this way will also be mandatory and so also be displaying the “required” symbol. In this example the highlight bar is a dark orange colour, but it may be another colour in your system. This coloured highlight bar means be sure to check the value in this field and update it if appropriate .
 Two subwindow image to the right of a function name: Indicates that this function, always opens in a separate sub window. Where a function opens in a subwindow, you can drag the corners of the subwindow to change its size, and you can move it around the screen. RefTracker remembers how you last used that subwindow and presents in the same location, and at the same size, as it was used last time. All subwindows automatically close when you log off RefTracker, so don’t leave unsaved information in a subwindow.
 Two subwindow image in brackets to the right of a function name: Where a function name is displayed with the small two screen image to the right of it in brackets, clicking on the function name will open it in the main RefTracker window. Clicking on the two subwindow image in the bracket will open that function in a separate subwindow.
+/- boxes to the right of a data entry box in the question answer screens allow the size of the box to be doubled in height (+) or halved in height (-) to a minimum of 4 lines, in order to be able to view and enter long pieces of text more easily, and still be able to bring the Save button back onto the screen. Or, if the “+” and “-” icons do not appear, a drag indicator will appear in the bottom right corner of the box that allows the depth of the box to be adjusted by dragging it up or down.
Division headings differentiate types of information on the screen. Usually a heading will be accompanied by a Show/Hide box so that the information appearing between this heading and the next can be contracted, or if not showing, expanded. Click anywhere in the Division heading name or on the Show/Hide box to expand or contract that division.
Drop down boxes provide the ability to select a value form a list. In RefTracker the values in these lists are most often determined by your library’s System Administrator using a code table. You can select a value by clicking on the triangle to the right of the list and clicking on the value that you want, or by typing the first letter of the entry you want to use, in the box.
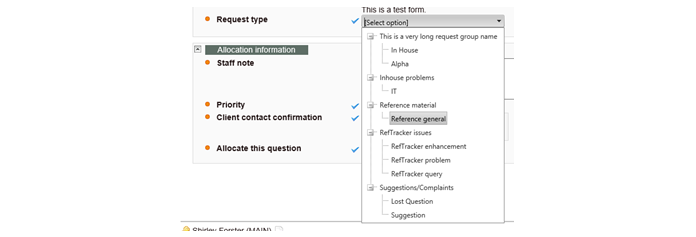
When a mandatory field is showing [Select option] it displays with a coloured background.

It makes noticing that this field needs to be completed so much easier! For example – the “Request type” field at the top of the “Answer” screen, and the “Closing status” field in the “Close without client contact screen”.
A tree structure drop down box is used for displaying Request type wherever it occurs. It allows request types to be displayed under their appropriate Request groups, making it easier to find the right Request type. In most places where this structure is used, you can only select entries like the one below that are at the end of the tree structure. However in some places (such as the Search screen) you can select a Request group when that is appropriate.
Data entry box – Where an empty box appears as shown in the example screen above, you can enter text into this box. A label and perhaps even descriptive text will provide guidance as to what needs to be entered.
Action buttons such as Save, Save/Send, and Update will generally save the information on the current screen to the database, and bring up a new screen. An easy way to get to the Save/Send/Update button is to use the Pg Dn or End Key.
To abort use of a screen, simply choose another page before clicking on the Action button for that screen.
Action buttons present in a highlight colour to emphasise that, because RefTracker is a web based product, nothing entered into that page gets saved until an Action button is clicked!
Page size controls allow more records to be displayed on a single page, and other pages to be viewed. Click the number of the page you want to view, or the arrows to move between pages. To show more or less events per page, change the default Page size value (12 in the example below) to another number and then click Change (you cannot make it larger than the number of records available to display. This is particularly helpful if you want to print the entire History! Beware – the system remembers your favourite page size, and will use that value next time you display this page! If there are less records to display than your default, the Page size will show the number that it has to display, and then revert back to your preferred larger number when there are more records to display in future uses. The larger this number the slower your page will be to load.

Presenting text
RefTracker has to efficiently display what can often be large amounts of information. To do that is uses a number of conventions.
It also has to display HTML constructs within an HTML page. In order to achieve this RefTracker displays the question and answer in a “Simplified” format (that also provides application security benefits).
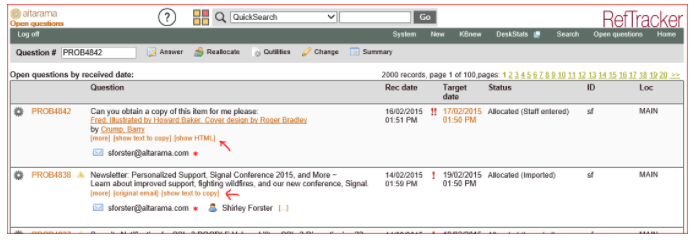
[. . .] appears where a summary does not contain all of the available information. For example, it will appear after the client contact details summary, if there are more client contact details than are not showing in that summary. Click this ellipsis [. . .] to see the further details. Some contact details can be clicked to contact the client directly such as the MS Teams link.
[more]/[less] appears where text fields are long and have been truncated to minimise scrolling. Clicking on [more] will show the complete extent of the text in this field. Clicking on [less] will return the display to the shortened version. System administrators can control when [more] appears using Parameter 3.5. The system intelligently works out where to place the [more] symbol. If it would appear in the middle of a complex structure such as a table, it will appear before the start of that complex structure. If the text includes complex HTML like dot point lists, [more] will appear before that complex HTML and the [original format] link will display to ensure you can see the data in its unsimplified format.
[original format] appears where the text includes any complex HTML that cannot be efficiently displayed with the RefTracker screens (such as tables, images, headings and lists) without the risk of it effecting the layout of the rest of the page. The text will be displayed in RefTracker in a “simplified” format, but you can click [original format] to see the text with its full HTML formatting (as it was supplied), in a pop up window.
This simplification process removes incomplete and complex HTML that might impact on how the question displays in RefTracker. This simplification may result in the formatting shown in RefTracker being slightly different to that originally pasted in – but it will be recognisable and, importantly, efficiently usable! The text before simplification is saved, and can be viewed by clicking this [original format] link.
[original email] appears where the source of the request was an email in HTML format. Click [original email] to see the original imported email in its original HTML format, complete with its header information (who it was from and who was copied on it, etc.), in a popup window. RefTracker will usually show a good representation of imported email, but if you have any concerns this copy of the original email is just one click away!
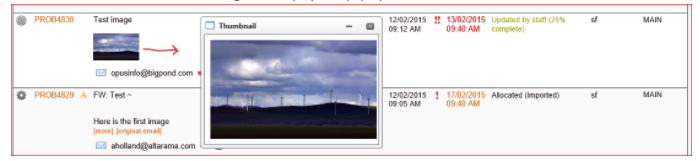
Image thumbnails are used in the position where the image should appear. To see the image at its full size, click on the thumbnail and the full size image will display in a pop up window.
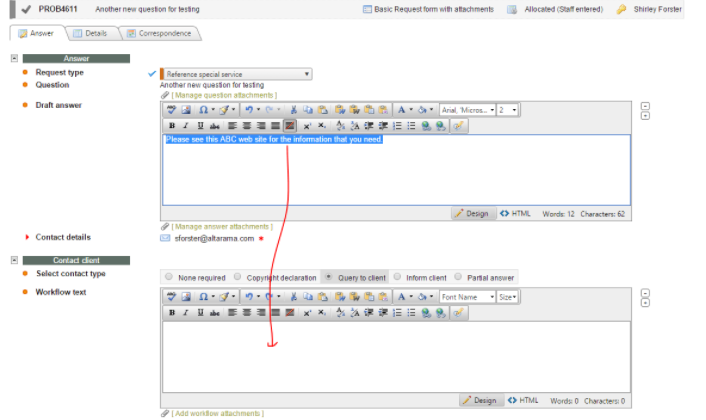
Using the formatted text box editor

Formatted text boxes, like the one in the screen print above, provide staff with the ability to format text in Questions, Answers, Client correspondence and Third party correspondence. The editing buttons do not appear until you click in the box (in order to minimise scrolling).
Behind the scenes this box creates HTML. HTML like characters that are entered in this box are encoded before being stored so, whether entered by staff or clients, they can never be executed (ensuring a hacker proof solution).
 This “HTML editing” button usually only appears for System administrators. It allows editing of the HTML code behind what you see in the normal Design mode, should that ever be needed to add extra formatting, or to correct any bad HTML that might have been copied in. After using this function ALWAYS click the keyboard icon
  that appears in the same location, in order to return to Design view. Any changes that you make in HTML editing mode are not saved until you return to the normal editing mode, so always click
  after you have finished any HTML editing.
The editing features provided by this box make sending responses through RefTracker as easy to do as using your own email. Sending your correspondence through RefTracker allows other staff to participate in the response process, when appropriate, so if you are tempted to use your own email, try using RefTracker first.
– Selecting text in one of these boxes is just like using a word processor – left click and select, double click to select a word, or triple click to select the whole paragraph.
– Formatting text in one of these boxes is just like using a word processor – select the text that you want to format and click the appropriate button. The buttons should be familiar, but also have tooltips to indicate their purpose when you hover over them. The Word processing short cuts that you are used to also work:
ctrl b for bold
ctrl i for italic
ctrl u for underscore
ctrl c for copy
ctrl v for paste
ctrl x for cut
– The  button in the HTML editor initiates the RefTracker QuickText function. It is always the last button on the right. You can also bring up QuickText with CTRL/ALT/q
– Enter provides a new line. Create a new paragraph by using Enter twice.
– You can cut and paste formatted text, such as from a web page, word processing document, spreadsheet, email, etc. into this box and it will retain its formatting. The HTML editor provides both “Paste” and “Paste as plain text” buttons.
Paste or Ctrl v, pastes in your formatted text, but some browsers (Chrome and Firefox) force you to use their own, or the standard Ctrl v, paste function. This means that it is usually easier to user Ctrl v, rather than this button, no matter what browser you are using.
When you use Ctrl v and are pasting from a source that provides html, like a web page or WP, the text comes in from the source with paragraph coding around it and so will always present on the next new line.
Paste as plain text pops up a box to enter your text, then inserts the text you add into that box, into RefTracker without any formatting. This is a good way to insert text copied from other web sites that might have different formatting like different sized fonts, but it does mean that any hyperlinked words will lose their associated URL. When you paste as plain text, the text will appear on the same line as your cursor.
Important hints:
1. When you copy and paste from MS Word, the system will popup a message asking if you would like to clean the MS Word formatting.
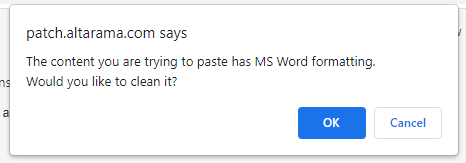
This occurs because you are converting text from MS Word format to HTML format, and that creates messy HTML.
Clicking “OK” in this popup will convert you pasted text to simplified HTML which is generally well formatted. however if your MS text has complicated formatted such as dot points, you may need to retain the full MS word formatting. To do that choose “Cancel”.
2. When you copy and paste text from another source it is possible that you might not pick up all of the formatting for that text, or you might pick up some unwanted formatting. We recommend that you always add two new lines and then paste your copied text between those two new lines so that you can select from new line to new line, and then use Ctrl x, to cut out any text that pastes in badly formatted.
Another handy hint is to use the “Paste as plain text” button whenever you are copying in text from an HTML source like RefTracker (or any other web page), as that will prevent any unwanted formatting from being carried over.
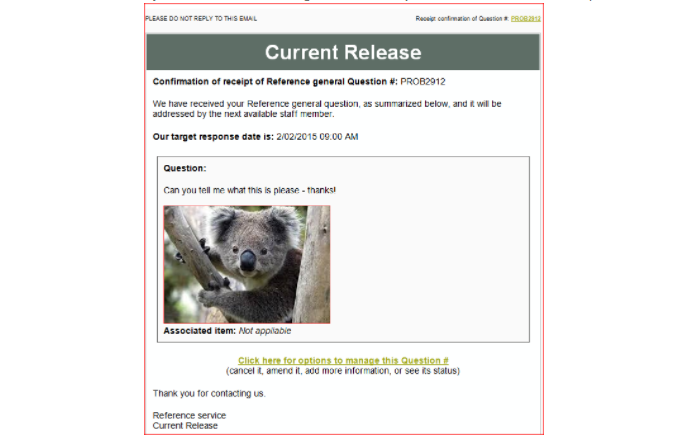
– You can cut and paste images into these formatted text boxes, and the images will appear in the body of your question, correspondence or response, both in RefTracker and in emails created by RefTracker.
Some email clients like Outlook may provide icons that indicate that the images in email created by RefTracker need to be downloaded – just select “Download images” and the body of the email. Here’s an example:
For security reasons the file types that can be handled as embedded images have been limited to .bmp, .gif, .jpeg, .png and .tiff (prevents attempts at phishing).
When an image that you cut and paste into RefTracker, or an image received in an imported email, cannot be accessed by RefTracker (such as if the image is located behind a firewall), RefTracker inserts the standard ![]() “missing” image that you will be used to seeing when your email client does not automatically download images. There is nothing that can be done to retrieve inaccessible images.
“missing” image that you will be used to seeing when your email client does not automatically download images. There is nothing that can be done to retrieve inaccessible images.
Images should be kept as small as is practical – consider that your client will be reading your response in a window, email or piece of paper that will generally be smaller than a letter/A4 sheet of paper. To properly control this the image need to be resized before lapcing in RefTracker.
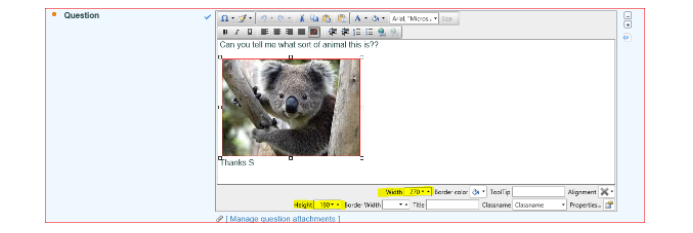
You can reduce (or increase) the size of images in RefTracker by dragging the corner of the image when displayed in a formatting box edit box.
You can also change the size of images by using the image inspector. Double click on the image and the inspector will show at the bottom of the Box. You can change the Height or Width values to change the size of the image. This adds a style tag to the image and controls how the image looks in RefTracker, but other applications like the end user’s email client may not handle the style tag and may display the image in its original size.
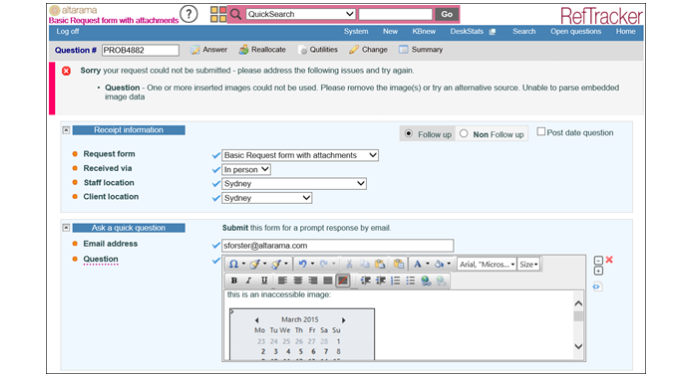
Some images appear to cut and paste into RefTracker, but are not accessible to it. For example this might occur if the image points to something on the user’s own computer that is not accessible from the Internet. RefTracker will not know that the image is not accessible to it until it tries to save the data, so RefTracker has a validation message that indicates when it has found that an image is not accessible to it. Here’s an example of the validation message. Note that it asks that the image be removed and added as an attachment to ensure that staff do not receive requests referring to images that they cannot see.
– Where more than one of these formatted text boxes appears on a page, you can drag and drop selected text from one box to the other. For example, if you start typing in the Answer box and realise that you really need to send your text as a Query to client, select the text (such as by triple clicking) and drag and drop it into the Query to client box. Note that Firefox cannot support this feature (at May 2015).
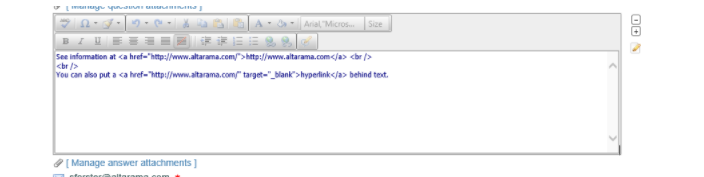
– RefTracker automatically hyperlinks anything starting with www, and any standard URI’s enabled in your URI scheme code table, such as, http, https, mailto, etc. URL’s entered into this box will automatically show as hyperlinks in IE but for Firefox and Chrome the hyperlinking occurs after the text is processed by RefTracker. You can see how they will look after processing by using the [Preview email message] link.
When a hyperlink appears in a Formatted editor box the user can click on the link and be shown the attributes of that link. This line also includes a convenient copy of the hyperlink editor button that can be easily clicked to edit the hyperlink. This function is called the Inspector and will also display useful information about images and tables.
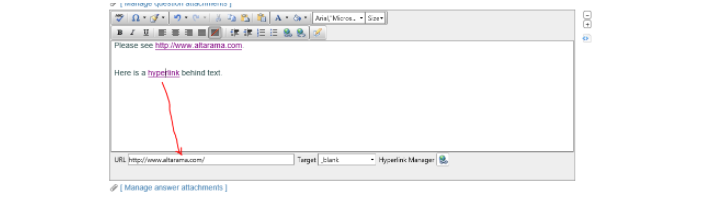
If you are seeing a URL in an HTML edit box that does not appear hyperlinked, there is no need to do anything about it unless you want to present the hyperlink behind some text. RefTracker automatically presents all URL and selected URI’s as hyperlinks when outside the Edit box (so clients see them as clickable links, for example).
There are many security features in RefTracker, and one of them is that all URL’s entered into RefTracker by staff or clients are checked against the Google safe browsing API. Any URL that the Google service indicates as being known to present malicious web sites, will be automatically removed and replaced with “* UNSAFE URL REMOVED *”. You can see an example of this by entering http://altarama.malware.
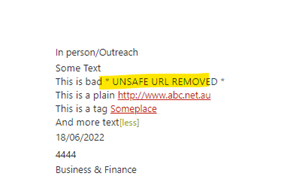
If RefTracker detects a badly formatted URL, the invalid formatting means it cannot be checked against Google safe browser, so it is preceded by the note “*WARNING – malformed URL : ” to indicate that if it happens to bring up a web page, the page has not been checked as safe.
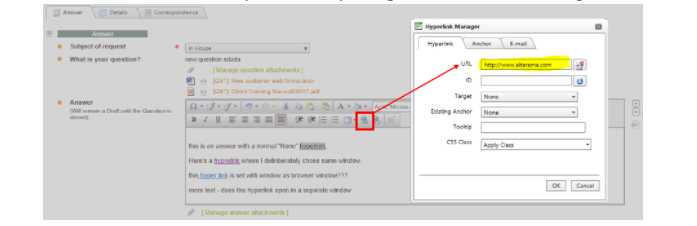
The Hyperlink button brings up a small parameter box that allows you to define how a hyperlink for the selected text should operate. You only need to enter the URL to hyperlink to. Other parameters will be sensibly defaulted by RefTracker. For example, ALL hyperlinks you create in RefTracker will open in a separate window so that they do not overwrite the RefTracker screen that you are currently viewing – so there is no need to set Target.
– The Format stripper button provides a number of options for removing formatting from selected text. When you cut and paste text, it is easy to pick up extra formatting, or not enough formatting to have the copied text appear as you expect. If you are having trouble with the format of some cut and pasted text, try selecting a little more either side of the copied text, and using Format stripper button with the “Strip all formatting” option.
– The Format painter button has three functions accessible from its drop down menu – Copy format, Apply format, Clear format. When you cursor over the Format painter button, the tool tip will tell you which mode the function is currently in.
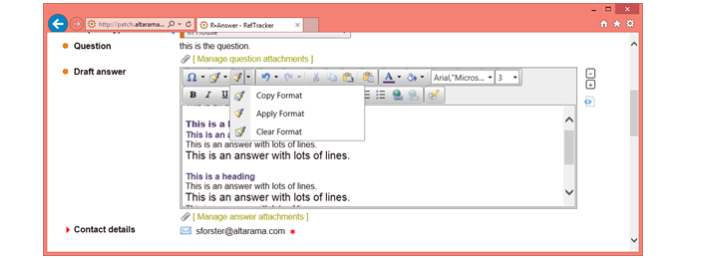
To use this function select the text that uses the format you want to use elsewhere, and click the format painter button when it is in Copy format mode.
Then select the text where you want to replicate the formatting and click the format painter button again. It will have automatically changed to Apply format mode.
Apply the formatting as many more times as you need.
When you want to select a different format to apply you will need to use Clear format mode first which will automatically make the Copy format mode available for use next.
– The Insert table button provides table creation and formatting functions. To add a table click this “Insert table” button and select the number of rows and columns in the table by clicking the bottom right cell at the size you want. Enter text into the table by clicking in the appropriate cells. The other editing functions provided by this button allow rows and columns to be added and deleted etc. Attributes of the table can be edited using the editor function in the Insert table drop down. Attributes of cells can be changed using the attributes displayed in the Inspector at the bottom of the editor window.
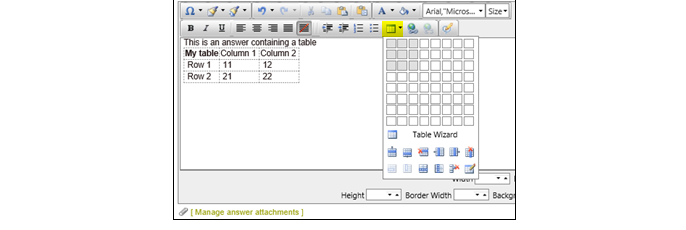
The editing functions provided by this Insert table function are limited. You may find it easier to create your table in WP or Excel, and copy and paste it into your response, as pasted tables keep their formatting.
Tables in emails created by RefTracker will expand to fill the width of the email.
If the [more] symbol needs to be presented in a RefTracker display at a point where a table would display, the [more] symbol will appear BEFORE the table.
– HTML mode can be used by System administrators and anyone else specifically given permission to use it (by granting “Allow editing of HTML source” in the Functions tab of their signon). When access has been granted, a “Switch to HTML view” button appears on the right of all Text editor boxes.

Clicking the “Switch to HTML view” button will show the HTML behind what is showing in the editor box, and allow changes to be made at the HTML level (such as if the client has supplied their question is a very large font). Click the “Switch to Design view” button (pen icon in the same location) to ensure your HTML changes are saved by RefTracker, and view your new formatting in the normal Design mode.
Bad HTML will cause unusual RefTracker behaviour (badly formatted screen displays and even issues with the Answer screen not displaying), so be very careful if you have this feature available to you.
Access to HTML mode has been provided for support purposes and should ONLY be allowed for staff who are competent in using HTML. Imported email and HTML cut and pasted into RefTracker goes through a simplification process before being stored into RefTracker to ensure that it is valid and displays nicely in RefTracker, so it should be very rare that this HTML mode is required by a customer. The simplification process will fix things like cut and pasted HTML where the beginning HTML tags may be included but not the equivalent closing tags.
There is no spell checking button in this editor, as spell checking is done well by the browser you are using. The browser will highlight any miss spelt word, and right clicking on that word will provide spelling suggestions, and even the ability to add the word to your personal dictionary.
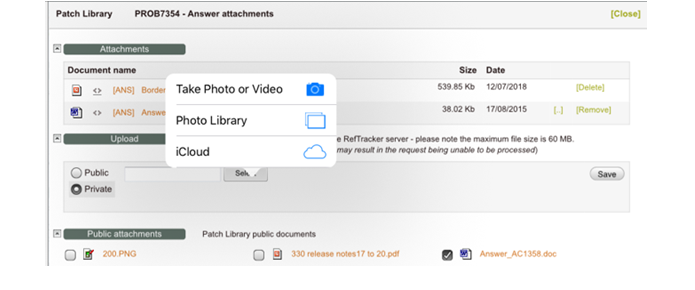
Attachments
Where attachments are allowed a hyperlink will provide that function. The name of the hyperlink will vary according to what sort of information the attachment will be associated with: Question, Answer, Contact, or Note. The attachment process is the same for all types of note.
To use the attachment function, select your files then click “Save files” and the files will be uploaded and the attachment window automatically closed. The files you added will then show in the screen you are returned to as confirmation that they were added.
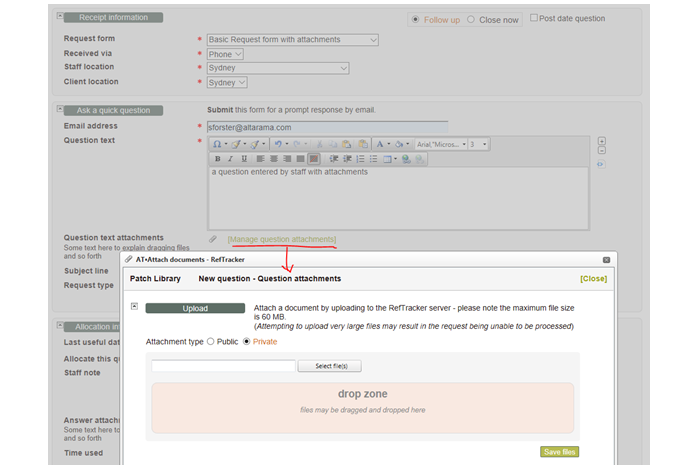
You can select the files by using the traditional “Select files” option (which allows selection of one file at a time using the standard Windows file selection function), or, by selecting one or many files in a Windows file Explorer screen and dragging the selected files to the “drop zone”. The select file names will appear at the top of the gray selection zone.
To upload your selected files click the “Save files” button. Your selected files are ready to be saved when they have a green dot to their left.
Drag and drop is especially useful when you are picking up files from a scanner!
Don’t forget that if you are using RefTracker on a tablet with a camera option, an option to take a photograph as an attachment is automatically provided!
Entering staff time used in RefTracker
Where time can be entered, a display like this is provided:

When you cursor over the time entry box a popup shows that time can be entered as
digits – e.g. 30 which means 30 minutes
colon separated – e.g. 0:30 which means 30 minutes
period separated – e.g. 0.5 which means 30 minutes
You can use the timer manually or have it run automatically according to how you set the “Auto start timer” parameter in the Answering tab of your My preferences.
Just click the clock icon to start the timer, and click it again to stop it. The clock will flash if it is active. The timer will start from the time already showing in the time entry box (except if a default time value has been provided for the box, the timer will start from zero). You can manually adjust the Time used at any time. If you forget to stop the clock, it will be automatically stopped, when you click Submit/Update. If you have the timer set to run automatically, it is very important that you adjust the time before saving your work if you have left your RefTracker screen open while doing another activity (coffee break, handling email, answering a phone call, etc).
If the timer is running, the time display will be updated every 5 seconds for the first minute (this helps to indicate that the timer has been turned on, and to explain that 1 minute of time is only recorded if more than 30 seconds has been recorded), and then every minute.
The “time to date” information only shows if time has already been recorded for this question. Its major benefit is for organisations that have policies regarding the maximum amount of time that should be spent on any question, and for customers where a lot of the work is done outside of RefTracker. It also makes it clear to new users that they only need to record additional time spent, not total time to date. Total time recorded to date also appears in the Details tab of the Summary screen, and the Journal tab shows all of the details of the entries that make up that total. If you have used time whilst not working in a RefTracker screen such as an extended visit to the stack for a request, you can enter that time using the Record time screen under Actions.
If you are unsure about how much time you’ve entered for the various questions that you worked on today, go to Home, and then My journal entries for a summary of the time you have been entering. A total in the top right of that screen is a helpful indicator of the total amount of time that you’ve entered for the selected period, and may help you judge whether you have entered all of the time that you should have.
Date, time and money formatting in RefTracker
Your RefTracker system should automatically present dates and money in your local format (as set by the Locale that you choose in your My preferences, Contact details tab e.g. English (British) will give dates in dd/mm/yyyy format and use £ for currency, whereas English (United States) will give dates in mm/dd/yyyy format and use $ for currency. Your System administrator can have more locales added (via the Locale code table) if you are not finding the language that you want at Locale. For more information about the impact of Locales, see the Language and Locale code table descriptions in this help page.
Times are always presented in your local time according to the Location to which your signon is linked.
Searching and reporting offer options to search and report by the week, calendar year or financial year. Your System administrator sets up the start day of the week using parameter 2.18 (Often Sunday) and the start month of the financial year using parameter 2.19 (often July as opposed to the calendar year that starts in January).
When staff need interfaces in more than one language
Where your organisation supports clients and staff using more than one language, RefTracker can be set up by your System Administrator, to operate in multiple languages.
Other languages available in that RefTracker staff interface will be presented on the line above the footer of each RefTracker staff interface page. Clicking on the name of another language, in that line, will present that page in the newly selected language and any further staff interface pages that the user views in that session, in the newly selected language. This makes it easy for staff to swap back and forth between languages – allowing a page to be viewed in one language, and then in another! This is particularly helpful for System administrators setting up translations for a new language.
The RefTracker staff interface will initially present in the language determined by the following criteria (as long as that RefTracker system supports that language):- Any language specified in the URL string used to display the page, for example [ http://<domain>/staff.aspx?lang=fr will bring up the login page in French – The preferred language last selected- The “Default language” specified in that user’s signon/My preferences (this will be the language used after a new log in).
For staff to be able to see dates and money symbols in the preferred format for a language, they must have that language set up in the languages/locales for their browser as described in the section “Dates, times and money formats in RefTracker” earlier in this manual.
Detecting the hardware device being used
RefTracker detects the type of hardware that it is running on and presents its screens in a way that enhances usability on that type of device. RefTracker can detect mobile phones versus larger screens.
When the client interface appears on a mobile phone, the screens are reformatted for that environment, for example, forms are presented with all fields at full screen width to deliver a neater presentation. This is called “responsive design”.
We do not recommend use of the staff interface on mobile phones as there is just too much that staff can do to fit well in a screen that small. However a small tablet can be effectively used by staff!
If you have email on your phone or tablet, the hyperlinks to RefTracker, in RefTracker emails, will open on your mobile phone or tablet.
You can also create an application icon for RefTracker on your phone or tablet, to provide easy access to it. To do that, bring up the RefTracker client interface page you want to access, or the RefTracker staff interface login page, as appropriate, using your device’s web browser. On an Android device click the three dots, and on an iPhone click the Share icon, and find and click the “Add to Home screen” option. An application icon will be created on your phone or tablet.