Adding new users – using the Copy function
Once you have some signons in your system that have values in them that reflect how your user’s work, it is usually simpler to copy existing signons than to create them from scratch each time. The Copy function allows you to do that, so be sure to pick a user with similar requirements.
A handy technique you can use with this screen is to create an example user at each permission level, with all of the right permissions for how you use RefTracker, and set that example user to Disabled (so the example user doesn’t show in your live use of RefTracker. When you want to create a new user, select Disabled in the Status selection box, and copy the appropriate level example user. It will create another disabled user that you can enable whenever the new user is ready to start using RefTracker.
Using this screen
All settings for the user that you copy, except the Functions, are copied, as the functions are set for the permission level that you choose.
You are presented with the Edit staff details page with the Contact details tab showing so that you can adjust the existing users details to fit this new user. Seeing the existing user’s details provides a guide as to how the new user’s details should be presented and can reduce some effort, for example, not having to retype the domain in the email address.
When you have filled in the contact information, it is important that you check all of the other tabs to be sure they are set correctly for this user, especially the Functions tab if you need to set special Function level access, before clicking on Create user.
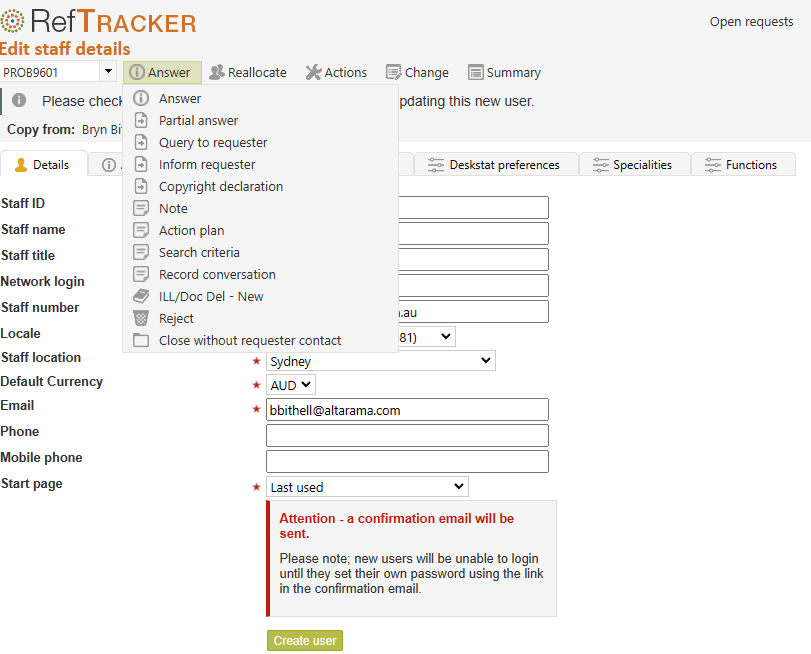
When you click Create user, this new user will receive a “Welcome email” from the RefTracker email address, with a “Set your password” link that they MUST use to validate their email address and change their password. The signon has been created but cannot be used until it has been validated by clicking this link.
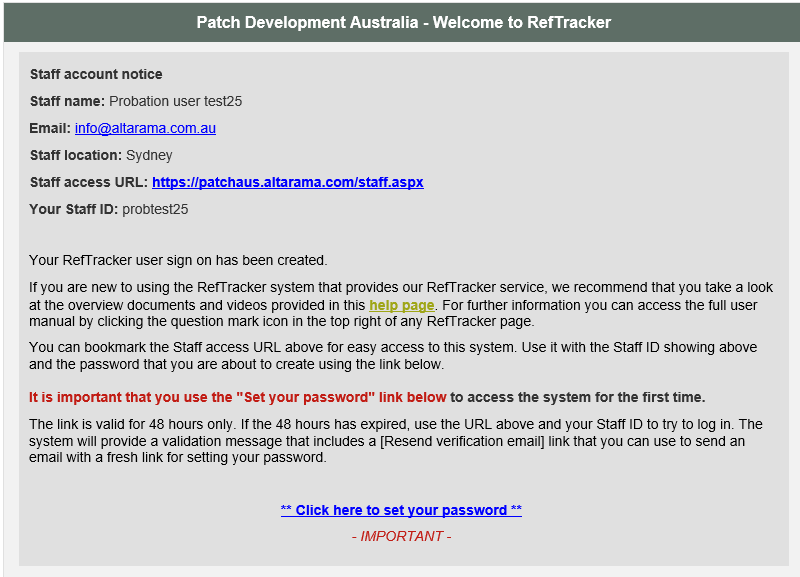
For security reasons the “Set your password” link in the Welcome email expires in 48 hours, and becomes inactive once it has been successfully used. If a user tries to log in without first having used the “Set your password” link in the Welcome email , or after it has timed out (they need to enter their user ID but can leave the password field blank), they will see a validation message that includes a [Resend verification email] link. This link will send a new Welcome email with a new 48 hour timeout period.
This “Welcome email” occurs for full users only. An email is not sent for new Service Point user signons as no email address is stored for them, and the administrator creating the signon must set a password. Please remember to tell Service Point users that their signon has been created.
Here’s an example of that Welcome email (System administrators can edit the text paragraphs of this email by going to System>Utilities>Administration utilities>Template editor (text) and editing the StaffWelcome.htm file):
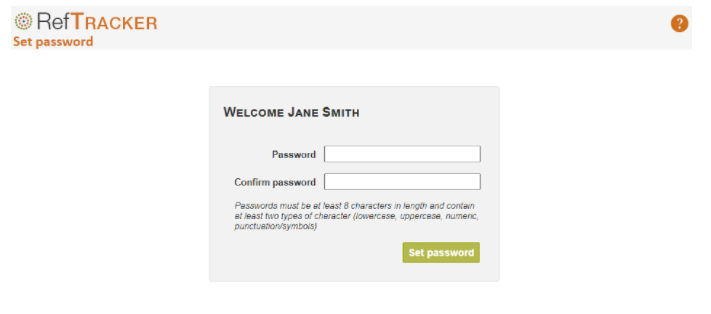
And here’s what happens when they use that “Set your password” link – remember that they cannot enter the RefTracker system with this user ID, without first clicking this link to validate their email address and change their password (they will see a message “Login disallowed”). Note that for security reasons. the “Set your password” link provided by this email can only be used once. If the user tries to log in without first using this link to set their password, they will see a notice that the signon is not verified, with an link that will resend the Welcome email so the user can be verified.
System Administrators should note that your password policy as set in parameter 9.34 is displayed in this screen.
Click here for more information about using the Welcome email process.
Exercise:
Click on the radio button next to the signon that you just created and then click on Copy to indicate that you want to create a signon with similar characteristics.
Fill in the details for a mythical user (as we are going to delete the user soon as part of this training), check all the tabs contain correct information, and then click on Update.
Don’t forget that the password needs to be reset by this new user!