Editing existing users (and using the Edit function)
You will notice the similarity between this Edit staff details screen and the My preferences function accessible by staff. Using My preferences, staff can change most of the values you set for their signons, on an as needed basis (except increasing their user and permission levels of course).
However there is one major difference and that is in relation to the Functions tab that only appears in My preferences for Supervisors and Administrators and those with permission to use the Functions function, but always appears for all users when a Supervisor or Administrator is using the System>Users-Full and ServicePoint signon management functions.
Supervisors/Administrators can use the Functions tab to remove access to certain functions for the staff member that uses this signon. When staff members use My preferences, they can only see the Permissions that their Supervisor/Administrator has made available to them – in other words they can cannot see what has been removed, and, if you give them permission, can only further remove Functions. Because of the importance of the Functions function, further information has been provided about it in the next section.
You can use each user’s signon Functions tab to control whether they can change their Preferences. There are separate Functions for controlling access to My preferences, and to the [Preferences] link in DeskStats. You will usually want to deny access to [Preferences] in DeskStats so that users of shared ServicePoint user signons cannot change the settings for that signon.
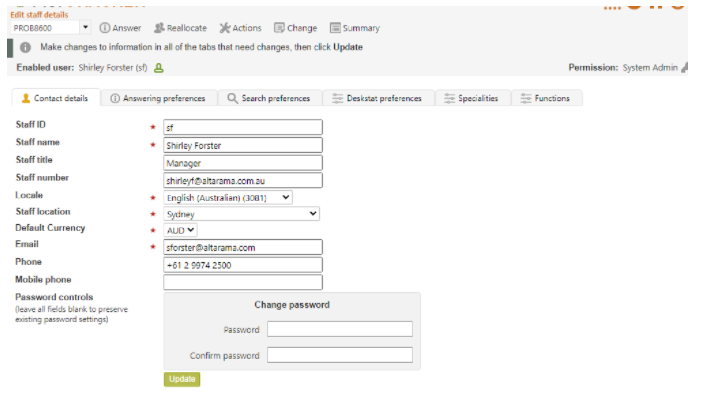
The number of fields displayed in the Edit screen you are seeing now, varies according to the information that needs to be collected for the permission level that is set for the user.
Ticks indicate fields that are mandatory for completion. You can move between tabs changing settings. You only need to click on Update when all of your changes have been made.
It is important that you complete this process by clicking Update. If you fail to indicate that the signon update process is complete, by clicking Update, the locked status that is applied while you make this change, will not be released. This will leave the signon in Locked status. To release this type of a locked status, just edit the signon and be sure to click Update to complete the edit process (even if you make no changes).
The following additional information will help you fill out the additional fields in all of the tabs (except Permission which is covered in the next section):
At the top of the page is the users name and their permission level. If this symbol appears it indicates that this user is currently logged on.
 If this symbol appears it indicates that this user is currently locked out because they provided too many incorrect passwords, or have not verified their email address (they can be unlocked by clicking the following [Unlock] link).
Contact Details Tab
ID: The value that you enter into the ID box when logging on to RefTracker, and the value that appears in the Open questions screen to indicate questions allocated to you. Only your System Administrator can change your ID.
Staff name: Enter this user’s full name here i.e. your name for the purposes of this exercise. This name is used to identify this user in RefTracker wherever space allows use of a full name rather than just the staff id. A sample name might be: Mary Brown Staff names are not normally included in emails to clients, but can be included (such as in an email template signoff), by including the variable {question_staff}.
Staff title: Enter this user’s title here only if your library has specifically chosen to include Staff title in any personal signoffs that have been set up in your email or print templates. This Staff title information is not used anywhere in the day to day operation of RefTracker, but can be included in templates (such as in an email template signoff), by including the variable {staff_title}. Maximum 50 characters.
Staff number: Enter your organisation’s unique identifying number for this staff member, if that information is being collected by your organisation. This information is not used within RefTracker, but is saved in the staff member’s record and is available for extract when information is extracted from RefTracker for use in other applications, for example in time billing systems, that require a unique identifier for each staff member.
If SSO is in use at your organisation, Staff number will be this user’s SSO signon, as the SSO signon matches to this field.
So that the SSO matching can be accomplished it is important that the contents of this field must be unique for each staff member.
Locale: When more than one language or locale is enabled in a RefTracker system, staff users can specify their staff interface default Locale using this “Locale” parameter in their My preferences. System administrators/Supervisors will be able to set it for them, using System>Users Full. The values that appear in this drop down list are controlled by the System administrator using the Language and Locale Code tables.
Locale not only controls the language that will be used, but also the date format, currency symbols, etc. that are presented for that user.
Staff location: Choose the library location where this staff member works, from the drop down list. For those doing initial system setup, you may have to choose MAIN if it is the only value available at this stage, and check that this signon has the right Location after you have adjusted your Location code table later on in this manual. To limit a staff member to only working in their own Staff location, Deny the Function “Ability to change operating location” which will prevent them from changing this setting and prevent them from Searching in other than this location.
Network Login: this field only appears if you have already set parameter 5.3 to allow use of auto logon. If it appears, and you want this user to be able to log in automatically, you should insert this user’s unique
- Microsoft network logon, in the format <network name>\<login name>, if Microsoft authentication is being used
- IP address, IP authentication is being used.
Using Auto logon can save a lot of time for staff who always use RefTracker from the same machine, especially those staff who regularly move in and out of RefTracker as they receive RefTracker emails. However it is not always usable at all customer sites, so be sure to read the full help for “Setting up Auto logon” before setting it up.
Default currency: When more than currency/money is enabled in a RefTracker system, staff users will be able to specify the default currency/money that they will use in RefTracker. System administrators/Supervisors will be able to set it for them, using System>Users Full. The System administrator controls the values appearing in this drop down list using the International currency codes code table.
Work reviewer: (Mandatory for Probation and General users, and highly desirable for Regular users) From the drop down list, select the staff member who is the direct manager (reviewer) for this staff member.
When closing questions, Probation and General users are advised that their answer, and KB inclusion recommendation will be referred to the Work reviewer nominated in this field. This person is usually anyone with permission level Supervisor or above, but the role can also be given to Regular users by ticking it in the Other Functions column of their signon Functions tab. Only staff who have Work review permission appear in this drop down box. The Work reviewer will make any corrections, send the answer on to the client, and decide on KB inclusion. The Work reviewer will be sent an email advising them of the review work to be done. If the nominated Work reviewer is not available at the time, the system will find an available Supervisor or above to perform the review role.
The Work reviewer field is optional for Regular users, so it does not have to be specified for them, but if it is, questions that need to be closed when that user is logged on as a general user due to lack of licences, will be referred to the specified Work reviewer.
Note that by default only Supervisors and above can be work reviewers. If you need a Regular user to act as a Work reviewer, you need to Grant them permission to be a work reviewer in their Functions tab, before you can set them as a Work reviewer for any other user.
Importantly, the Overdue notification and Evaluations notification processes, and the escalation processes in RefTracker, also use this Work reviewer information to ensure that if the staff member is unavailable, notices go to their direct manager. So, completing the Work reviewer information with that user’s direct manager, is important for General, Probation, and Regular users.
Email: Enter the normal email address of this user e.g. MaryB@library.gov. This is the email address to which emails generated by RefTracker for this staff member will be sent.Staff email address is not normally included in emails to clients, but can be included (such as in an email template signoff), by including the variable {staff_email}.
If you change the user’s email address, they will received an email at that new address that contains a link that they must click to verify that new email address.
Phone: Enter the normal externally available phone number for this staff member here. This information is never provided to clients, but can be given to third parties from whom you request assistance with answering questions. Staff phone number is not normally included in emails to clients, but can be included (such as in an email template signoff), by including the variable {staff_phone}.
Mobile phone: Your mobile phone number should appear here – it is not yet used by RefTracker other than as reference information for your System administrator.
Password controls: if a password has previously been set, you only need enter values in this section if you wish to change the password. If you are setting a new password, your system may have been set up to apply password strength controls and change frequency controls (parameters 9.30-34). A validation message will be displayed if your password does not match the password strength requirements. All password are stored hashed.
Blank password: Click here instead of entering text in the New password/Confirm password fields, if you wish to use a blank password, and blank password has been allowed in your system (parameter 9.30).
Password/Confirm password: if you wish to change the password, enter the new password here, and again in the Confirm password field.
If you set up a new user, they will receive an email advising them of their new ID and allowing them to set their own password. They cannot use their new signon until they click the link in that email to set the new password as that also verifies that their email address is correct.
Answering Preferences Tab
Availability: This setting determines whether the user is available for automatic allocation of questions by the system. The system will never allocate the user a question if their availability is set to Unavailable. If a staff member is going on leave they should set your Availability to No and back to Yes when you return using My preferences, but if they forget Supervisors can do it for them using this parameter. Availability is also shown in the staff Reallocation screen, where staff can override it and specifically allocate the Unavailable staff member a question even though they are Unavailable (for example if they know the staff member will be back from leave tomorrow). Availability is also taken into account when staff need to be emailed about a question. If they are Unavailable, the email will be escalated to their Supervisor or above according to their availability. We recommend that staff keep their own Availability setting up to date, and to encourage this, an image providing a reminder of their setting is provided in the Home screen, and the footer of every RefTracker page, that can be toggled to reset their Availability. The next two parameters may also help you and them to keep their Availability up to date.
Prompt for availability: Tick this to have the system prompt the staff member with an option to change their status at log off and log on (see examples below). Set this if “who is available” to respond to requests is important to your organisation – such as if your organisation uses the escalations provided by the Needs attention functionality, or the availability showing in the Reallocate screen when deciding who to reallocate questions to. We recommend most staff have this turned on as it is unobtrusive, yet a fantastic reminder to keep your availability up to date.
Automatic availability: Tick this to have this staff member’s status automatically set to Available whenever they log in, and Unavailable whenever they log out. Set this if this staff member does not work on responses to requests when they are not rostered on to do so. This option is only able to be set by Supervisors and above so it shows in this screen, but lower level users will not see it in their My preferences screen.
When BOTH “Prompt for availability” and “Automatic availability” are ticked, RefTracker will reset Availability at log off, and log on, but provide the opportunity to override the change.
When ONLY “Automatic availability” is ticked, the status changes are automatically made without any indication to the staff member.
If “Prompt for availability” is on and the user is available at the time of Log Off – the log off page will display a panel like this for a time set according to parameter 2.29 (default is 5 seconds). If, for any reason, the timer does not run or is interrupted (such as by the browser window being closed manually), a post back will automatically occur to complete the log off.
The staff member can click “Change to Unavailable” to reset their Availability status to Unavailable. The new status will show in the icons on that screen, and the Change option with change to ”Change to available” and the log off will continue.
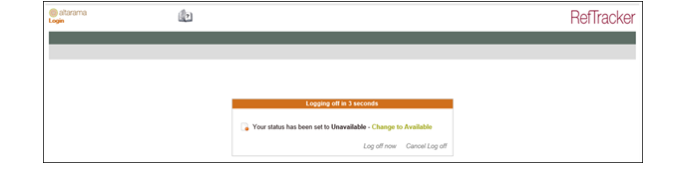
If “Prompt for availability” is ON and the automatic status is on – the status will have been changed to Unavailable automatically, but the user can over-ride by clicking the “Change to Available” link.
“Log off now” provides a link that can be clicked to provide immediate log out.
“Cancel Log off” provides the opportunity to go back into RefTracker if the user decides not to log off after all. If your status is automatically changed at log off, it will not have been changed as the log off was not completed.
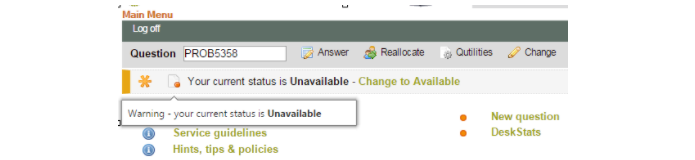
If “Prompt for availability” is ON then the user will also be reminded of their Availability status after log on with an alert display like the following.
Preferred request type: Sets the question Request types that can be allocated to this user when allocation by Request type is being used. This information is also listed on the Re-allocation page to assist other staff in allocating appropriate questions to you. This information is also listed on the Re-allocation page to assist staff in allocating questions to the most appropriate staff member. Any indicates this user does not work with only one specific type of request.
Default received via: This is used to set the default value for Received via in this user’s New question and DeskStats screens. From the drop down list choose the method that this user is most likely to accept new questions. For example you would set the value phone here, if this user is more likely to accept questions over the phone, than at a reference desk. Note that staff can change this value at any time using My preferences in order to reflect changed circumstances, e.g. if the user does not normally do desk shifts, but is doing one today, they can change this value to Desk at the beginning of the shift, and back to Phone at the end, and so obtain correct statistics without having to re-set the Received via field every time they enter a question during that shift.
Default New request form: Sets the Request form that will be automatically displayed whenever this user uses the New screen to accept new questions, so set it to the Request form that they will use most often (type of request that they handle most often). Of course this is only their default setting, and they can always choose a different Request form once they are in the New screen. The None option is provided for those who have not yet made a choice and will result in the Default form (or if it is not available the first form in the list of Request forms) being used as default in the New screen. For those doing initial system set up, choose the Reference form, and later in this manual we will address the forms you need for your specific library, and you can come back to your signon and reset this value to a new form you have created, if required.
Billing rate: Shows the name of the billing rate that will be used for this staff member. This information is used to calculate the cost of librarian time to answer a question. Selecting “None” indicates that Billing rate is not in use for this staff member – their time used will not be multiplied by any billing rate. Deny the “Ability to change billing rate” Function to prevent staff from changing this setting themselves.
Qprint application: Shows the application that this user will use to display and print the output when they use the Qprint function. “Browser” means the user’s default web browser will be used (provides simple one step printing). “MSWord” means Microsoft Word for Windows will be used (provides high quality prints plus the opportunity to amend and save the output). Other applications can be allowed for by contacting Altarama.
Auto start timer: Default is “No” – this setting means that to use the timer in the Answer screen you need to deliberately turn it on.
Set this to “Yes” to have the timer automatically turn on as you enter the Answer screen. It will automatically turn off and record the time since you entered the screen, whenever you Save/Send this screen. You can still turn the timer off at any time, and adjust the time it has measured (adjust for coffee breaks, time spend attending to your Outlook, etc.). Note that this turns the timer on automatically for ALL Answer based screens, so that means, Inform client, Query to client, Copyright declaration and Partial answer!

Answer default action: Default is “Leave open” – to Close a question and send the answer off to the client you need to manually Choose “Close” at “Saving and closing details”. This is a safe option that ensures you only send an Answer off when you specifically indicate that it is ready to “Close”.
Set this to “Yes” to have “Close” already selected as you enter the Answer screen so that in order to send off the Answer you only need to enter the Answer and click Save/send.
Notice that, if an email is to be sent, the Requester contact information box is showing as a clear warning that the Response email will be sent. Use this option if, more often than not, you develop the answer and send it off all in the one action.
Search Preferences Tab
The settings in this tab determine the information that will be displayed by default in the Search screens, such as the screens under Open questions in the main functions header bar. Additionally the Search screens remember some things about how you use them, that further tailor your searching experience. You would normally use Open questions to monitor open questions in an area of interest to you.
Default search location : If a staff member only deals with requests for one or more locations (rather than all locations) they can set a default search location/s for all their Open requests screens, here. Staff can also set a default location themselves using the [Set default] links in each Open requests screen, but the benefit of doing it here is that, with one action, it does it for ALL Open requests screens. Another important benefit is that System administrators can do it when they are initially setting up signons for users that will only work in one or more specified locations.
Search refresh (mins): Sets the number of minutes between automatic refreshes of the Open questions screens. If you are working in a quick response environment, or if you rely on Open questions to advise of incoming unallocated questions, a low value in this setting will prove invaluable. Otherwise a higher value should be chosen.
Answer database: Determines whether the Answer search will, by default, search all closed questions in RefTracker, only questions in the knowledge base including questions in the FAQ (staff who work with only qualified answers should select “Knowledge base”), or only questions in the FAQ (staff who want to be able to utilise any previous work should select “Any”). The KB and FAQ options are only offered if the KB and/or FAQ options are in use.
DeskStats Preferences
This tab will not display if your system is not licenced for DeskStats or if the staff member you are editing has both the DeskStats Functions disabled.
DeskStats preferences can also be changed using the Preferences function in this user’s DeskStats screen itself.
Visible request groups: Shows the Request groups that will show in this user’s DeskStats data entry grid. Untick the groups that this user will never use to save space in their DeskStats screen.
Specialties tab
Specialty: Specialties are usually used to show subject areas that this staff member has a special interest in, that might fall outside of the normal day to day activity of this library (as covered by the type of questions defined in your Request types). The items appearing in this list are controlled by the Specialties code table (see Question answering code tables for how to tailor it to your needs).
If you are doing initial setup of your system you will need to return to this signon set up after the code table has been set up, to enter the appropriate values.
If your system has already been set up, this table will list the specialties of your staff, that might be useful in allocating questions. Check ALL of the special skills that this staff member has.
This tab will not display if the Specialty code table is disabled in your system.
Using Specialties for staff notes
Specialties only appears in the Reallocate screen as an aid to choosing the right person to allocate a question to. Some customers use this concept creatively to record ANY other information that will help choose the right staff member to allocate the question to – for example you might use it to record the days that staff member does not work, or the maximum number of questions that should be allocated to this staff member at any time. Your System administrator can set this up by adding appropriate entries to the Specialties code table that can be selected in each user’s signon.

The Functions tab can be used by Supervisors and Administrators to tailor the individual functions available in the staff signon of each individual user – to add functions that they would not normally have access to or take away functions that you don’t want this specific user to have access to. For example, you can give a DeskStats only user access to the Statistics functions if you want them to be able to run their own statistics. (If you need to disable a function system wide, i.e. stop it shooing in EVERY user’s signon, the function can be removed by going to System>code tables menu>System and choosing the Application function code table. Please check with your RefTracker support representative as to which function/s in that table need to be disabled to achieve the result you want.)
This tab shows the user’s current capabilities as provided by their permission level and any previous changes to this user’s function access, and allows the Supervisor or Administrator to Grant or Deny access to specific RefTracker functionality for this user.
Should you need individual users to be able to further remove Functionality from their own signons, you need to specifically grant them access to use “Allow functions tab in My Preferences” in the System Management>Users section of this tab.
When users view their own Functions settings the words Included or Excluded are used to describe whether a Function can be used or not – they only see the functions that their System administrator has Granted them permission to use, and can Exclude any of those allowed functions that they don’t want to use. The system separately remembers which Functions were Granted to the user by their System administrator, and which the user separately Excluded themselves.
By default the Functions tab displays showing all of the Functions that can be set for that user. Using the “Select which functions to display” drop down near the top of the tab, you can choose to restrict the display to “Other functions” which are the functions not normally granted to this permission level user, or to the functions normally allowed for this user’s permission level. If a user is allowed to use all of the Functions normally allowed for that level of staff member all settings in this screen will show as Granted (green). Functions that have been Denied will show as red to highlight them. Even a newly created user may have some Denied entries.
Note that Permission levels define how some functions work (such as the way Probation users operate at question closing) so you need to get the permission level for your user right first, and then make any adjustment using the Functions tab. For example if a Regular user is good at statistics, leave them as a regular user and add Statistics rather than making them a Supervisor and removing unwanted Supervisor functions.
By removing and adding access to functions using the Functions tab, you are in effect creating a custom user level for this user. This is a very powerful concept when you combine it with the User signon Copy function (see next section) that can be used to create new users with the same custom access as the copied user, simply by copying this user’s signon.
The information displayed for each Function is:
- the Function’s name
- the normal user permission level that is granted this permission, and
- a drop down box allowing the use of this Function to be Granted or Denied.
The Functions all have sensible names to help you identify their use. Where a function is identified in RefTracker by a symbol, the same symbol is displayed next to that function’s name in this Functions tab, in order to make it easy to identify. Also the Functions are presented in logical groups with headings within the groups that should also make them easier to find. To display all the Functions under a heading click the down arrow on the right of the heading line.
Should the function you want to add or remove not be clear, ask your RefTracker support person for assistance. The most common things that you may wish to change access to are:
Answer:
* Act as a work review – Grant this to allow this user to act as a reviewer of answers provided by General and Probation users that need checking before being sent out to the client.
* Response page history tab – Controls whether the History tab shows in the Answer screen. The History tab in the Answer screen contains exactly the same information as the History tab under Summary and so may be regarded as superfluous in Answer.
* Response page journal tab – Controls whether the Journal tab shows in the Answer screen. The Journal tab in the Answer screen contains exactly the same information as the History tab under Summary and so may be regarded as superfluous in Answer.
*Reject a question – This function is generally only used by organisations providing a service to the general public. All other organisations will want to deny this function for all users.
* Change (closed) – Controls whether the user can use the Change screen on closed questions. If your staff routinely need to add information like Matter numbers to closed questions, you may want to grant this access to this function.
* Change details – Controls whether the user can use the Change screen on open questions.
Workflow:
Denying any of these workflows will remove that function from the Client contact or Note areas in the Answer screen.
Third party:
Denying any of these functions will remove that function from the Actions menu.
Actions:
Denying any of these functions will remove that function from the Actions menu.
* Edit a question in KB review – Controls whether “KB review” appears in the Actions menu so this user can or cannot add or change any entries already in the KB.
* Place a question in KB review – Prevents this user from ever seeing the Add to KB question when closing questions, even if Add to KB has been allowed for the form in use.
Summary :
* Summary page journal tab – Deny this to remove the Journal tab from the Summary screen and all time and cost information from the History tab – if you are using the time and/or cost functions, you will want to do this for any staff for whom time and cost information is not important. If it is irrelevant to all staff, just Disable the Time type code table and the Cost type code table and all time related functions will disappear including this Functions option.
* View client evaluation – This function ensures that by default, ONLY System administrators can see the Evaluation rating and Evaluation comment information in the Details tab and History tab. Evaluation information is often very sensitive so, please note that it is also provided in the Data extract reporting, which means that you might also want to review the Functions setting for “Statistics reports”, as “Statistics reports” is normally available to Supervisors and System administrators.
* Copy to create question for client service – Controls whether “Copy for client service” appears in the Actions menu.
* Copy to create question for internal task – Controls whether “Copy for internal task” appears in the Actions menu.
* Create child request for client service – Controls whether “Copy for client service” appears for questions that are already a copy of a Primary – this funvtions will create another copy from that same Primary.
* Duplicate question for internal task – Controls whether “Duplicate internal task” appears in the Actions menu.
DeskStats:
* Can select staff member in Batch mode – Grant this to allow this staff member to enter Batch mode statistics on behalf of other users (a Staff name selection drop down will appear in Batch mode for this user).
* Enter Batch DeskStats – Deny this to remove the Switch mode button, and the ability to use DeskStats Batch mode from the DeskStats function.
* Enter Live DeskStats – Deny this to remove the Switch mode button, and the ability to use DeskStats Live mode from the DeskStats function.
Deny both Live and Batch mode to remove DeskStats from the header bar/menus of those who never use it.
* Set DeskStat preferences – Deny this to prevent this staff member from changing their DeskStats preferences in either My preferences, or the [Preferences] link in DeskStats (the [Preferences] link is removed when you deny this). You will want to Deny this for shared signons so that users cannot change the setup that the next user sees.
General:
* Allow negative values – Grant (or Deny) this if you want users other than Supervisors and Administrators to be able to enter negative values in Time, cost and payments, and DeskStats Batch mode.
* My preferences – Deny this to prevent this user from changing their own My preferences. Note that there is a separate “Set DeskStat preferences” Function that controls whether the DeskStats preferences can be changed by this user in My preferences or via the [Preferences] link in DeskStats.
* Email form – Deny this to prevent this user from using the “Email all these users” function in the “Users – full screen”, and prevent them from using the [Forward] (resend) function in the [View email message] screen when used from the History screen.
* Ability to change billing rate – Grant this if you do not want your staff to be able to change their own billing rate.
* Ability to change operating location – Deny this and this user will not be able to change their Staff location, or Pool view setting in My preferences, or change to a different location in any of their Open question screens, or Search for questions in any other location than their own location (note that this overrides any setting for Pool view location in the My preferences Search preferences tab).
This function is used in highly secure organisations that need to ensure that staff are limited to working in their own area. Please note that although this tightly limits what a user can access, it does not guarantee that a staff member can never see things in other areas – more work needs to be done to completely lock users out of all places where they could access a question that does not belong to their location – but it does provide a good start towards an “ethical wall” for all but most inquisitive of users. Further this function is useful for signons used at service points. By denying “ability to change operating location for these users, the Staff location drop down will not appear in their DeskStats screen, not only preventing them from recording statistics for other locations, but making DeskStats more intuitive for these users to use.
* Allow editing of HTML source – Grant this function if you trust this user to be able to edit HTML of badly formatted questions. It controls whether or not the “Switch to HTML view” button appears to the right of Formatted text boxes (such as in the Answer screen.
New questions:
* Add questions to KB – Deny this to prevent this user from directly adding anything to the Knowledgebase as it removes KBnew from the main menu and removes the option that allows users to decide to add things to the KB from the Answer, New and Quick screens. If you Deny this function, you can, in effect, create a new level of Regular user that cannot add things to the KB!
* Post date a question for anyone – Deny this if you do not want this user to be able to use the Post date function to enter and close questions on behalf of others . For this to be active the user my have “Post date a question” Granted.
* Post date a question – Deny this if you do not want this user to be able to enter or close questions at times other than the current time, even if this has been allowed for in the Request form. You may well want to remove this function from lower level users, unless their role is specifically to enter question backlogs.
Journal:
* View time (others), and View costs (others) – Deny these items if you do not want this staff member to be able to see time and cost records created by other staff.
* Undo Journal entries – Available to System administrators only by Default. Grant to other level users to allow then to use the [Undo] function to delete bad Time and Cost entries. The [Undo] link will appear in the “Record Time” and “Costs screens” and the “My journal entries” and “Journal entry reporting” screens
Search & reporting:
General:
These permissions relate to all Search (Simple and Advanced), and Statistics reports (Data extract reporting, Journal entry reporting, Third party usage analysis, Resources usage analysis, Reallocation and Evaluation reporting)
* Export data (other than client) – Deny this to prevent this staff member from exporting data, from the Search and Reporting screens (using the Export links in the top right of the Search screens, or the Export Output type in the Reporting screens).
* Export client data – Deny this if you want this staff member to be able to Export the selected data from the Search and Reporting screens, but do NOT want the sensitive client contact details (Client name, Client name 2, Client email and all the cc and bcc options, Client fax, Client phone, Client mobile and client address 1 and 2) to be included when this is done. Customers subject to the GDPR rules should Deny this for all but their Active system administrator to ensure that client contact information is not able to be exported in bulk by staff without authorisation to do that. The system defaults to this setting.
Staff with this setting Denied will not see the Requester tab in the Data Export Field selection function.
* Schedule reports and extracts – By default Supervisors and above can schedule saved searches, reports and extracts. Deny this Function if you do not want to give this user the freedom to have reports run automatically for them. Many customers will want to restrict this function to just their Active System administrator, so that one person controls all reports that get run automatically (In order to minimise the load on your system).
Search:
* Saved searches – By default, General users can create Saved searches. Deny this function for users where you do not want them creating Saved searches for their own use. You might want to do this for users that you do not want to change their own user interface.
* Can search all allocations – Denying this will restrict results to questions allocated to the logged on staff member only, for both Simple and Advanced based Search screens.
* Open request analysis – Controls access to that menu item under open questions, for the next three functions.
* Open requests analysis by status – Controls access to the Open requests by status graph under Open questions>Open request analysis, and in the Home page Workload overview section.
* Open requests analysis by progress – Controls access to the Open requests by progress graph under Open questions>Open request analysis, and in the Home page Workload overview section.
* Open requests analysis by request type – Controls access to the Open requests by request type graph under Open questions>Open request analysis, and in the Home page Workload overview section.
Statistics:
* My journal entries – Deny this if recording of time is NOT important to your organisation. When it is Granted it allows each staff member to check that they have recorded all the time they should have recorded – handy for staff to refer to before time is exported for billing.
* Statistics reports – This function, amongst other things, allows all of the data about questions to be exported from RefTracker. The default setting is Supervisor so they can do reports for their own areas. If you are using the question Evaluation functions, this means Supervisors will be able to see the Evaluation rating and Evaluation comment information in the Data extract reporting, which means that you might also want increase this to System administrators.
* Statistics for any location – By default only System administrators can do statistics for ALL locations. If you want lower level users, such as Supervisors, to be able to do statistics for locations other than their own, you will need to Grant them this “Statistics for any location” Function.
* My statistical overview – Deny this if time recorded by your staff is more important than the number of questions that they are allocated. It provides an overview of how questions arrived, and what types of questions were handled by the signed on staff member. It also provides time spend on DeskStats which might be a useful supplement to My time recorded summary for those organisations for which time is key. You might want to allow the statistical Functions for the signons used at your ServicePoints so that they can do their own statistics!
* My DeskStats – Deny this if you do not want staff to see the data generated as a result of the DeskStats they record. It is usually interesting for them to be able to see this data, and is especially helpful if you are asking them to record additional details like Comments, so that they can check that they have correctly recorded this additional data. Users without at least one of DeskStats Live or DeskStats Batch modes Granted, will automatically not see this function.
* Summary charts – Grant or Deny this to control whether the workload comparison graphs show in the Workload overview panel of the home screen, for this user (Supervisors and below see stats for their location. Administrators see stats for the whole system).
System Management :
* Allow Functions tab in My preferences – Grant this to allow this user to access the Functions tab in their My preferences screen, so that they can remove access to more Functions that you have given them access to. They can only remove access to Functions. They cannot add anything that you (the System administrator or Supervisor) have not already given them access to.
* System Management menu – Grant this if you are giving a staff member access to a function that can only be accessed through this menu – e.g. Locations.
Exercise:
Enter appropriate values in ALL of the tabs for the signon that you are creating for yourself using the guidelines above.
Your new signon is now ready to save. Click on Update. You will be returned to the Staff summary list page so that you can check that your new signon is now appearing in that list as a valid signon. Double checking the email address showing in this screen is a good idea, as the email address for staff will be heavily used!
If you are doing your initial system set up you should create signons for your other users at the completion of your setup, when your initial Code table settings have been completed, as some code table settings will effect what functions appear here. Don’t forget that you can use the signon Copy function (see next section), to easily create new users with characteristics, including permission levels, the same as existing users.
Now, for the purposes of this manual, you should now log off and log back on using the new signon that you have just created so that all further work you enter in this manual is logged against the new user ID that you have just created for yourself.
After signing back in, click on System and then Users-Full. We are now going to investigate the Copy function.
What to do when a staff member leaves
If a staff member leaves your employ, you will want to remove their access to RefTracker immediately, and the quickest way to do that is to disable their signon (using that option under the Admin button).
However there are some other considerations that you should address first:
- are there any forms being automatically allocated or notified to this staff member? If so you’ll need to go to System>Request forms summary and select [Options] for that form And reset to allocation or notification to someone else.
- Are there any open questions currently allocated to this staff member? If so you’ll need to allocate them to someone else by using the “Re-assign requests” option under the Admin mode button
- Do you want to Disable or Delete this user?
Disabling a user removes them from screens like the Reallocate screen so questions can no longer be allocated to them, but retains the link to this staff member for all their previous work ensuring that their work statistics are still attributed to them and responses that they provided can still be found by searching for work done by them. You would choose this option if this was a valuable staff member.
Deleting a user removes all record of them. Their statistics and work are assigned to another user of your choice. Make sure the user that you reassign their work to is from the same team/location. Delete users that you really don’t need to retain separate statistics for like temporary staff or staff no-one remembers any more.
By default Supervisors and above can schedule saved searches, reports and extracts. Deny this Function if you do not want to give this user the freedom to have reports run automatically for them. Many customers will want to restrict this function to just their Active System administrator, so that one person controls all reports that get run automatically (In order to minimise the load on your system).