The Admin mode function (change permission, delete, etc)
Admin mode provides the ability to change things that ONLY Supervisors and Administrators can change – changing permission levels, enabling/disabling a user, deleting a user and more.
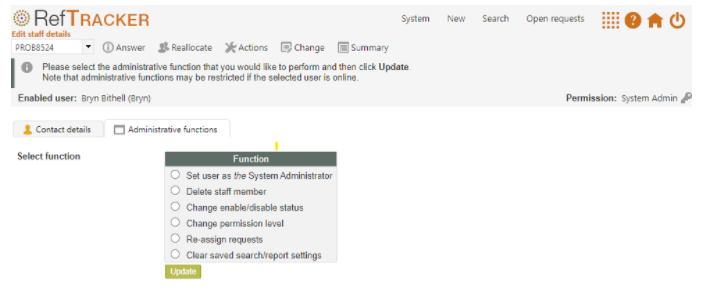
To use Admin mode, click on the radio button next to the signon that you want to amend and then click on the Admin mode button. You will be presented with a screen showing the Admin options available for that particular user – perhaps a subset of the ones showing in the screen print below.
For reference purposes another tab allows you to view the Contact details of the user for whom you are making the change (but not change them).
If you are not seeing many of these functions, it will be because the user you are trying to change is currently signed on. Some of these functions cannot be used while the user is signed on as making the change while in use could generate errors. Ask the user to log off so you can make the changes.
Admin mode – Set user as the System Administrator
The Active System Administrator is the person that will receive emails from RefTracker about problems with the system.
Clicking the radio button next to Set user as Active System Administrator in Admin mode, and clicking on Update will return you to the Staff summary list where you will be able to see that the Active System Administrator indicator is now showing against the user you just selected.
Admin mode – Unlock account
Parameter 9.35 and 9.36 provide controls on how many times a user can unsuccessfully try to log into your RefTracker system. This will prevent bad players from continually trying different passwords to get in.
If a user provides an incorrect password they will be warned about the number of unsuccessful login attempts that remain before they will be locked out for the parameter 9.36 period of time. For example, if parameter 9.35 is 3 and parameter 9.36 is 1 hour, the user will be locked out for an hour immediately after a third unsuccessful attempt has been made within an hour of the first unsuccessful attempt. If the user’s third unsuccessful attempt was at 11:58am, so, they will not be allowed to log in, even if they provide the right password until after 12:58pm.
However System administrators can clear locked accounts by clicking on the a red “head and shoulders” icon that indicates they are locked, in the System>Users-full screen.

Or they can click the radio button to the left of the user’s name and then the Admin mode button, and will see the “Unlock account” option already selected:
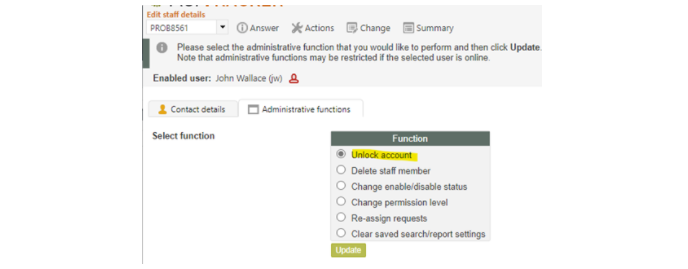
Click “Update” to unlock the account so the user can log in with the same user name and correct password. If you also need to change their password use Edit mode.
Admin mode – Delete staff member
Ensure the user is logged off.
Select the radio button next to Delete staff member and then click on Update, if you want to remove all trace of a staff member from the system (use disable, as described above, if you want to retain the signon or reference to the work that they have done).
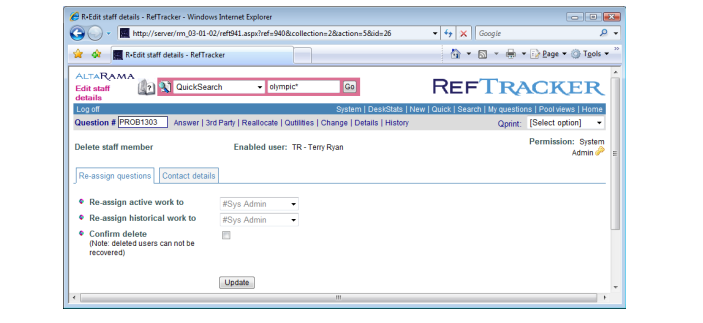
Delete completely removes the user’s signon information and all reference to work done by them, by assigning both current and historical work to another staff member/s. This means that they will no longer appear in statistics (use Disable instead of Delete, if you want to retain the reference to this user in historical statistics). It also means that any scheduled searches, reports and extracts owned by that deleted user will be deleted.
Select the staff member to receive currently allocated questions, and then select the staff member to be allocated all historical work. Then click the tick box to confirm that you really do want to remove all trace of this user. When you click on Update the signon will be removed, and the questions and work reallocated, and you will be returned to the Staff summary list where you can confirm that the staff member’s signon no longer appears.
Note that Allocation emails are NOT sent to the newly allocated staff member when you use these re-assign functions due to the risk of them receiving a large number of emails. If you want to let a staff member know that they have been allocated questions as a result of using this process, use the “Email all these users” function at the top of the Staff list screen that shows after you click Update.
Admin mode – Change enable/disable status
Sometimes staff go on extended leave and they need to be temporarily removed from the system (for example staff going on maternity leave).
Sometimes when staff leave, they have had such an influence on the system that you don’t want to delete all reference to them from the system (for example you’d still like to be able to find work done by the staff member when searching by staff member name). Their name will most likely be associated with work for which you want to retain the statistics about who did the work.
The disable/enable function has been provided to cope with all these situations and more, and is the most common way that you will take a user out of use in the system. Disabling a staff member will remove their name from active use in the system (for example they will no longer appear in the Reallocate screen). Enabling them will reinstate them on their return.
Deleting them removes all trace of that user, including reallocation of past statistics to another user, and so is only used in instances where the user truly needs to be totally removed. It also deletes any scheduled searches, reports and extracts that user might own, whereas disabling the user leaves their scheduled searches, reports, and extracts in place, but disables them. Re-enabling the user does not automatically re-enable their scheduled searches, reports and extracts.
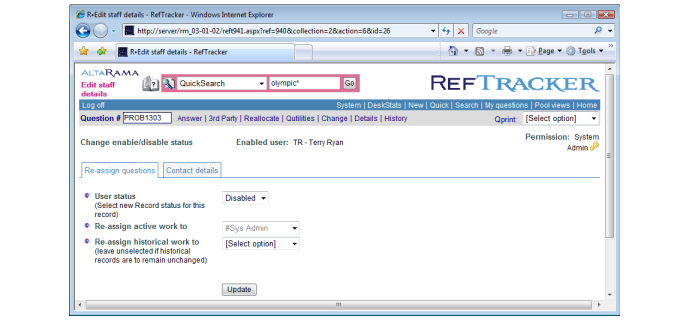
When you click on the radio button next to Change enable/disable status in Admin mode (the user needs to be logged off for it to appear), you will be presented with a screen like the following that allows the enable/disable status to be changed, and their active work to be reallocated to another staff. Optionally you can also reallocate their historical work to another staff member. Some system administrators create a disabled user called something like “Past staff member” so that historical work can be allocated to that staff member. However, it is not necessary to reallocate historical work when disabling a staff member – retain it if you want to be able to Search for “work done by Mary even though she left last year”.
Note that Allocation emails are NOT sent to the newly allocated staff member when you use these re-assign functions due to the risk of them receiving a large number of emails. If you want to let a staff member know that they have been allocated questions as a result of using this process, use the “Email all these users” function at the top of the Staff list screen that shows after you click Update.
Note that you can see all disabled signons by changing the Record status drop down to Disabled or Any in the display selection criteria at the top of the Staff summary list page.
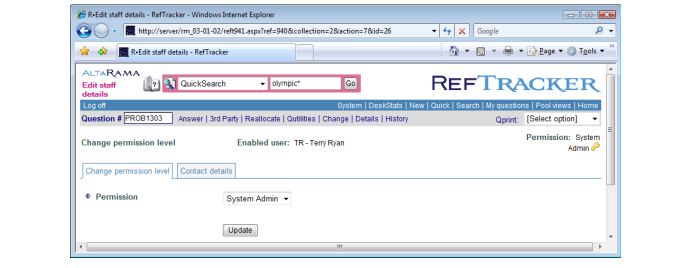
Admin mode – Change permission level
To change the permission level of a user, ensure the user is logged off.
Select Change permission level and click on Update. User’s permission level can be changed up or down. You can even change from Full to ServicePoint, or ServicePoint to Full permission levels.
Select the new permission level that you want for this user from the drop down list in the screen that displays.
Because you are making a fundamental change to this user, that might change any of the rest of their preferences, you are then shown the Edit Staff Member Details screen so that you can check all of the settings in all of the tabs of this user’s signon. Be very careful to check the Functions now available to this user. As you have changed their permission level they have been given access to all of the standard functions that a user of this level would have access to. Any Function access that you had previously specifically removed, will have been restored. If you still want this use to not have access to some Functions, you will need to specifically remove those Functions again. Make any required changes, then click on Update.
It is important that you complete this process by clicking Update. If you fail to indicate that the signon update process is complete, by clicking Update, the locked status that is applied while you make this change, will not be released. This will leave the signon in Locked status. To release this type of a locked status, just edit the signon and be sure to click Update to complete the edit process (even if you make no changes).
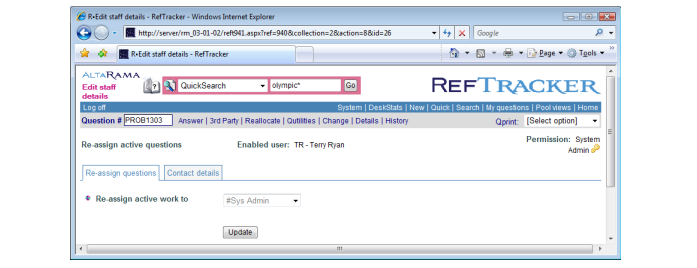
Admin mode – Re-assign active questions
Re-assign active questions can be used at any time to re-assign all of the questions currently allocated to a specific staff member, to another staff member. You might want to do this because the person will be on leave for some time. The reassigned question will appear in the My questions list of the staff member selected (see the screen print below for how the receiving staff member is selected form a drop down list) to receive them. Note that Allocation emails are NOT sent to the newly allocated staff member due to the risk of them receiving a large number of emails. If you want to let a staff member know that they have been allocated questions as a result of using this function, use the “Email all these users” function at the top of the Staff list screen that shows after you use this function.
Admin mode – Clear saved search/report settings
After an upgrade, when searching and reporting parameters change, it is possible that a user’s saved searching and reporting parameters may not be compatible with the new release. Upgrades try to ensure this does not happen, but just in case, there is a way that Supervisors and Administrators can clear out those saved parameters and so fix any issue that a staff member might be having with their saved parameters.
Use this feature if an individual user sees an error, or is not seeing all of the parameters in any of the searching or reporting screens (any of the Simple search based screens like Open questions; Advanced search; or any of the screens under System>Statistics – 930 and 506 based reports). It may be just one search or reporting screen that is causing a problem for this user, and other users will be using that same screen without any issues.
To use this feature choose the “Clear saved search/report settings” in Admin mode for that user, and click Update. The saved settings will be deleted and you will then be returned to the Users full screen (there is no confirmation screen as such). When that user next logs into RefTracker all their search and reporting screens will present initially with the default parameters and the latest settings they use will be freshly saved the next time any of those screens are used.