The Staff signon summary screen
The process for setting up Full and ServicePoint users is the same (there is just less information to be set up for ServicePoint users). Full users are set up by using the Users – Full entry on the System menu, and ServicePoint users are set up using the separate User – ServicePoint entry in the System menu.
Here is an example Staff signon administration screen for Full users:
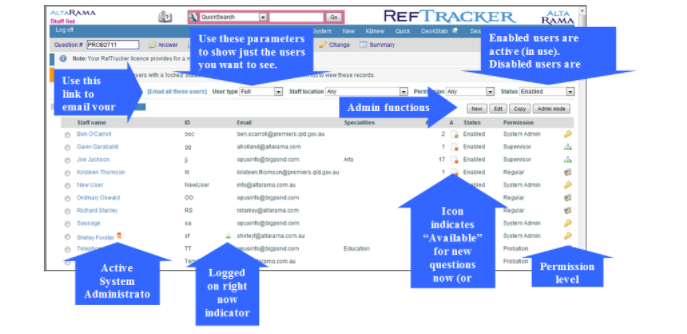
The Staff signon administration screen summarises the signons that have already been created for your system, and provides New, Edit, Copy and Admin mode staff signon administration functions.
You must be an Administrator or a Supervisor to be able to set up new users, or maintain existing user signons. Administrators can maintain all accounts. Supervisors can only maintain accounts for users with permission levels of Supervisor and below.
Supervisors and Administrators can manage the signon for any user without knowing the password for that user.
Users are presented in this screen, within the Locations that they are associated with. Locations are always presented as the signed on user’s location first, followed by all other locations in the sequence order specified in System>Locations.
 This symbol indicated the active system administrator (who receives error messages).
 This symbol indicates that this user is currently logged on (and so may be able to give a quick response to a request).
 This symbol indicates that this user is currently locked out because they provided too many incorrect passwords (they can be unlocked by clicking this symbol, or using Admin mode, or by going to the Concurrent users screen where an [Unlock] function is provided).

Where a user’s name is followed by (unverified) as show in the above image, a verification email has been sent to that user, but the link in it has not yet been used to verify their email address. For security reasons, they cannot use their signon until the link in that email has been clicked, so, if they do not appear to have received the email, it can be sent again, by either the user or an Admin going to the login page and entering their user id, and clicking Submit. A resend link will appear. Click the link to resend the email.
The Signon selection parameter summary at the top of the screen:
The selection criteria for the signons currently displaying, shows at the top of the screen. You can change the selection at any time by changing these parameters.
For example:
- to swap between Full and ServicePoint user, simply change the User type selection in the selection summary. This option will not be offered if you do not have any ServicePoint licences.
- to view only the signons for a specific Staff locations, change the Staff location selection to the location.
- to view both enabled, disabled and locked signons, change the Record status selection to Any.
– to enable a disabled signon, select the user, then Admin mode and Change enable/disable status
– signons that show as locked here are signons that are missing data, or where the creation, or upgrade process was not completed (this is not the same as users locked because they have entered their password incorrectly too many times). To fix one of these locked users click on the user name. complete nay missing data, and even if you have not had to make any changes, click on Update in order to indicate that the singon update process is complete.